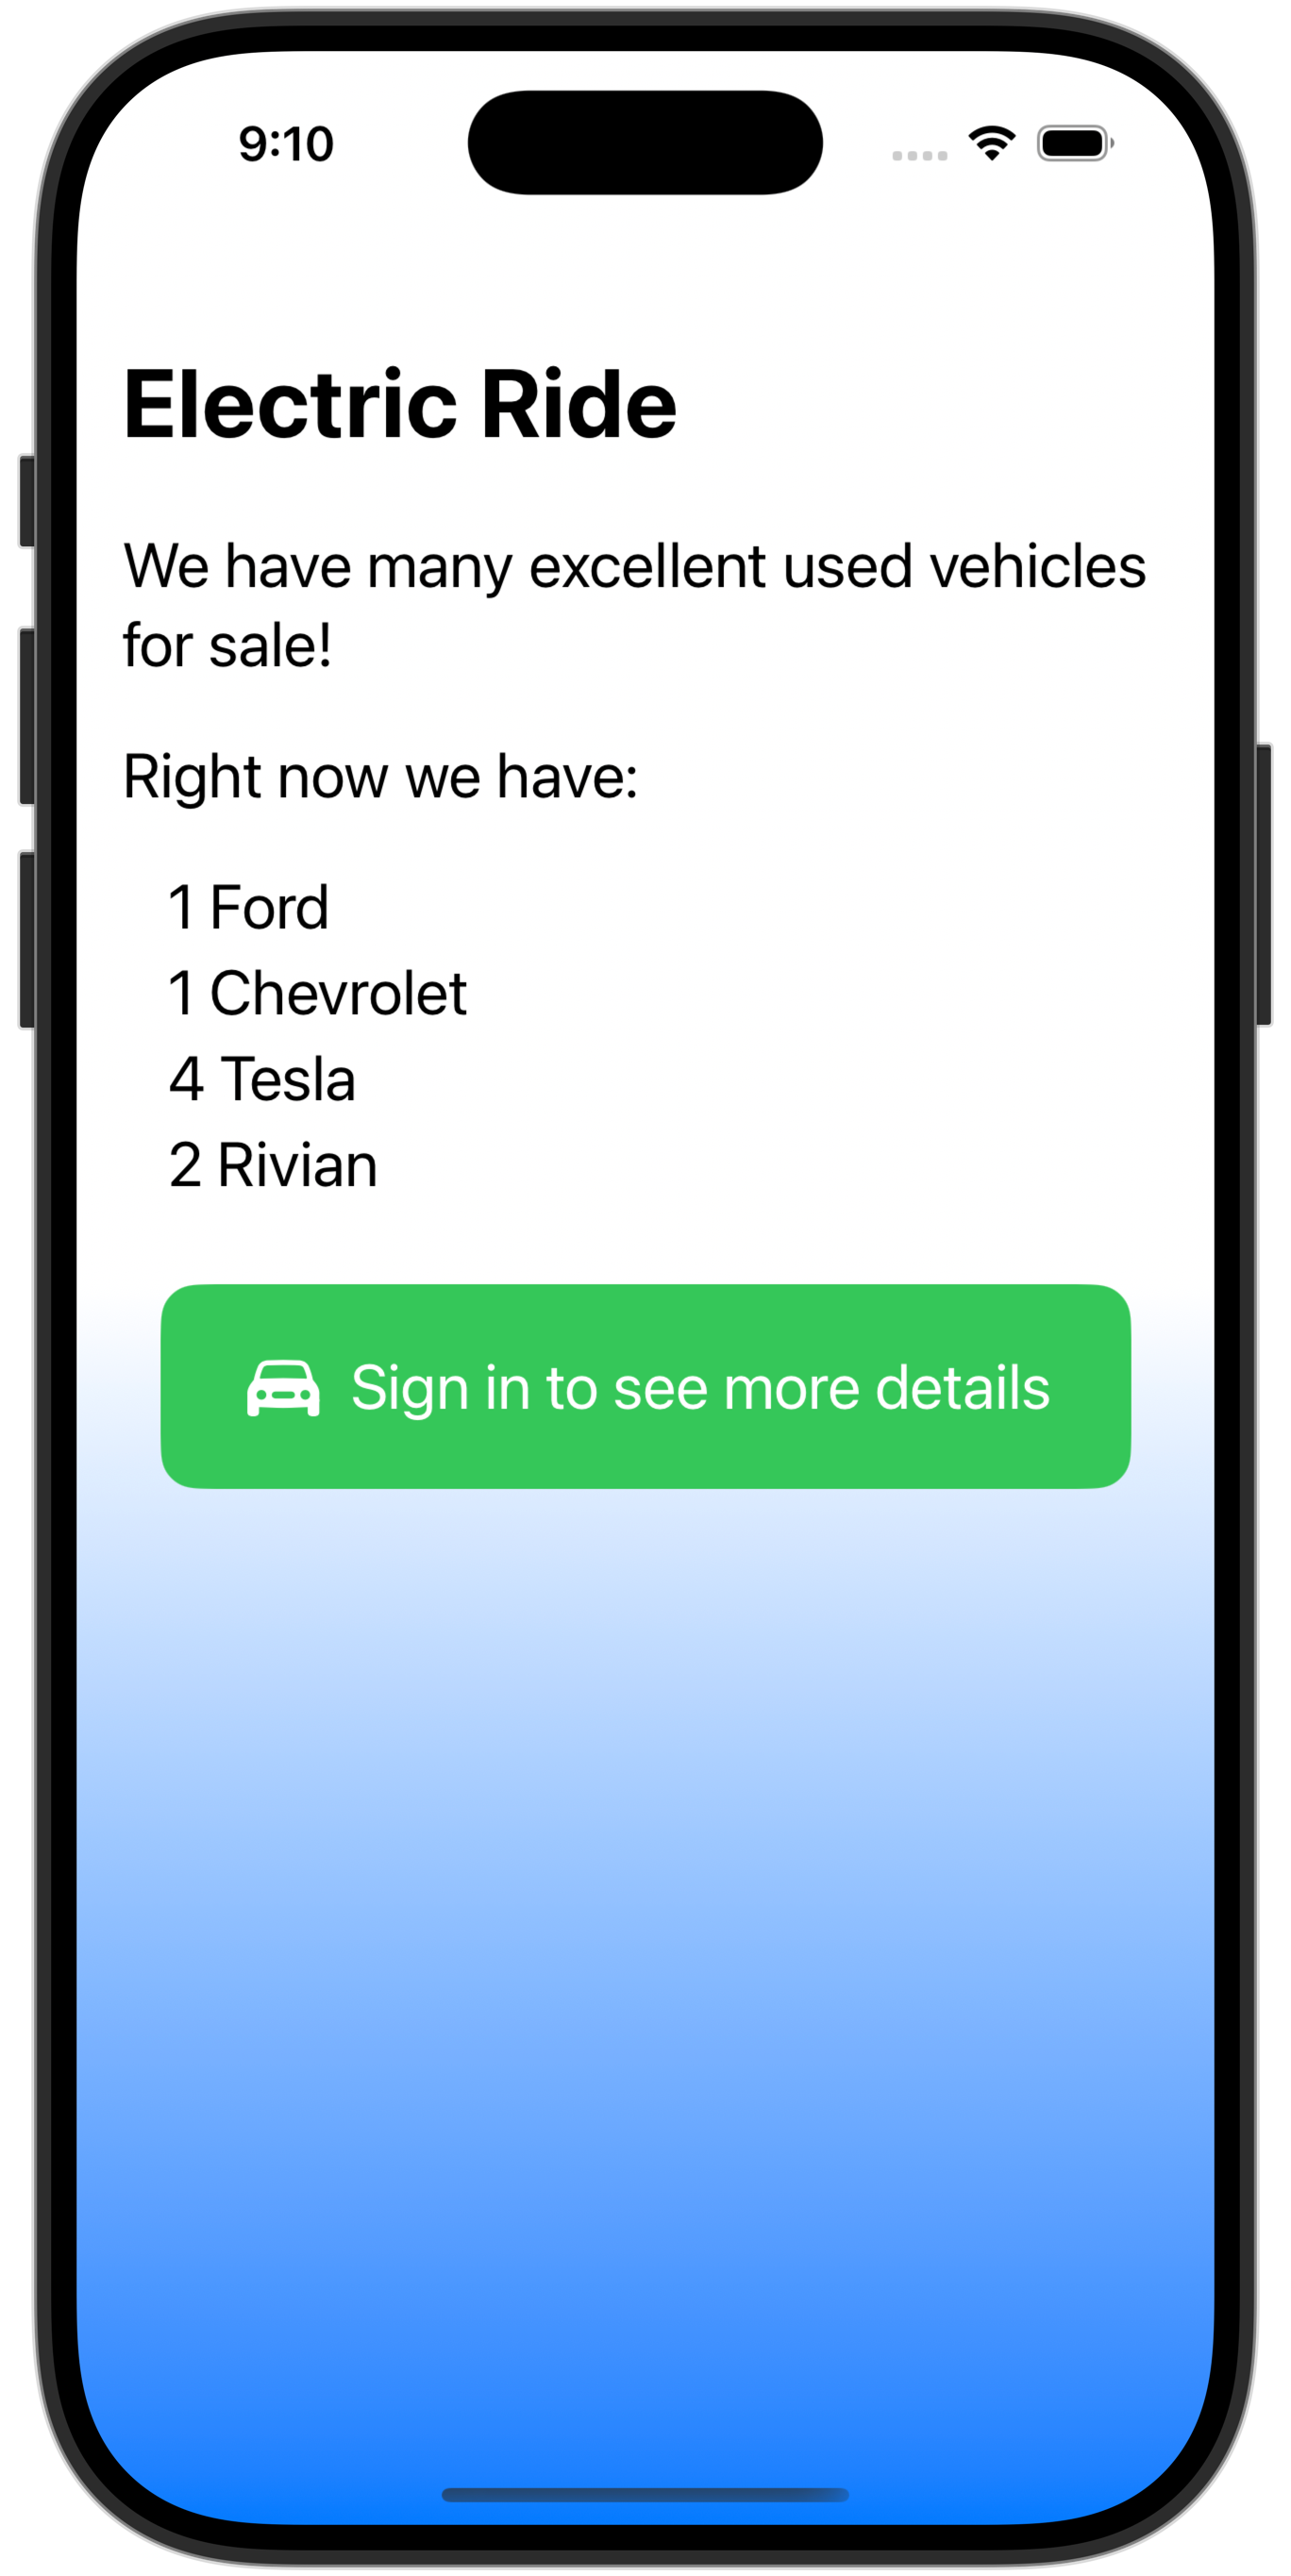
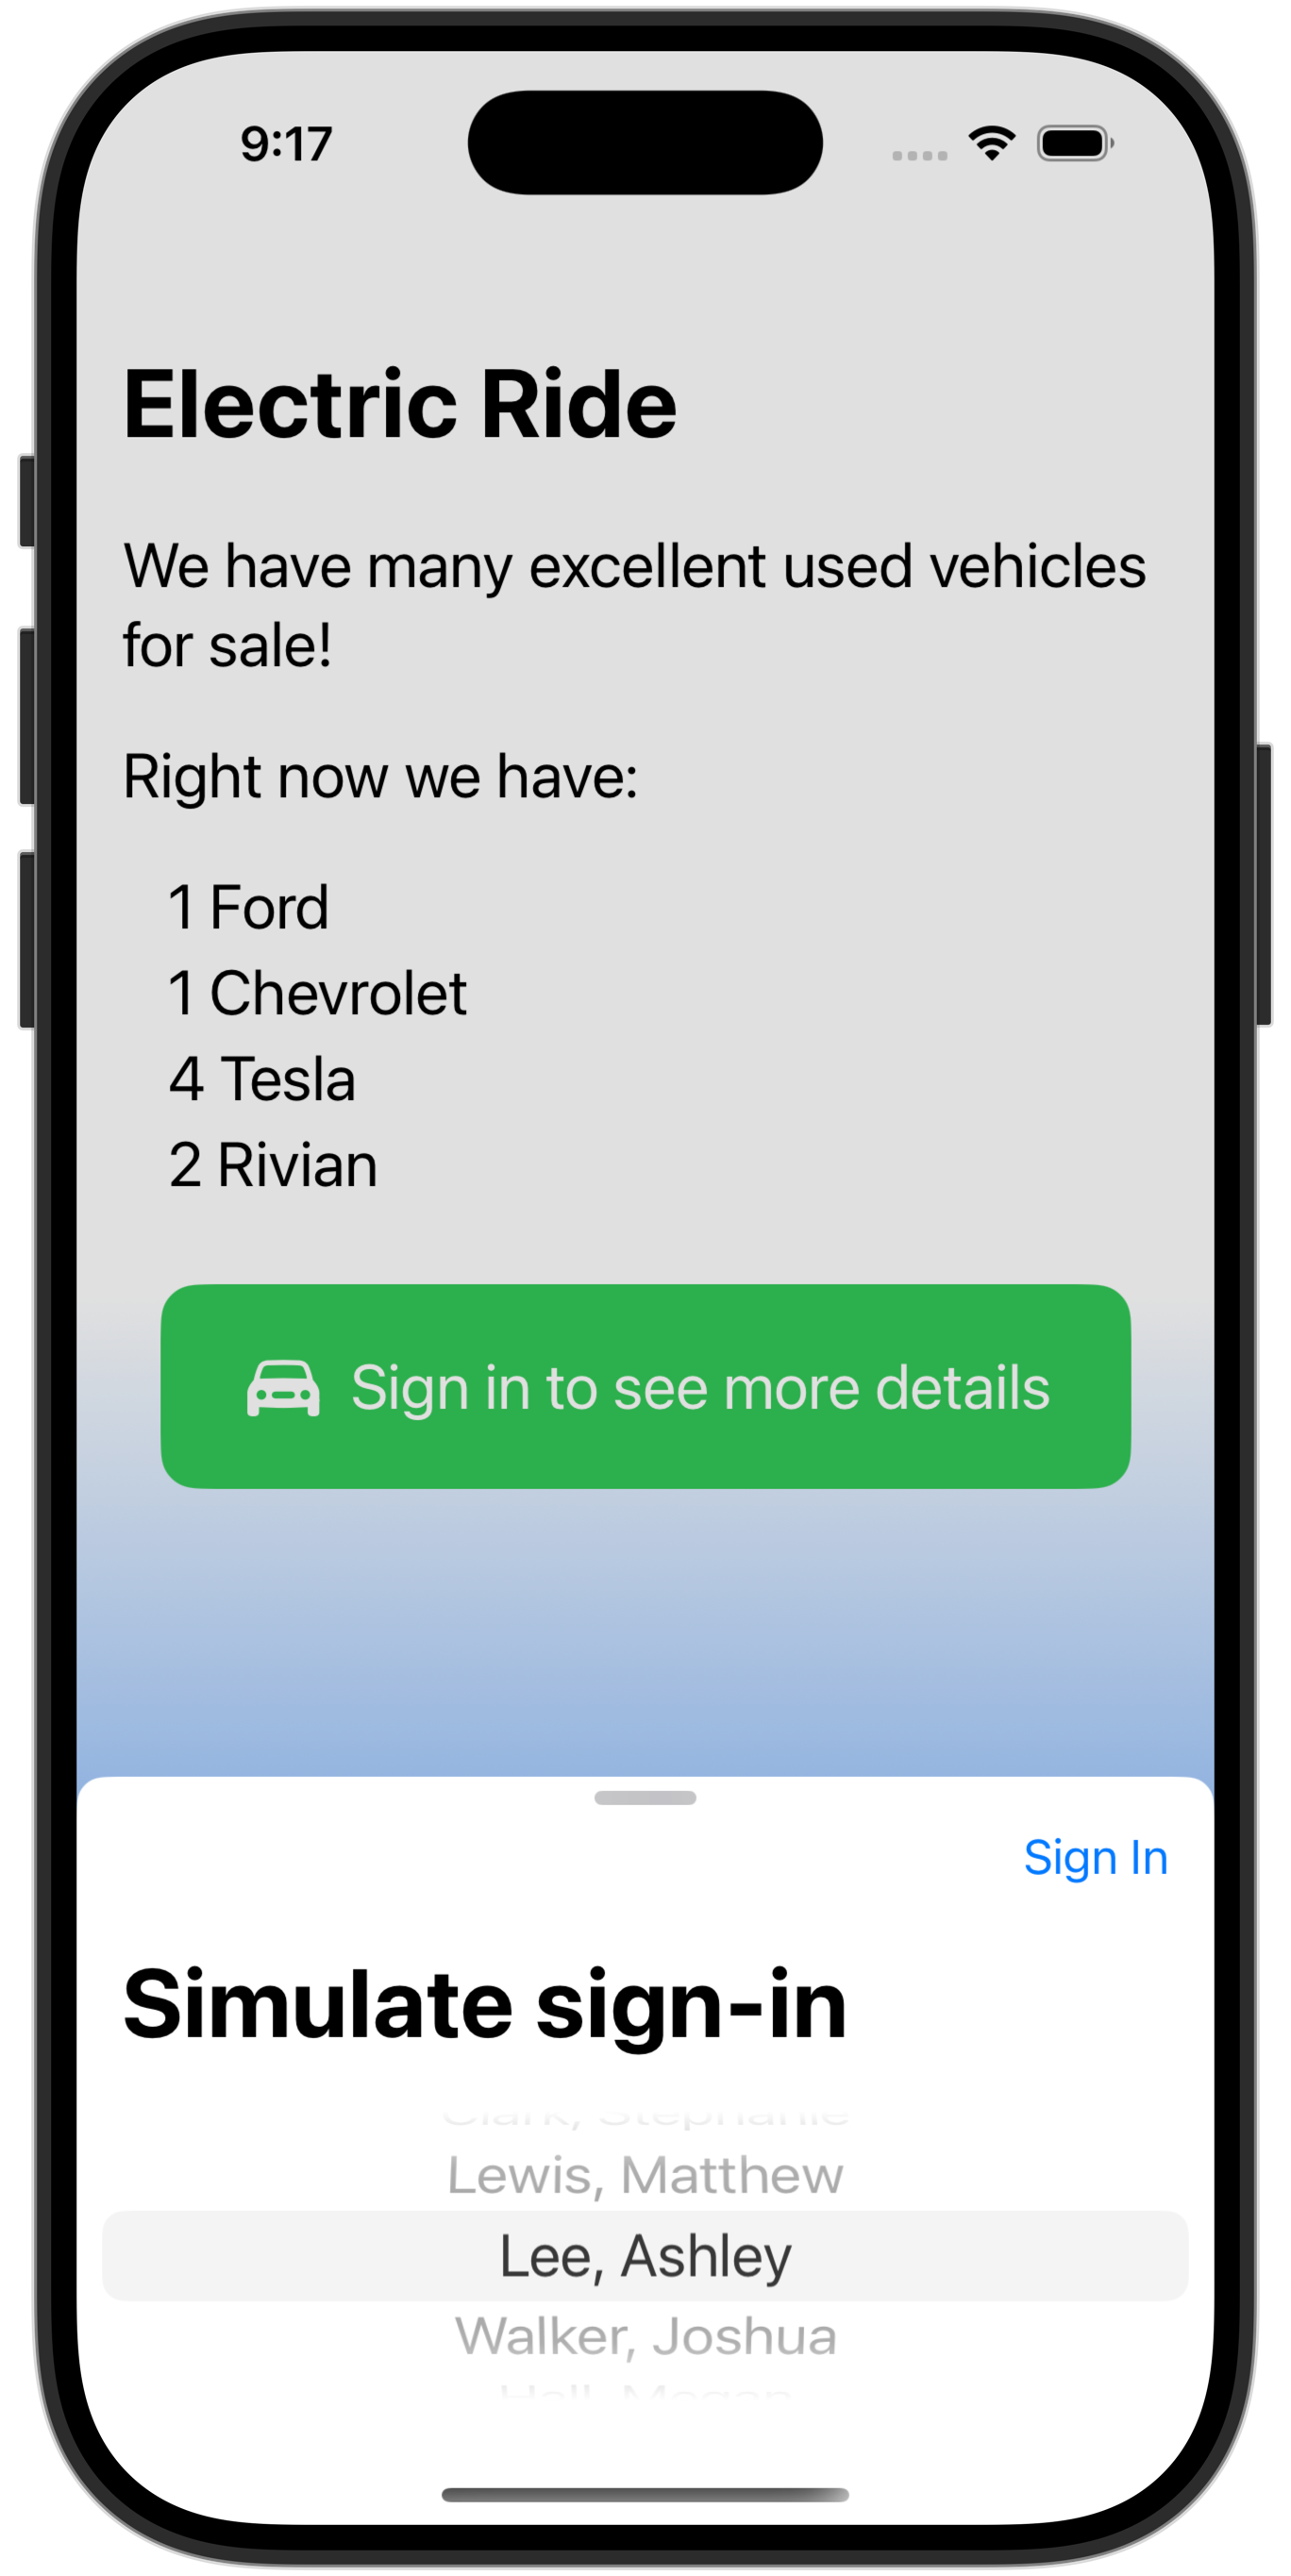
When the user opens the app, if they are not signed in, they see only a summary page that shows how many vehicles are available for sale, but without providing the details of each vehicle:
Requires authentication
Once the user signs in:
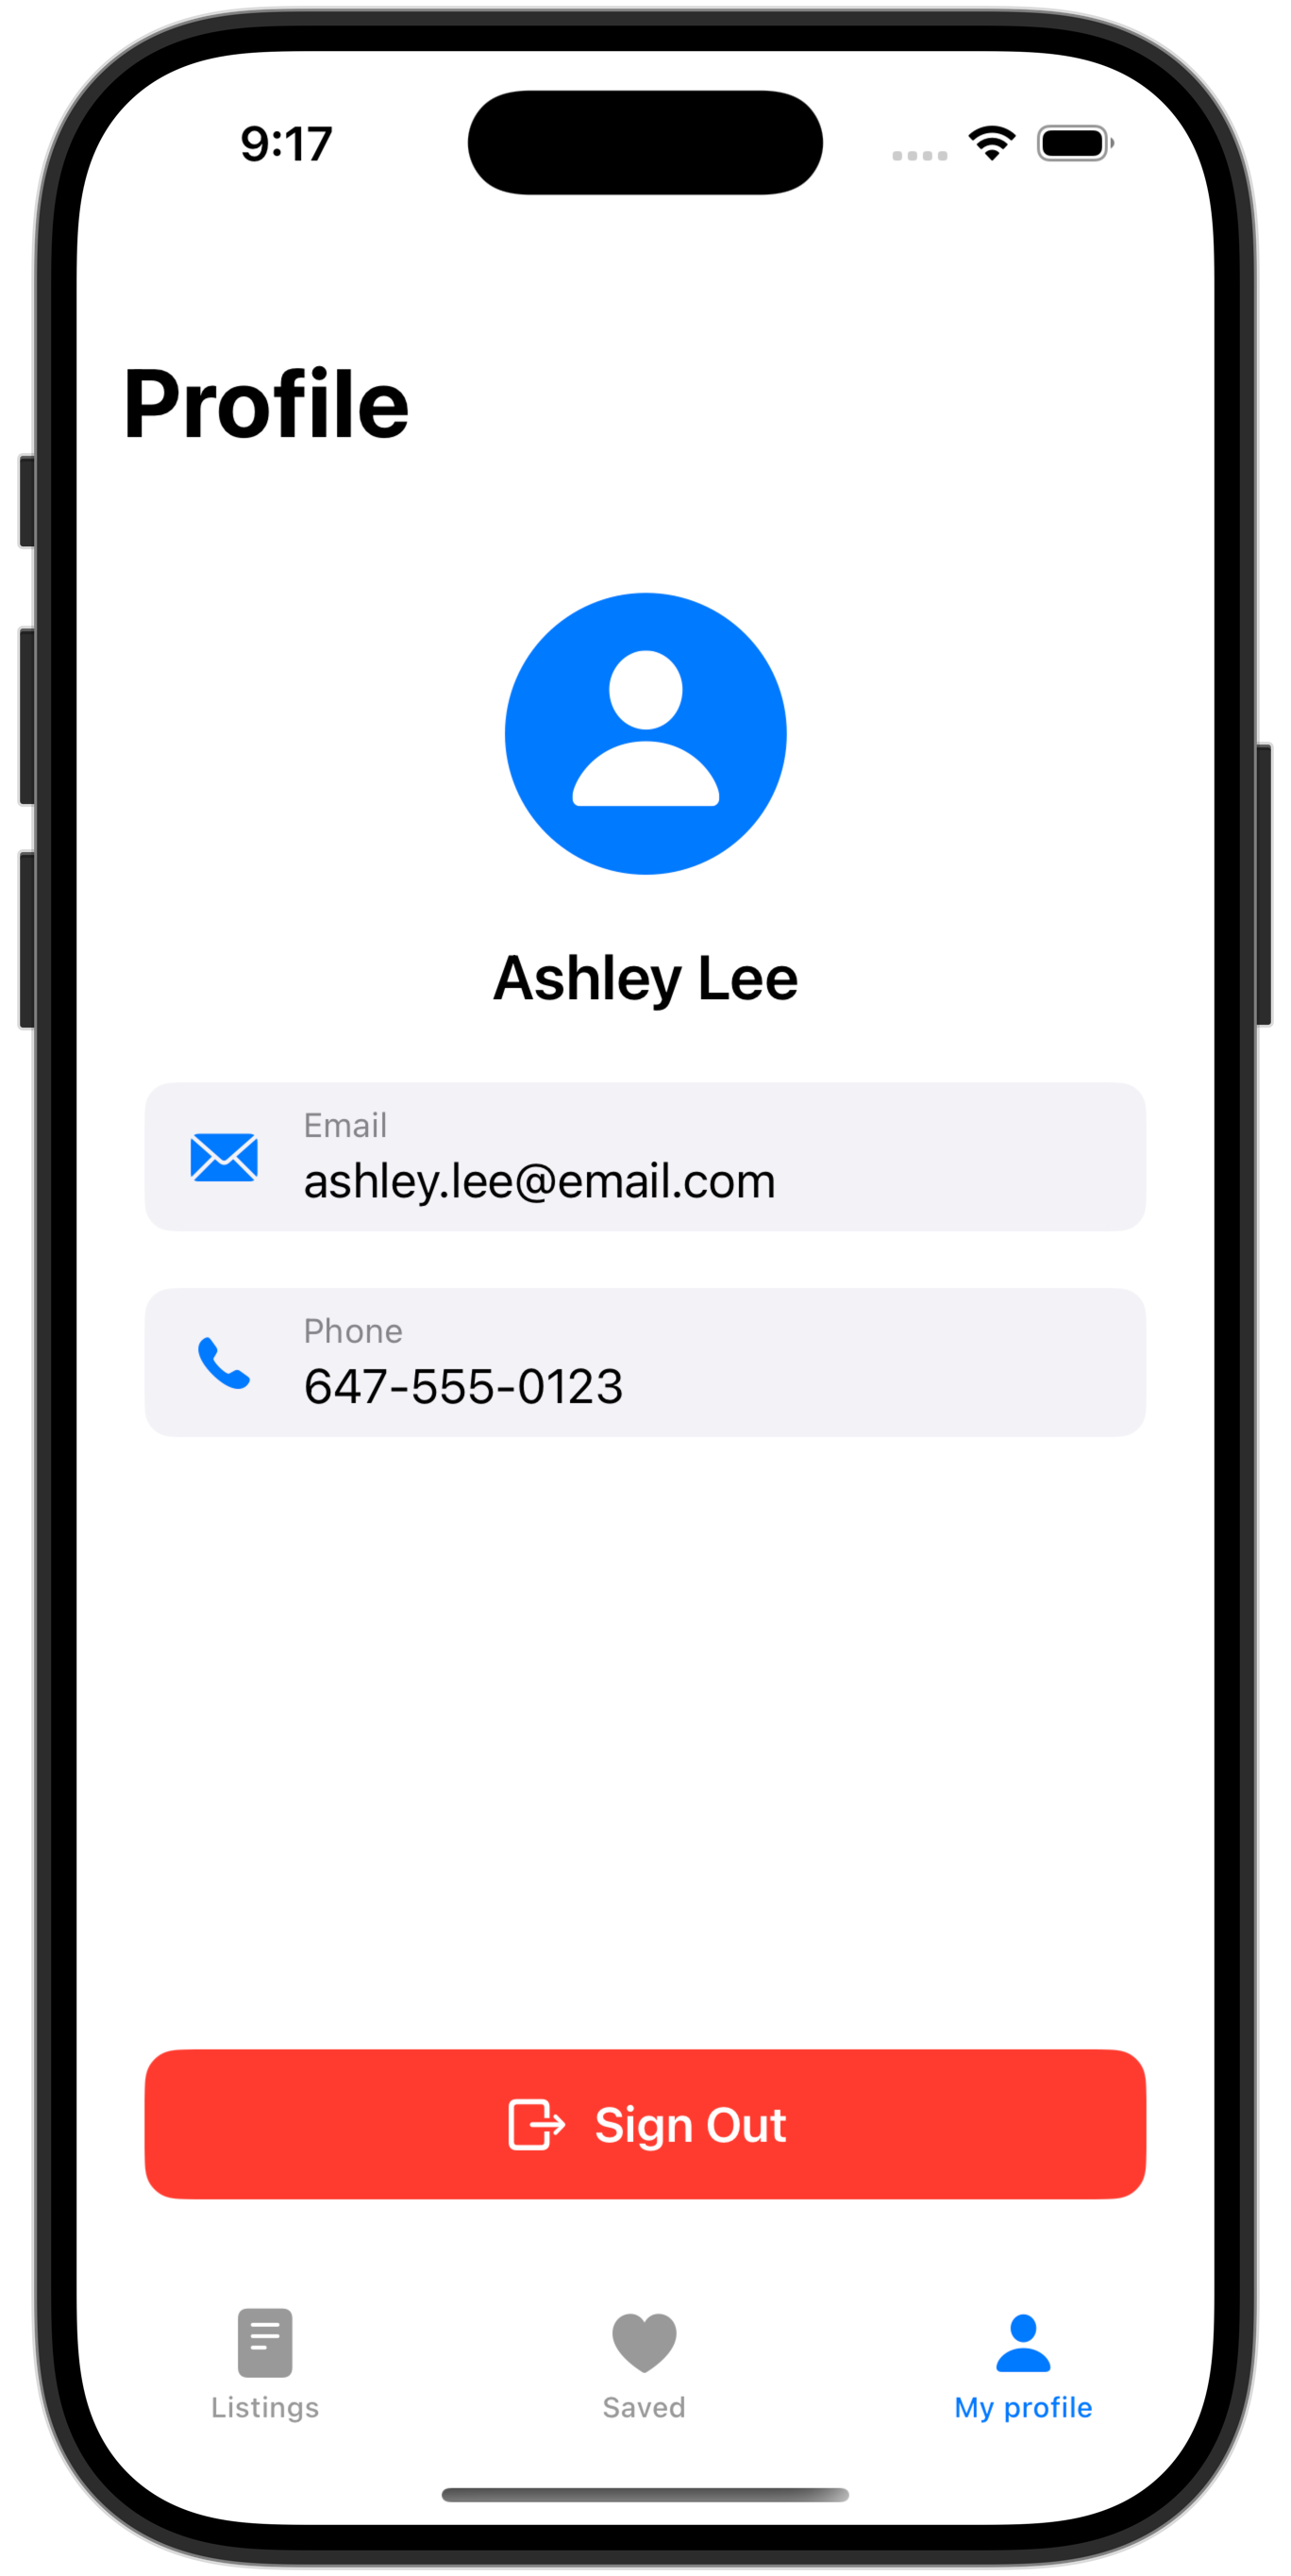
They can view their profile page:
Browse listings:
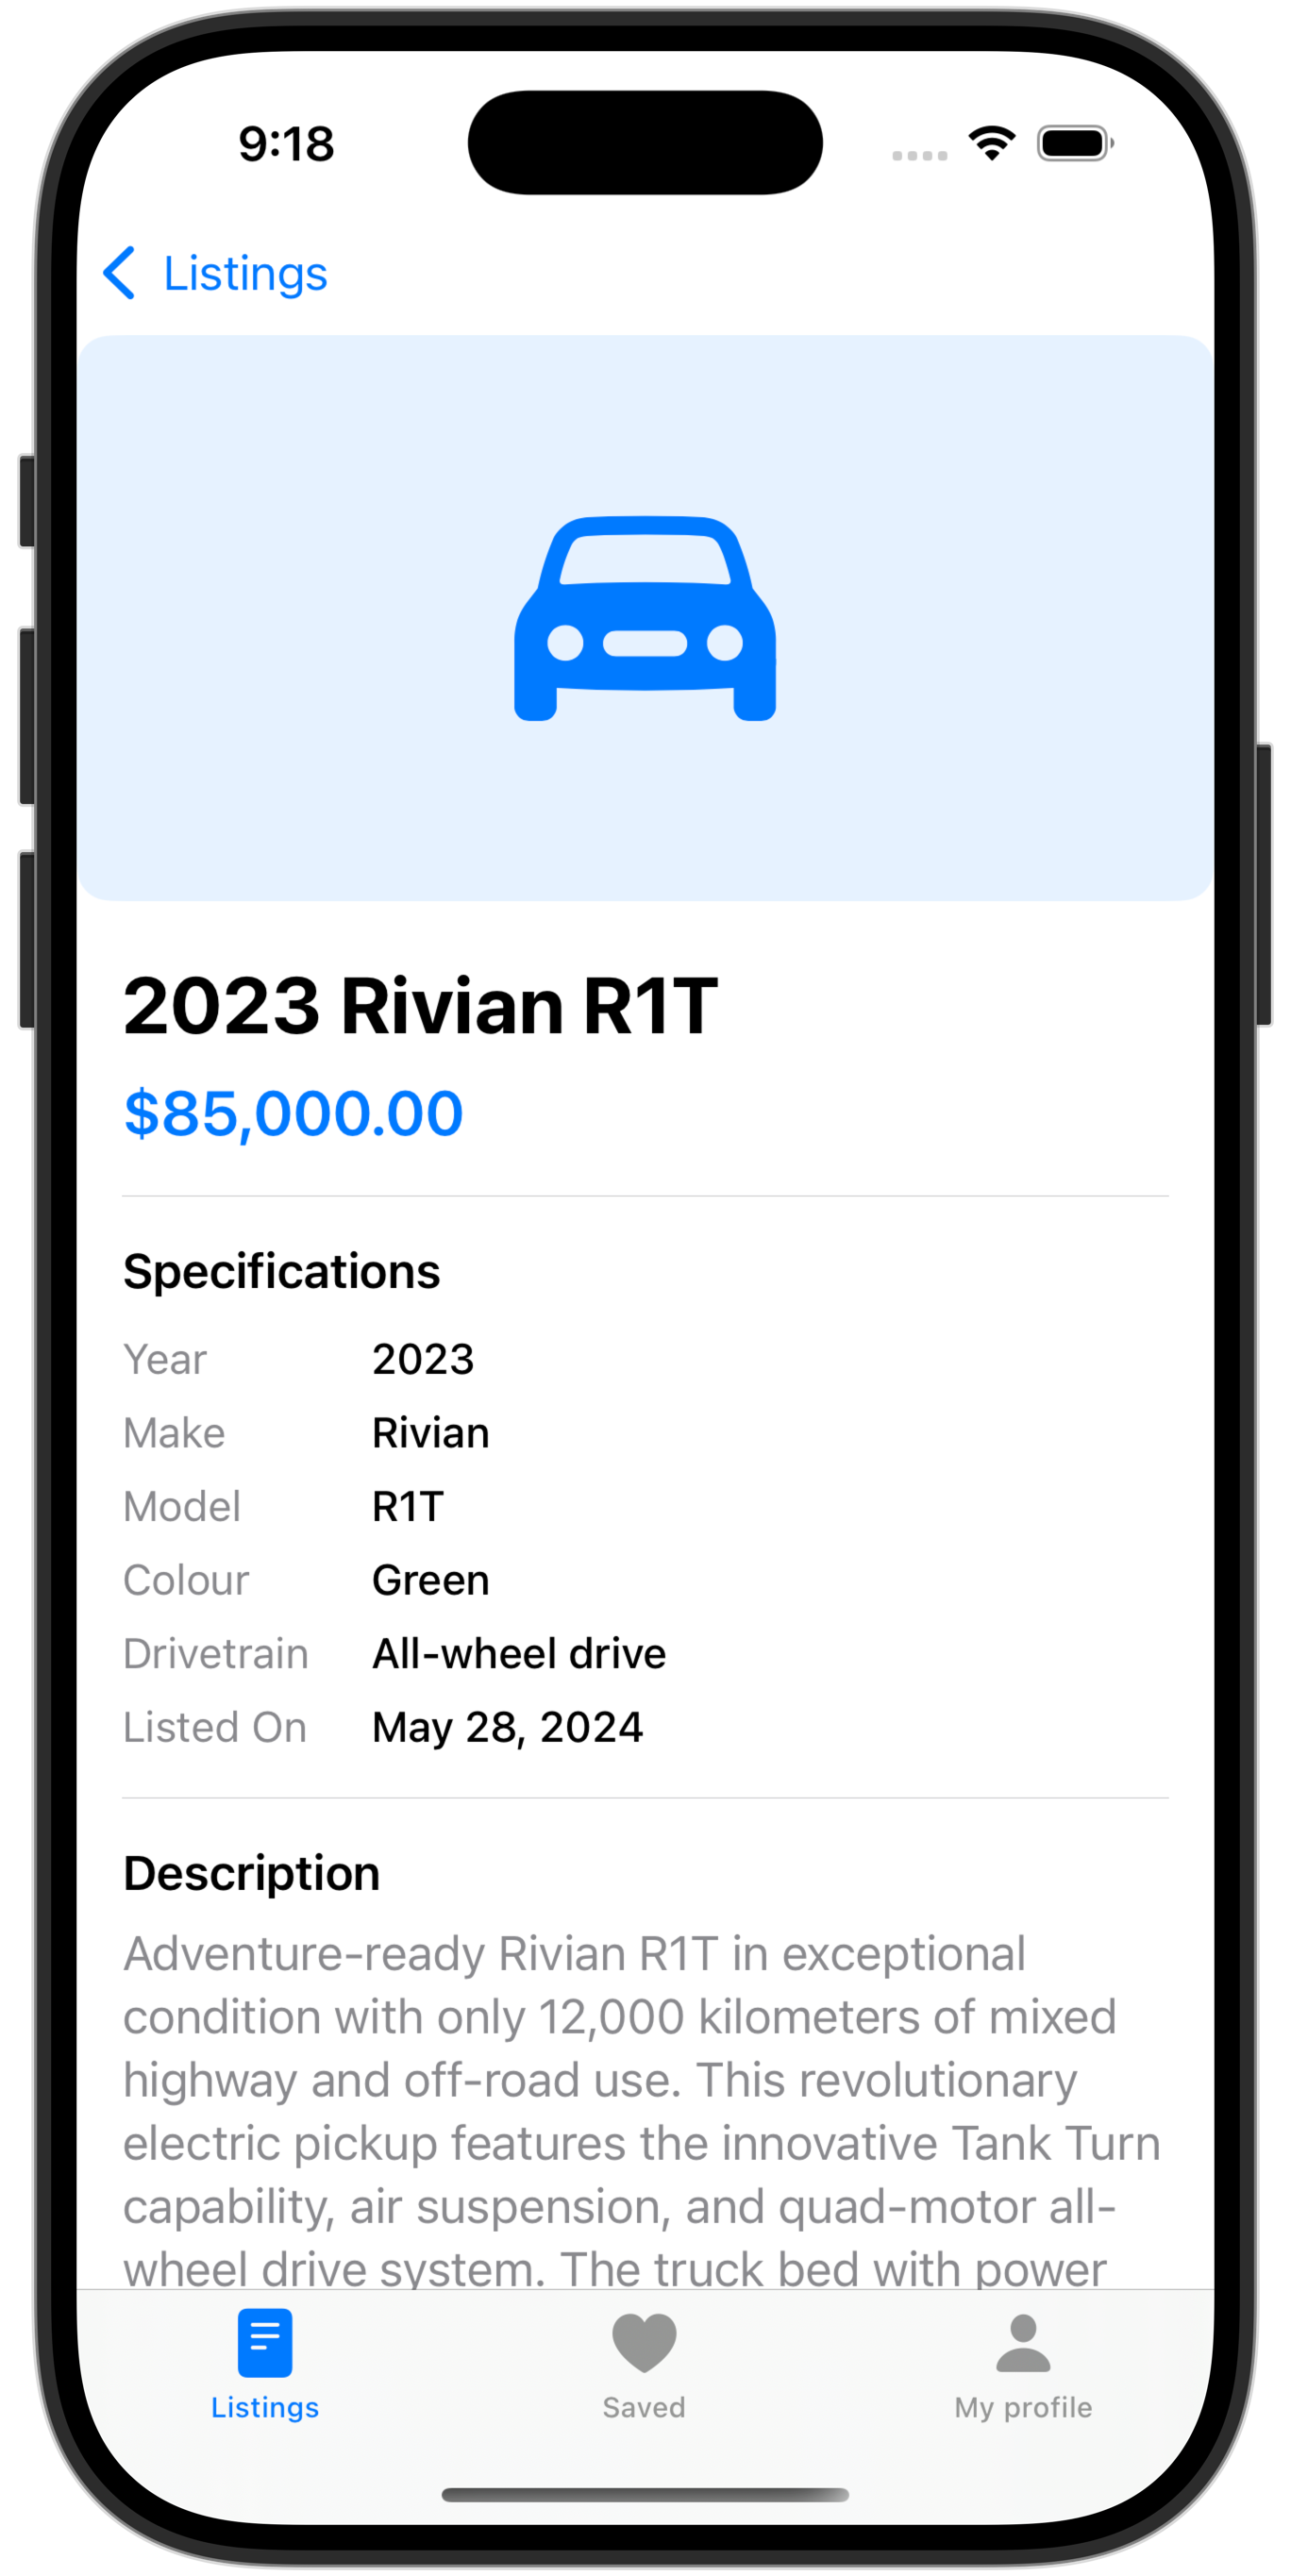
Review details of a listing:
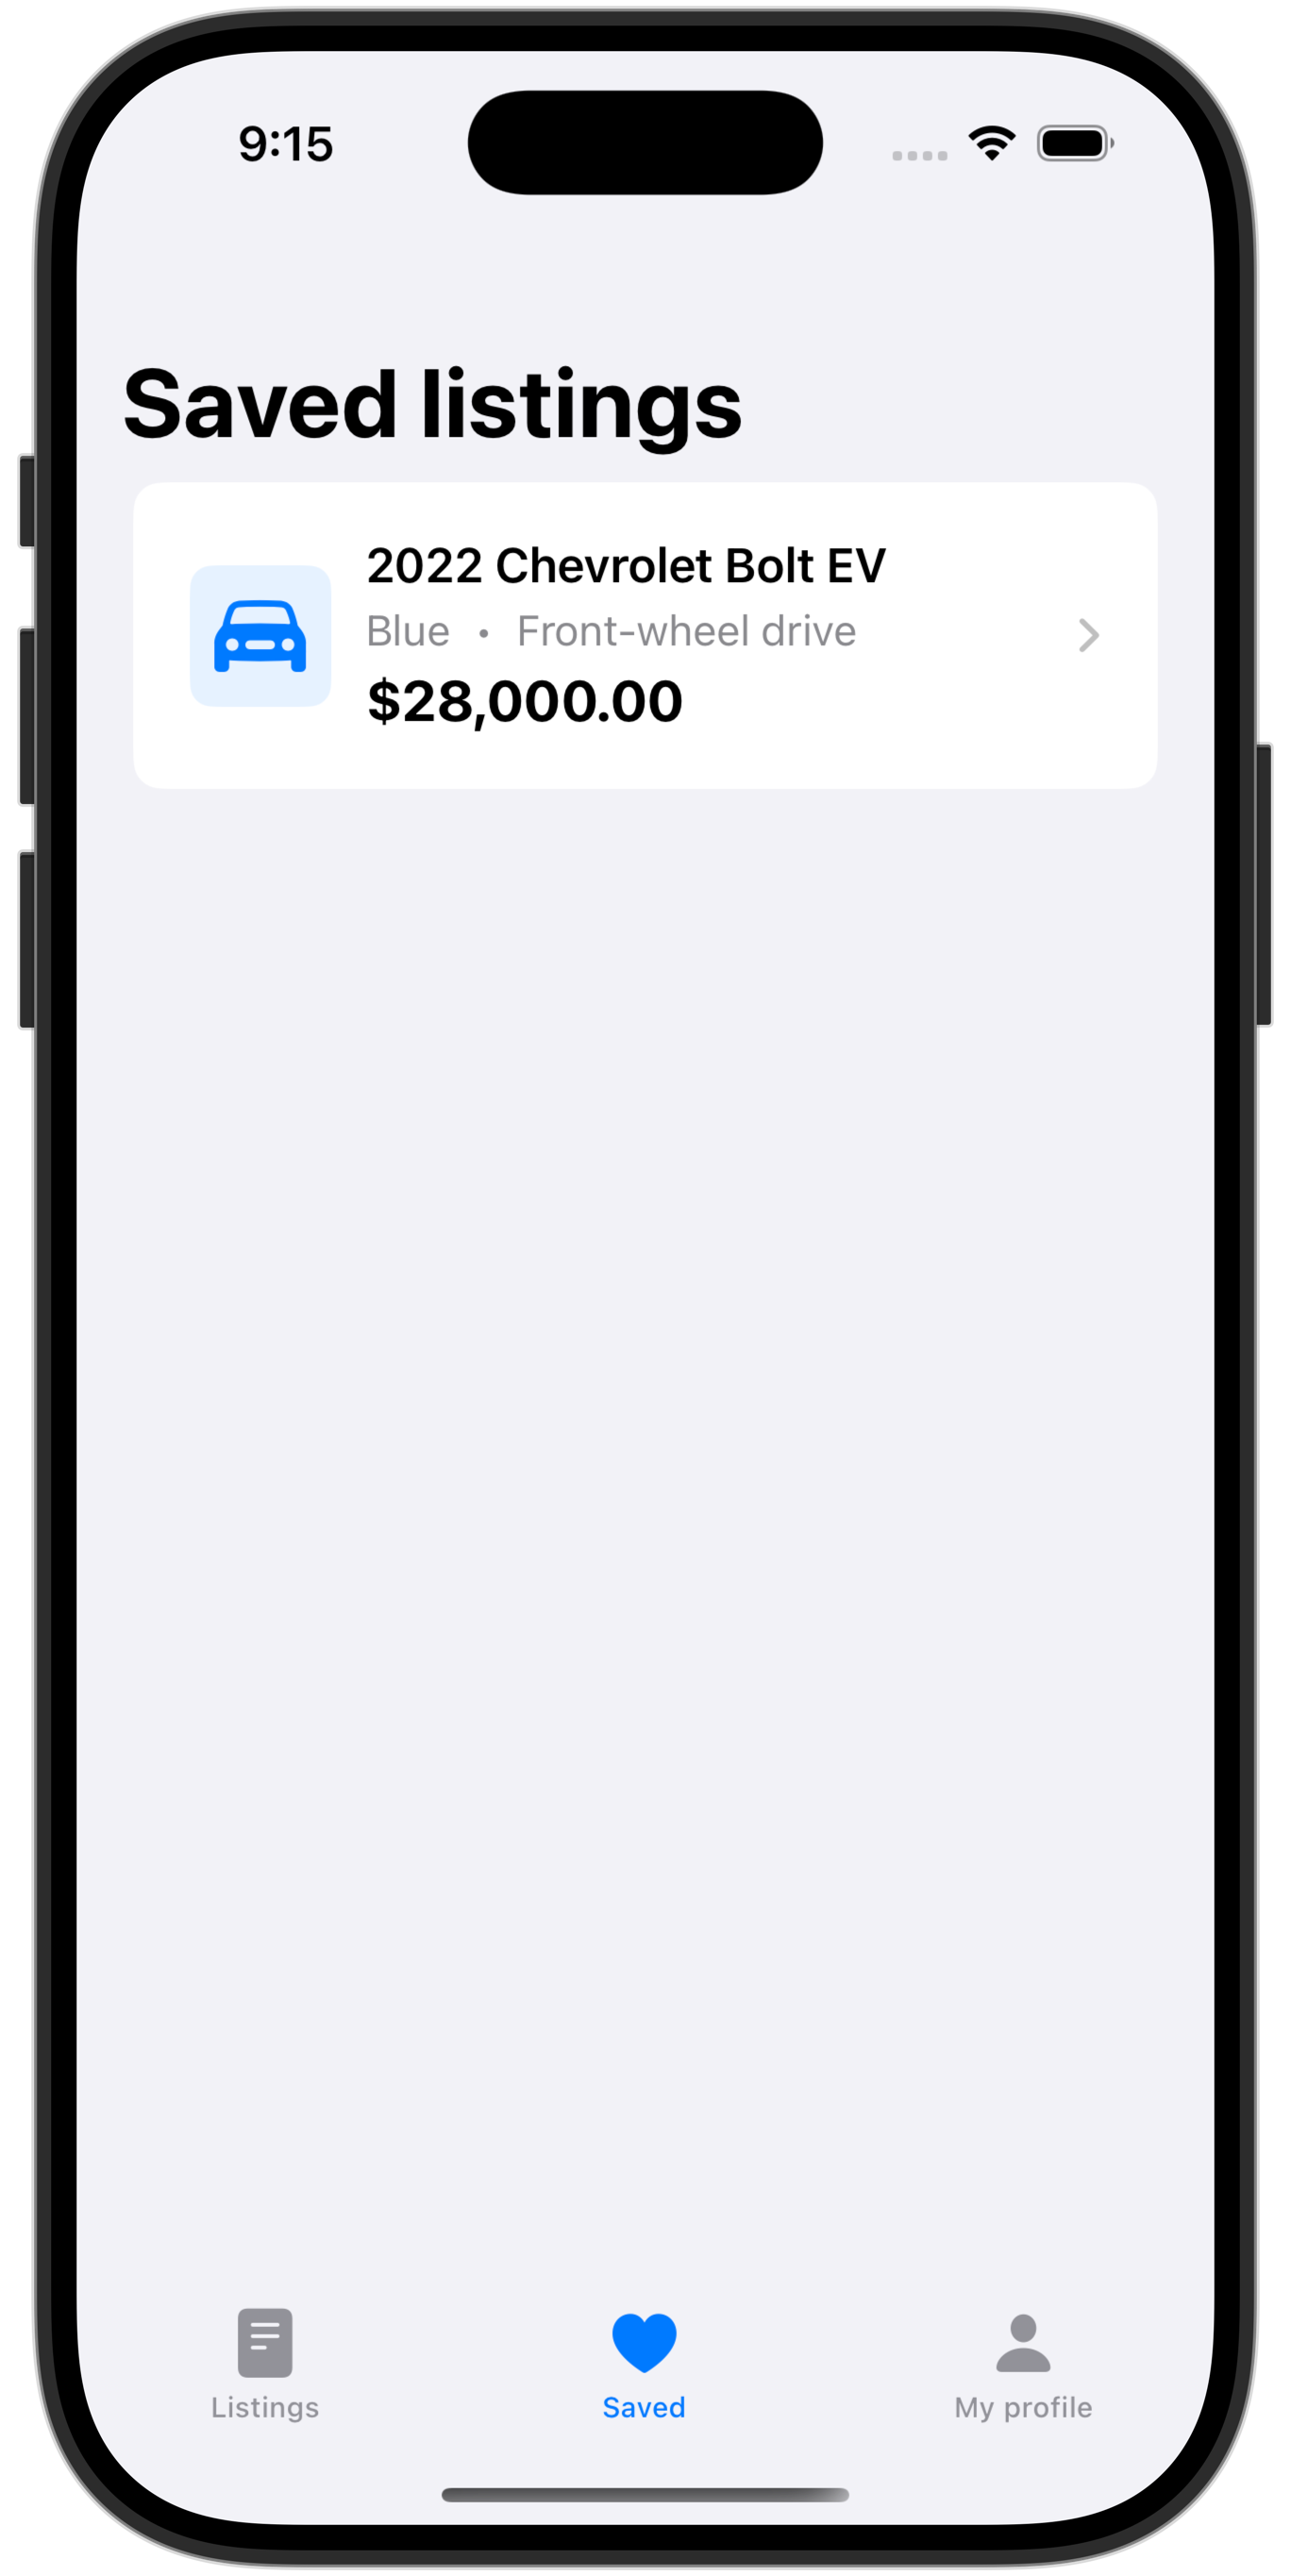
And save listings they are interested in:
When we author an app, we must have a clear idea in our mind about what information in our database:
anyone can see
any signed in user can see
a specific user can see
In this app:
WelcomeView can be seen by anyone, signed in or not
DetailedListingView can be seen by any signed in user
FavouriteListingView should be available only to signed in users, and should show them only listings that they themselves marked as a favourite
About authentication
Authentication means the app “knows” a secret that the user must provide to prove their identity.
Apps can handle authentication in several ways.
Some apps handle authentication entirely on their own – these are the types of apps where a user would need to create a new account to use that app or service.
Other apps choose to use a third-party sign-in service. The third-party service handles authentication using an account the user has already created (at Apple, Google, Facebook, or other similar services). The third-party verifies that the user knows the secret (typically a password or a biometric identifier such as fingerprint scan or face scan) then re-directs the user back into the app.
In most cases, when building apps for use within LCS, we can authenticate users using the Sign in with Google service.
Why? We know that everyone at LCS already has an email address hosted by Google.
So, the rest of this tutorial will explain how to:
Set row-level security on each table so that we are following our access plan.
Set up authentication using Sign in with Google in a Supabase project.
Specific to Electric Ride – which has data that should be visible to users who are not signed in – Mr. Gordon will then also explain how to fix security settings so that the welcome page showing a count of vehicles available by brand still works:
Remember, data on that page should be visible to anyone – publicly available – without signing in.
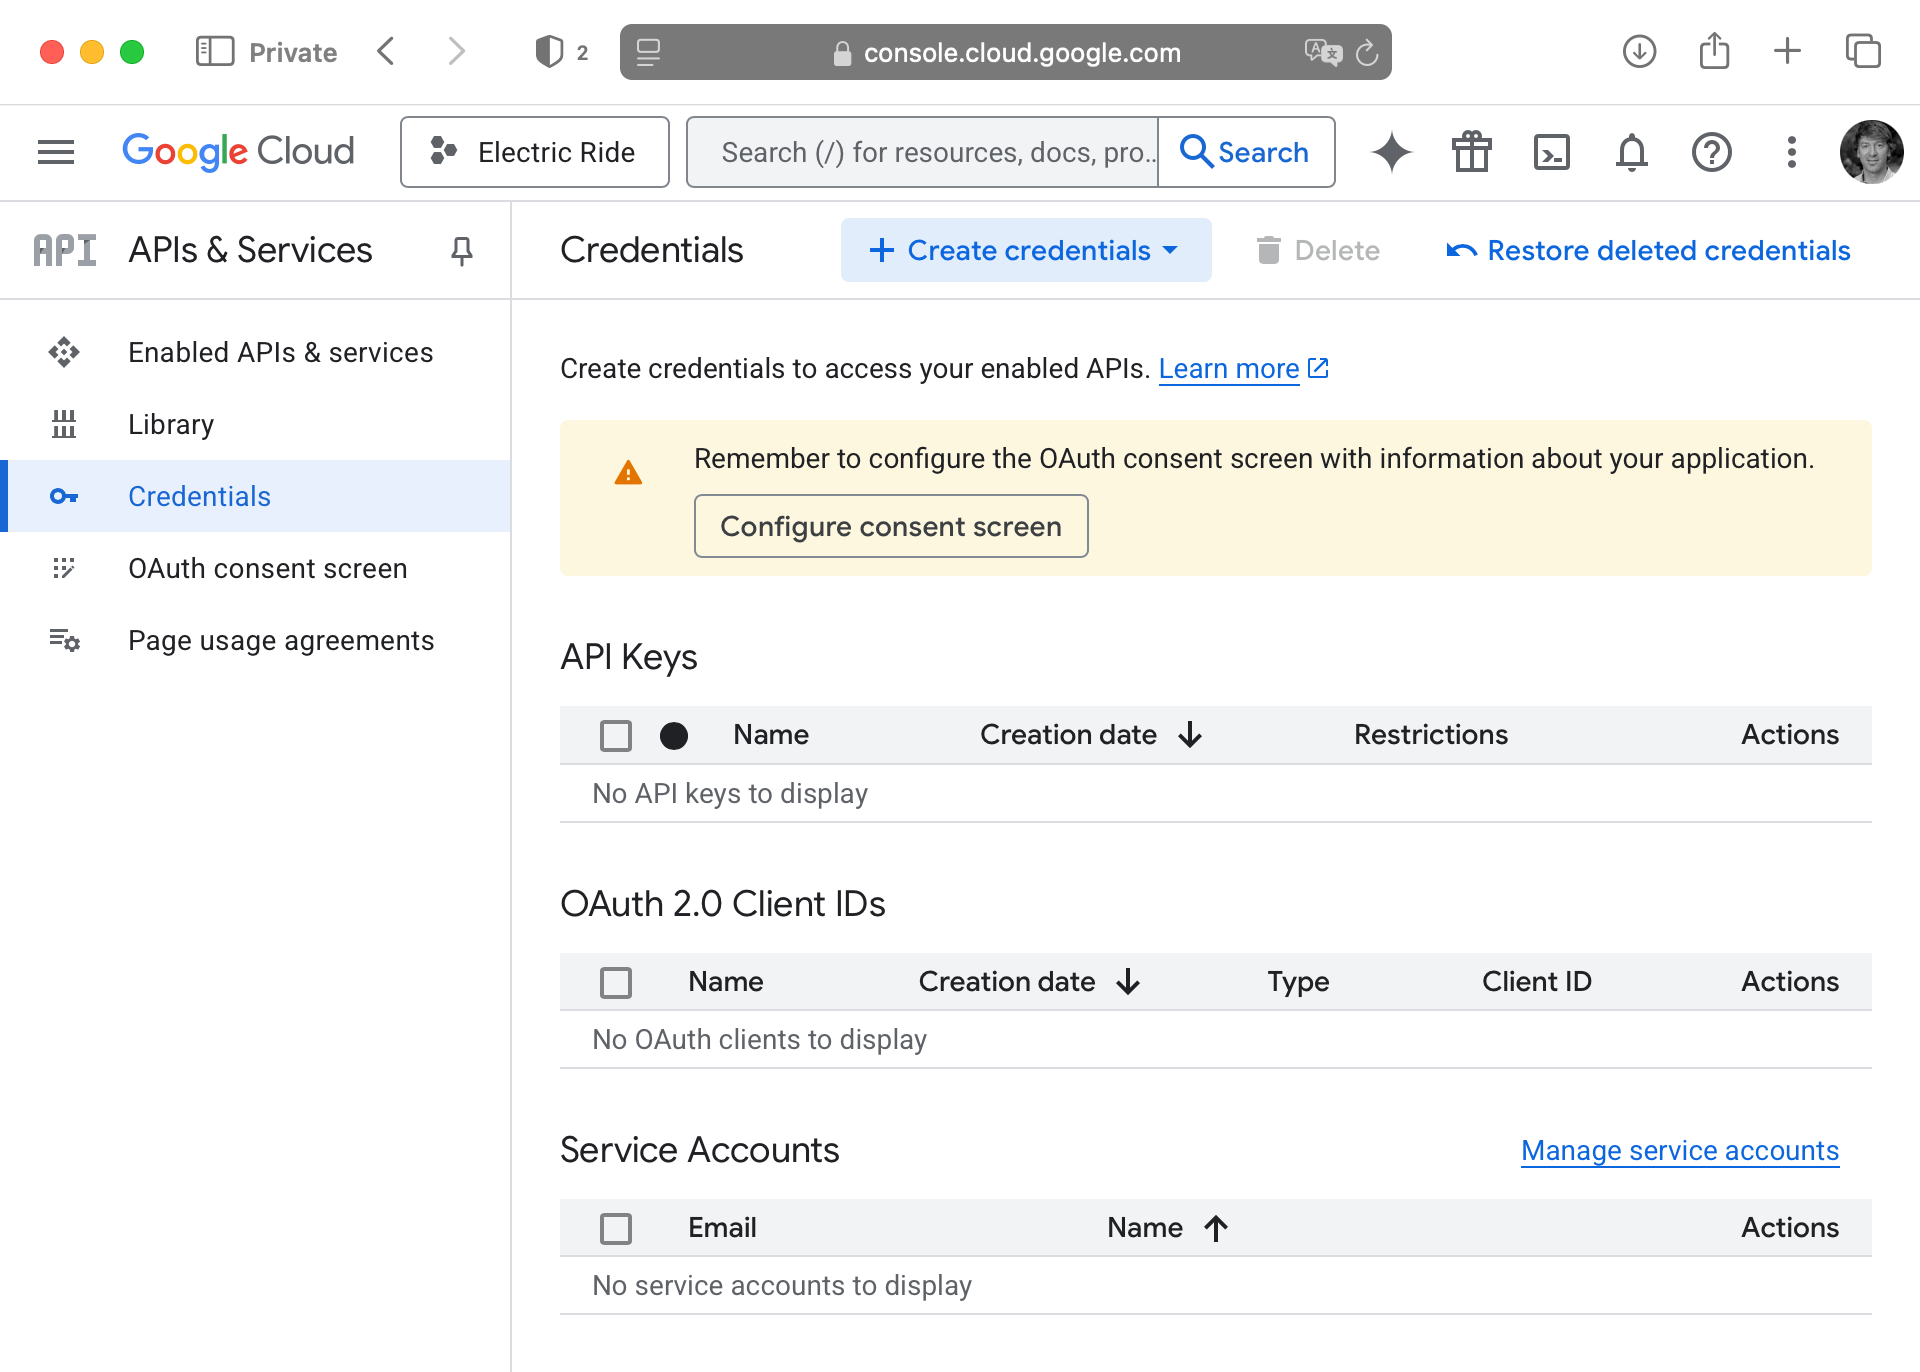
Row-level security policies
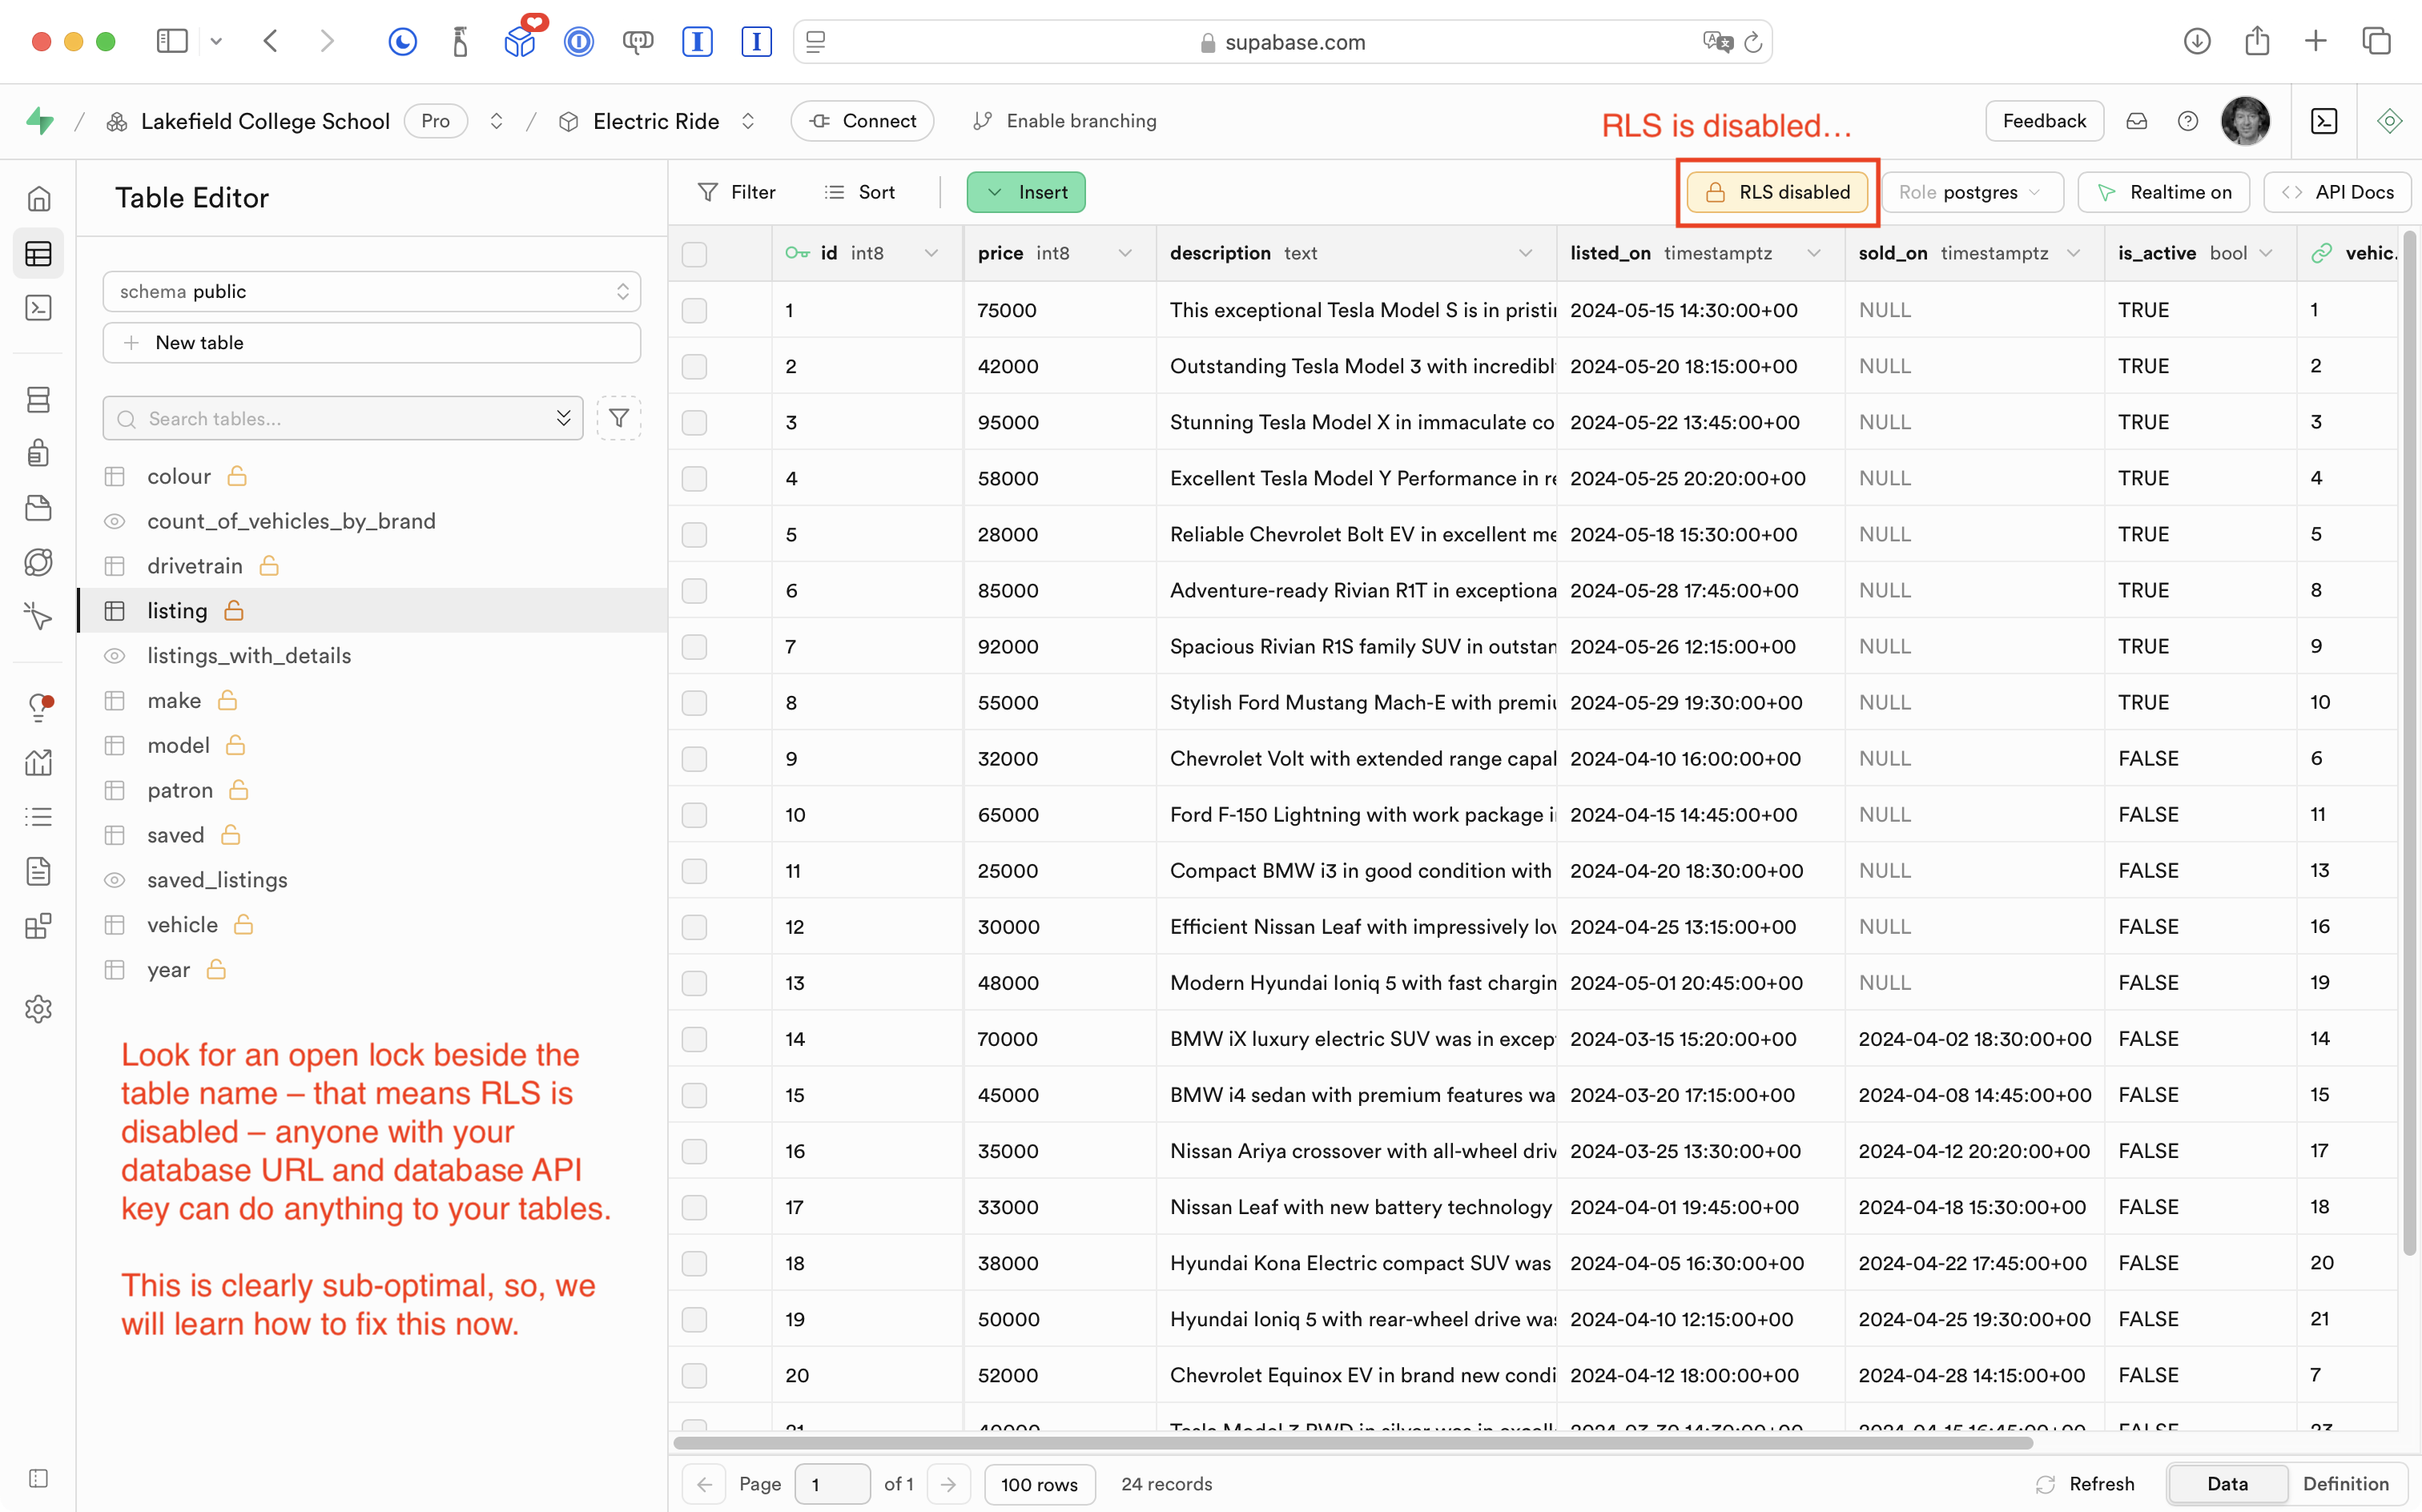
Right now in Mr. Gordon’s database for Electric Ride, none of the tables have row-level security (RLS) policies defined:
This means that any person that knows our database URL and API key:
… can theoretically write an app to interact with our database and its tables – adding, deleting, or otherwise changing the data without our permission.
TIP
This is why, when using Supabase within an Xcode project, we should set our GitHub remote to private. We want to avoid exposing our database secrets to anyone who happens to look through our repositories on GitHub (which until now, we’d left open with public access).
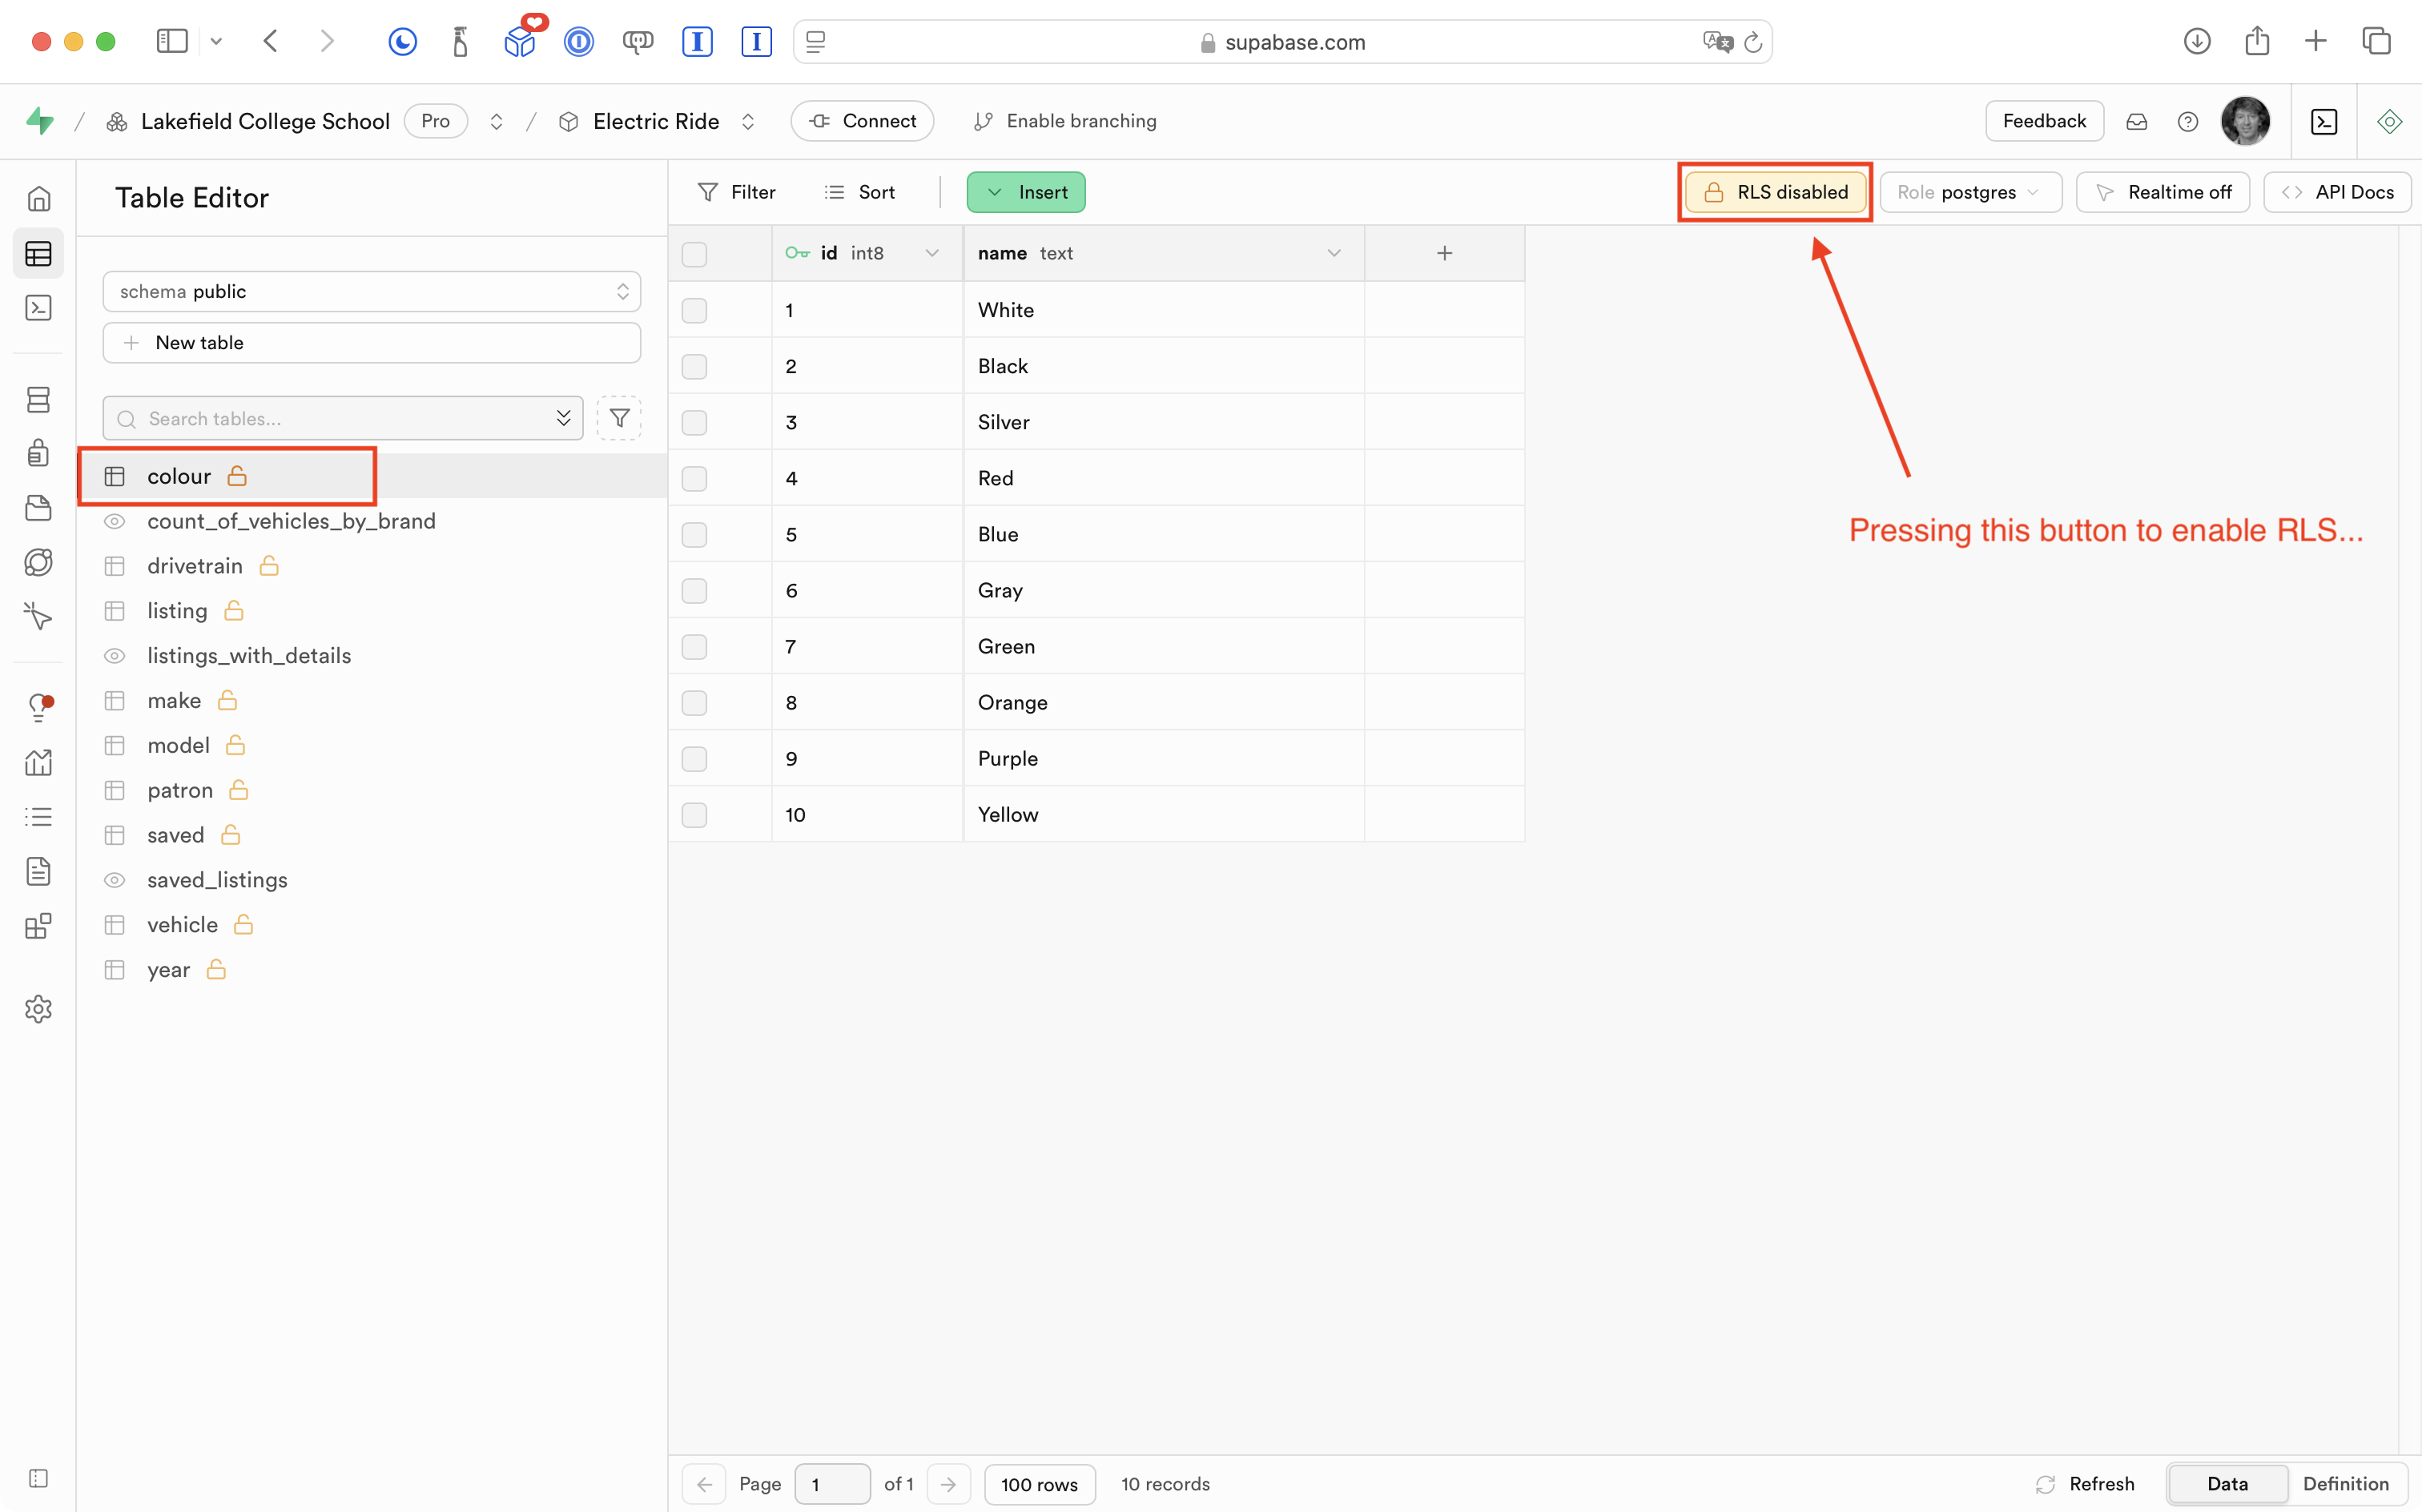
Enable RLS
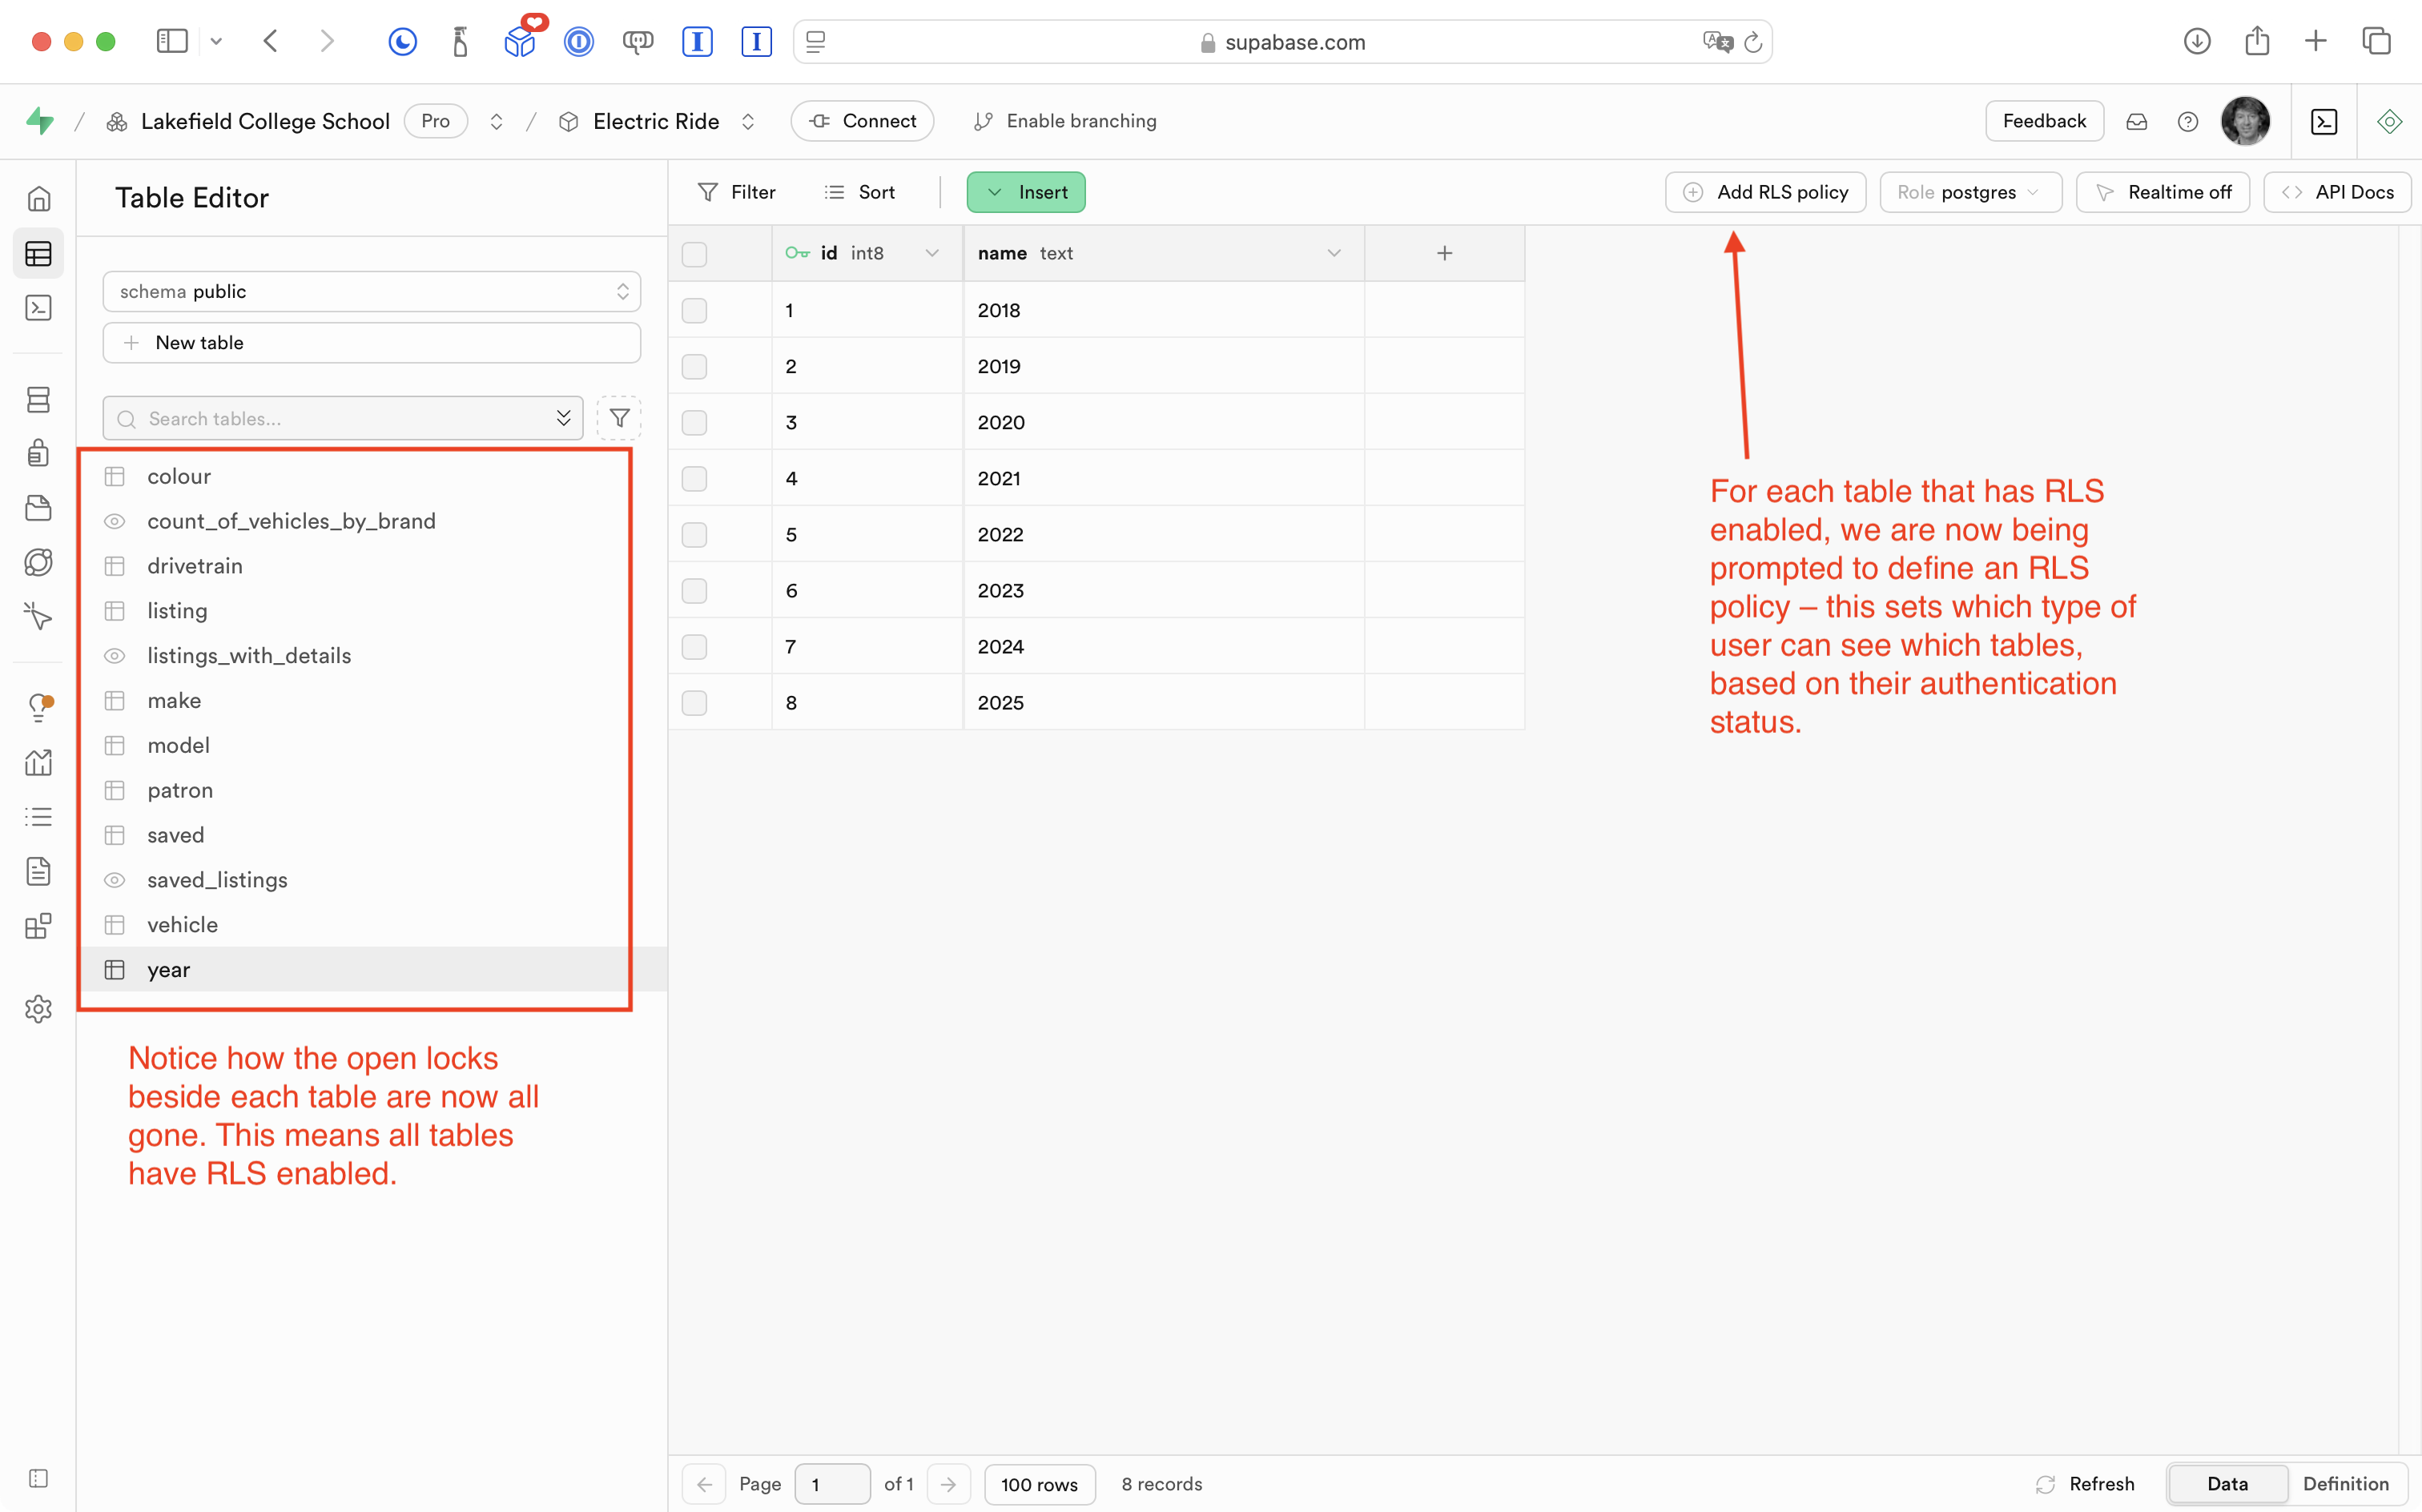
In his Supabase project’s dashboard, Mr. Gordon will now move through each table in turn, and enable row-level security (RLS).
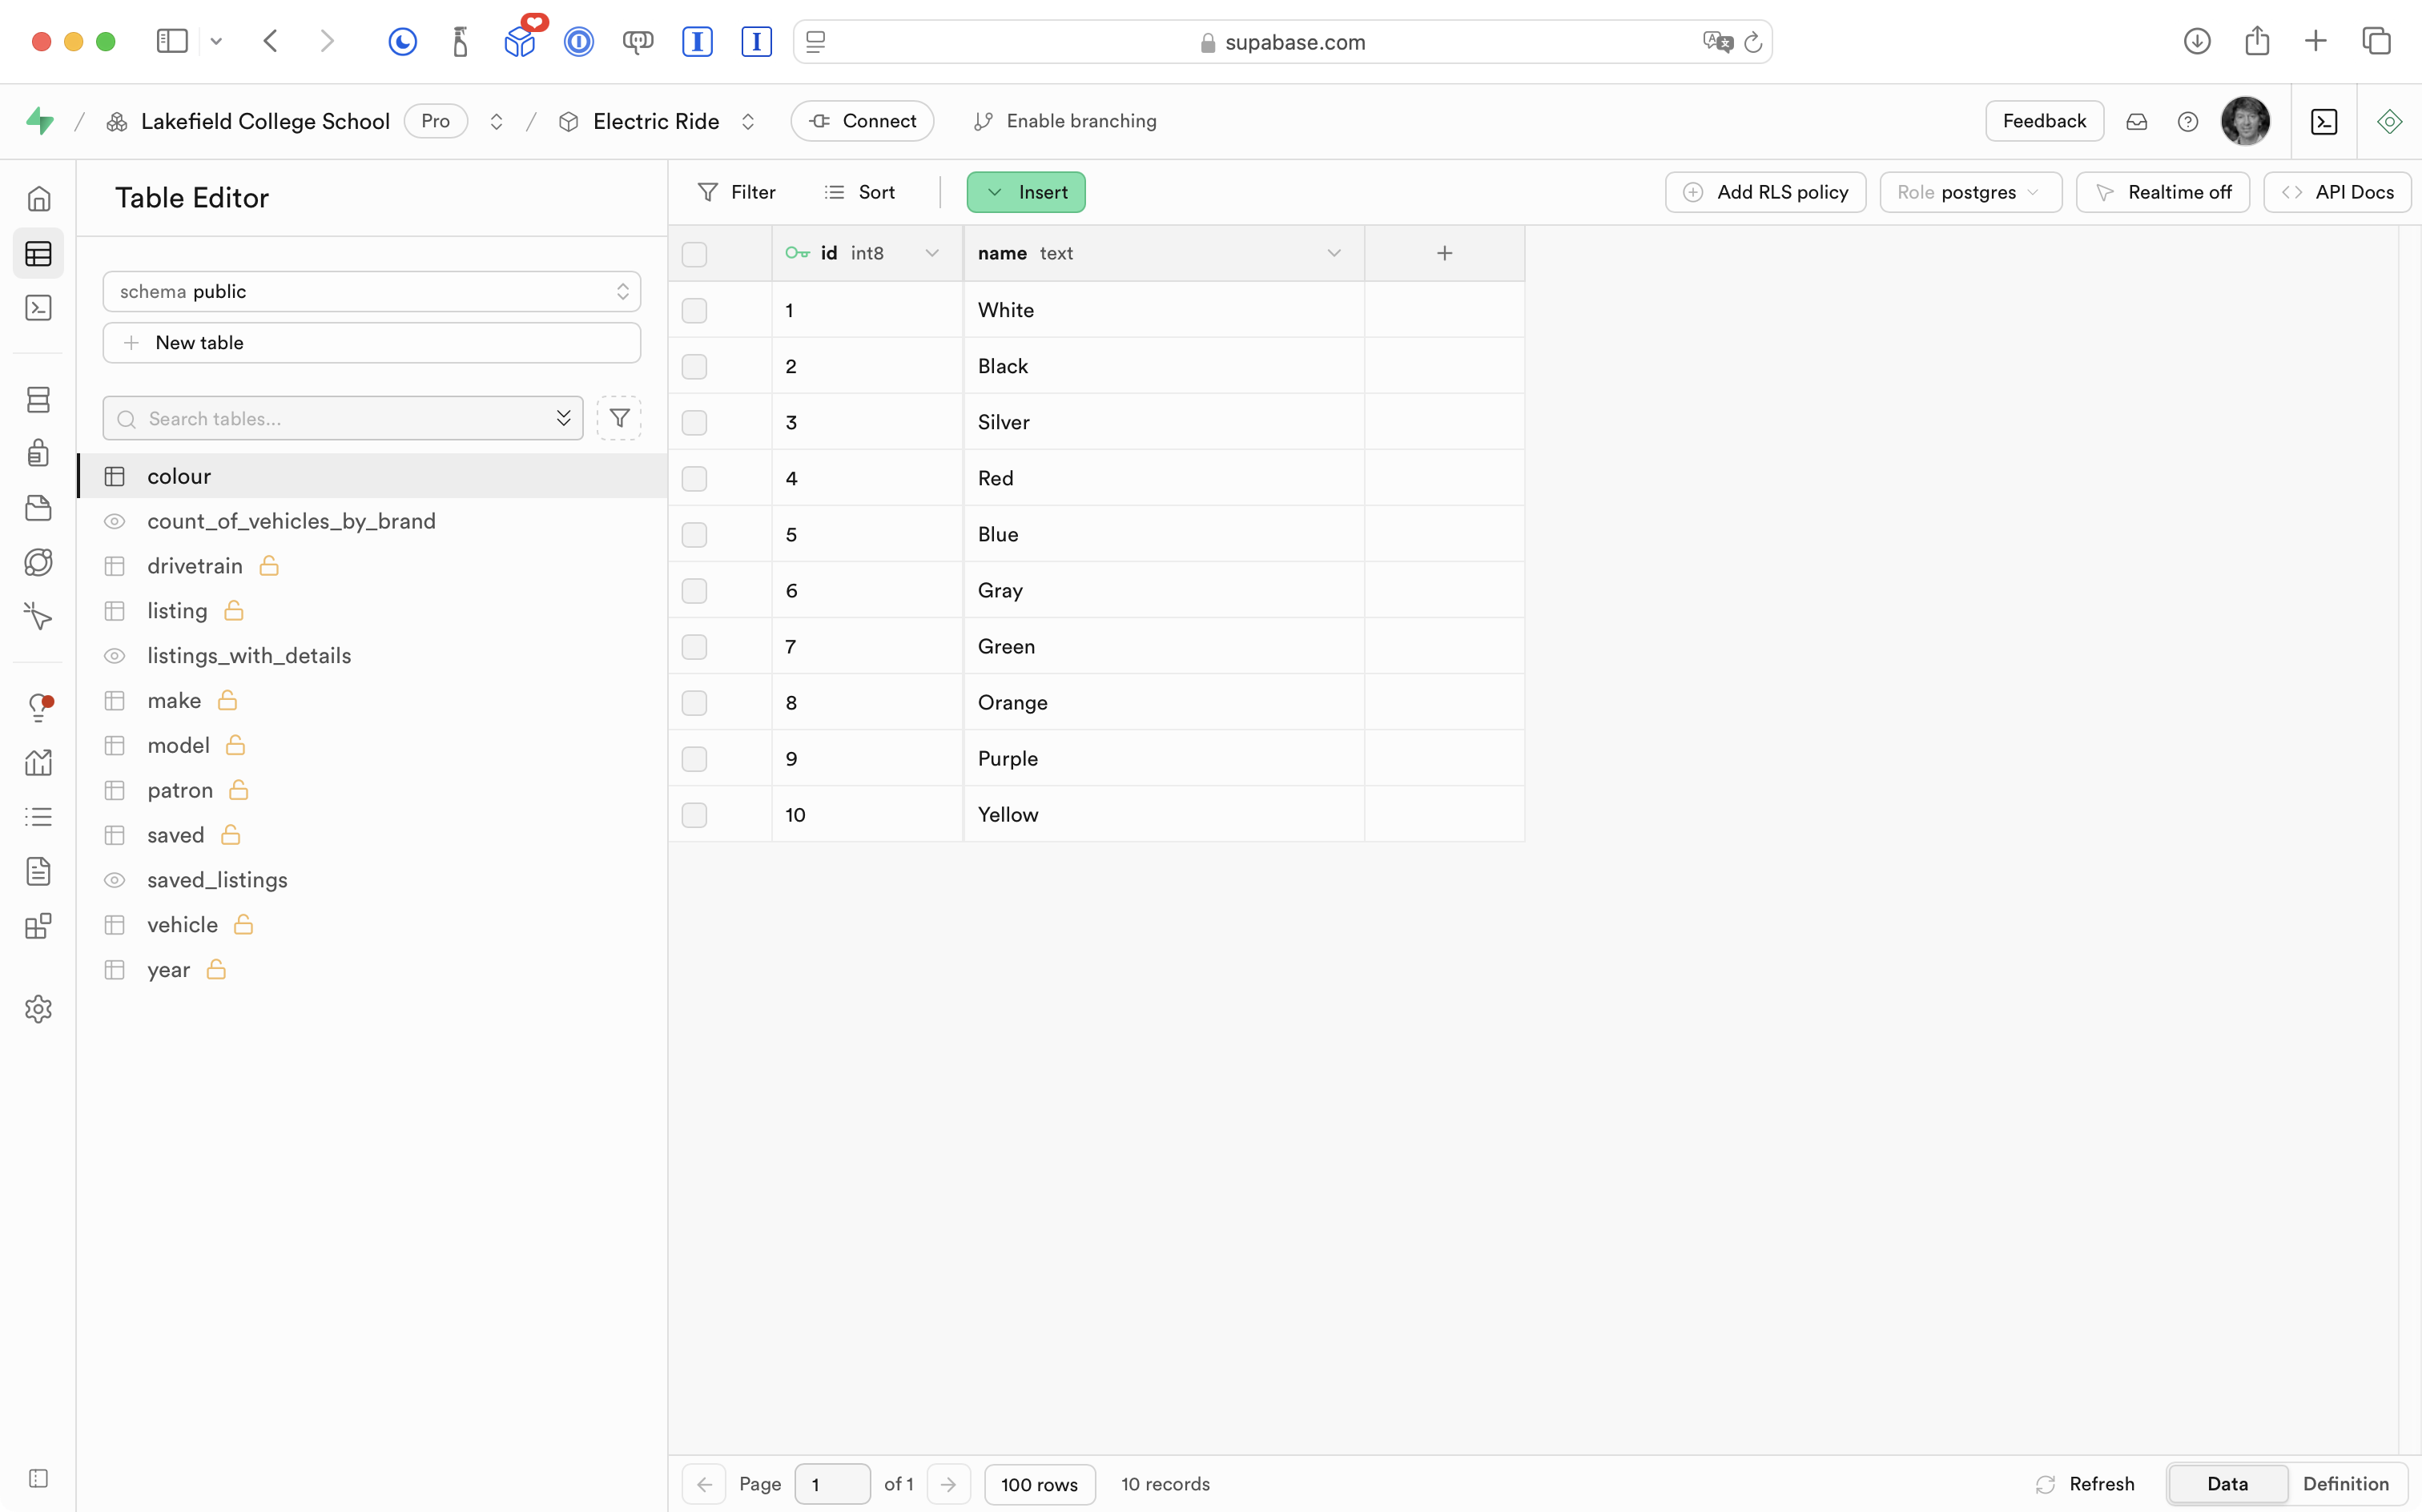
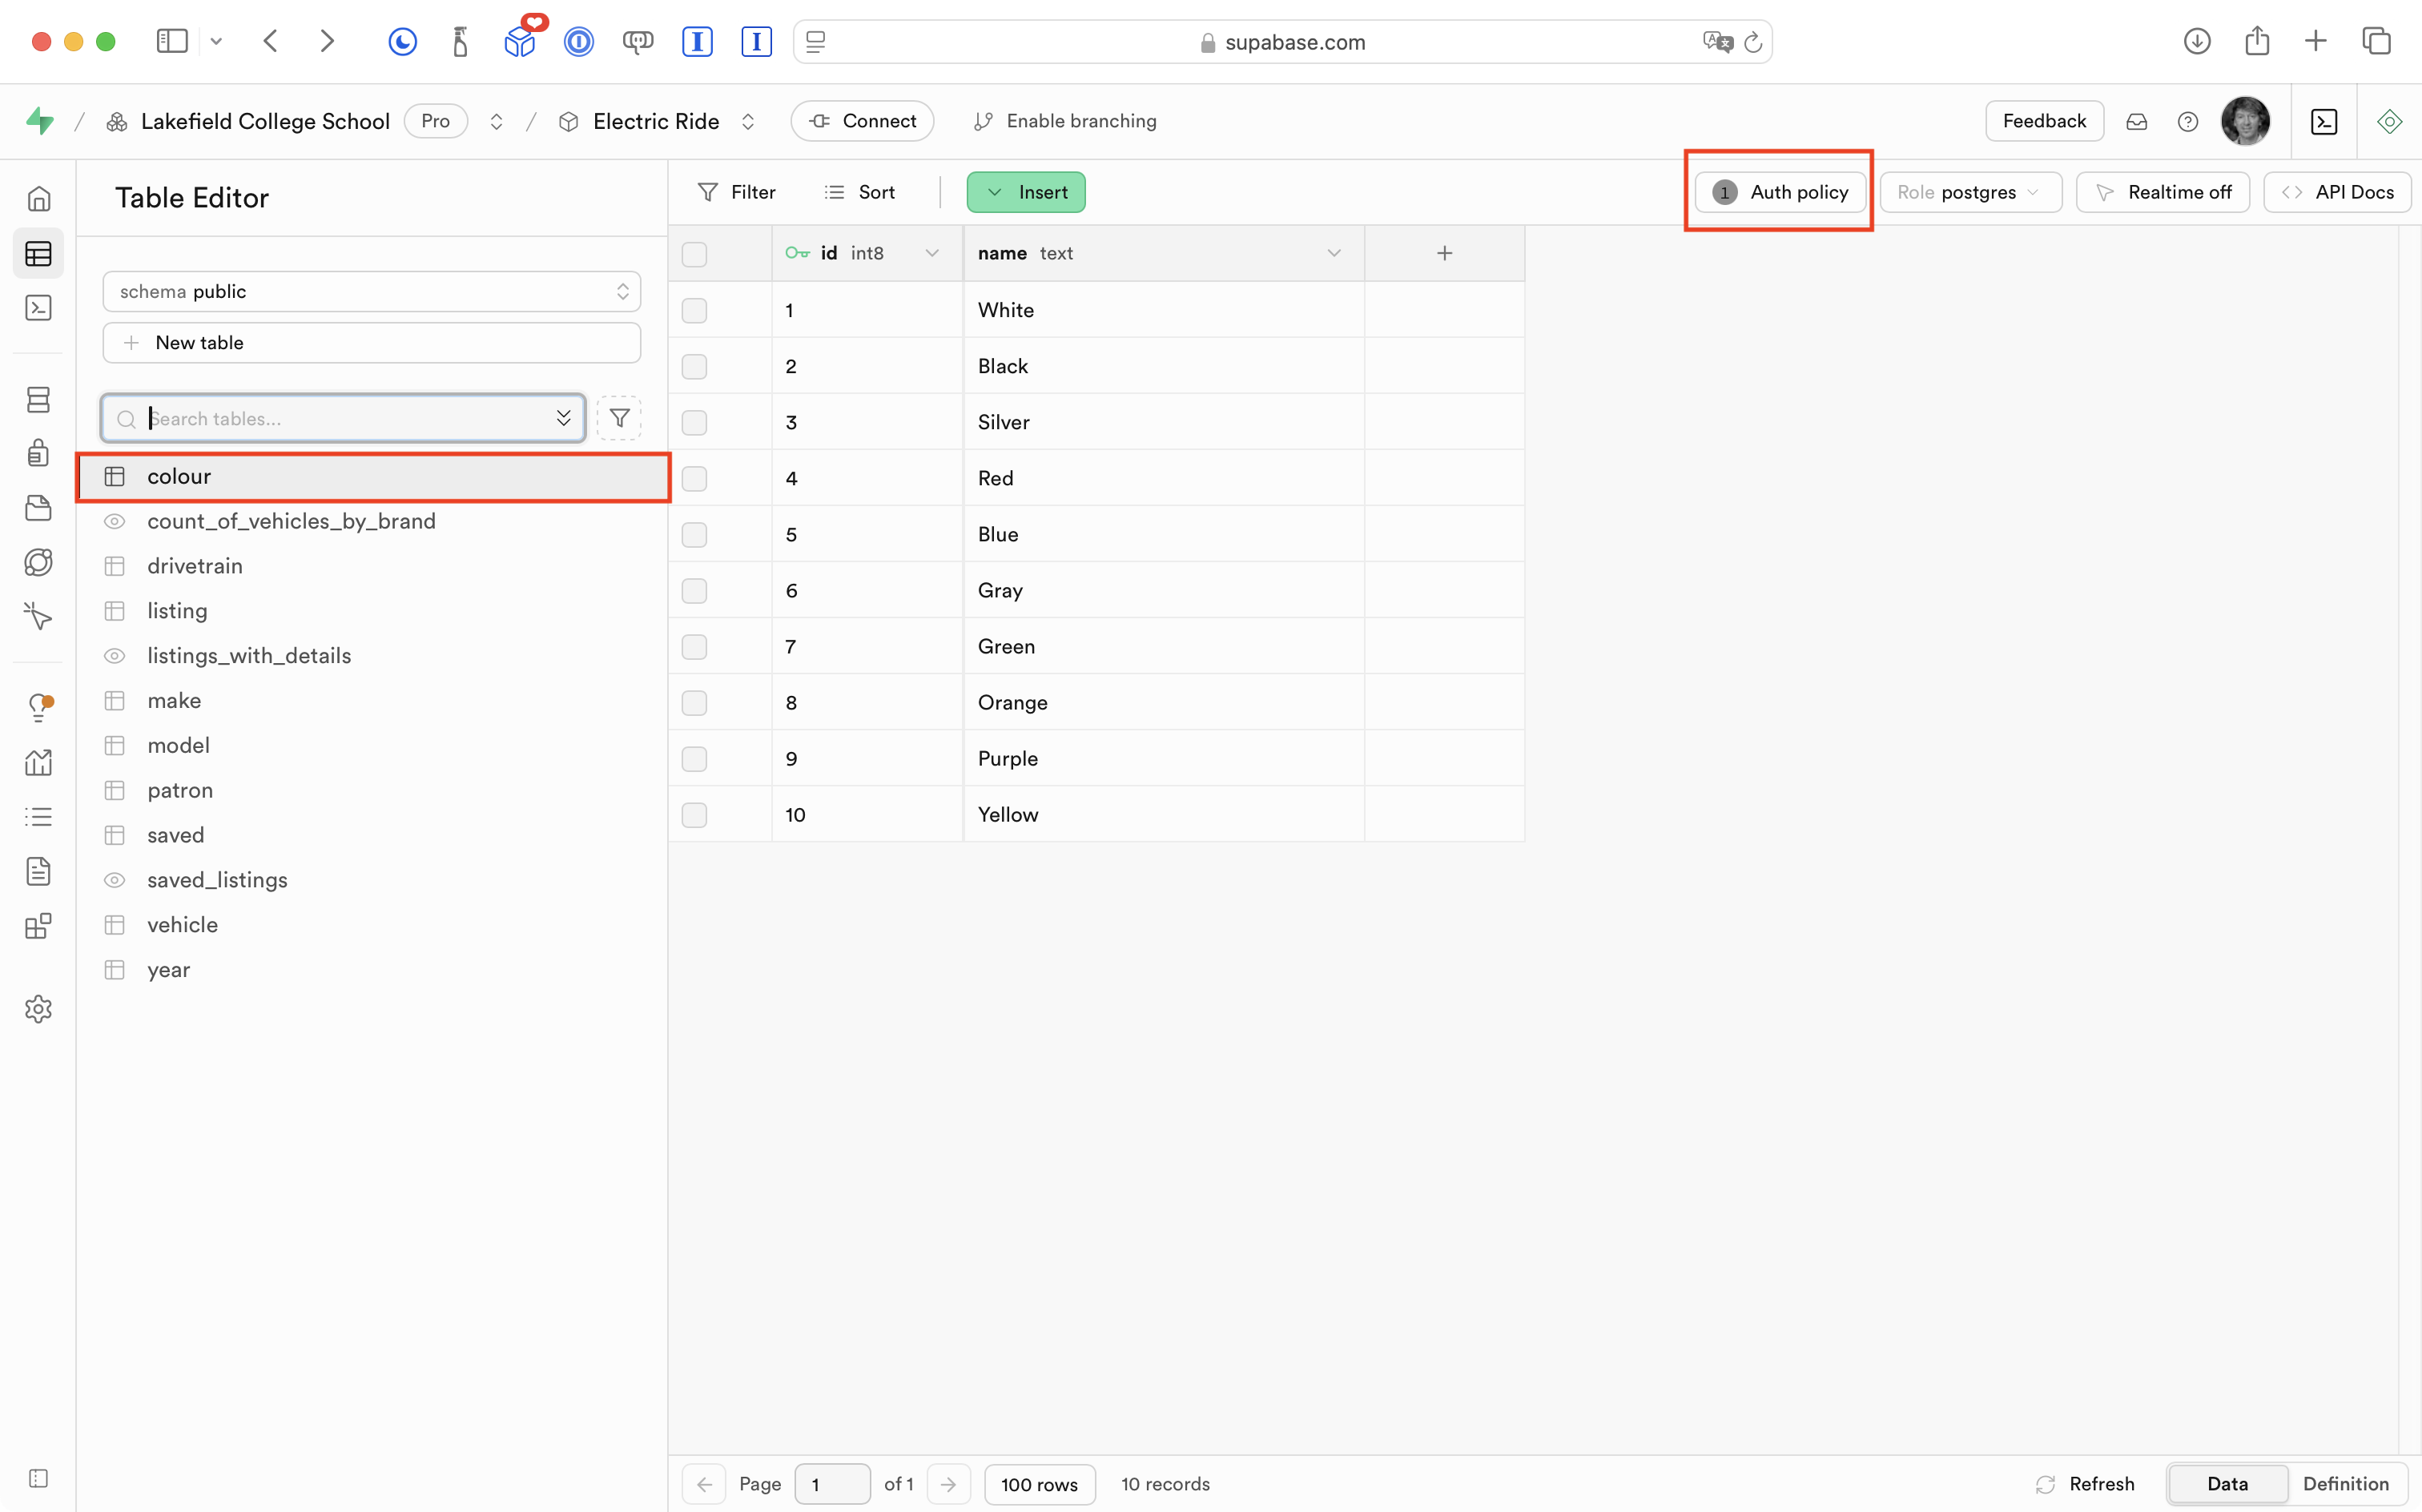
First, he clicks the button shown here for the colour table:
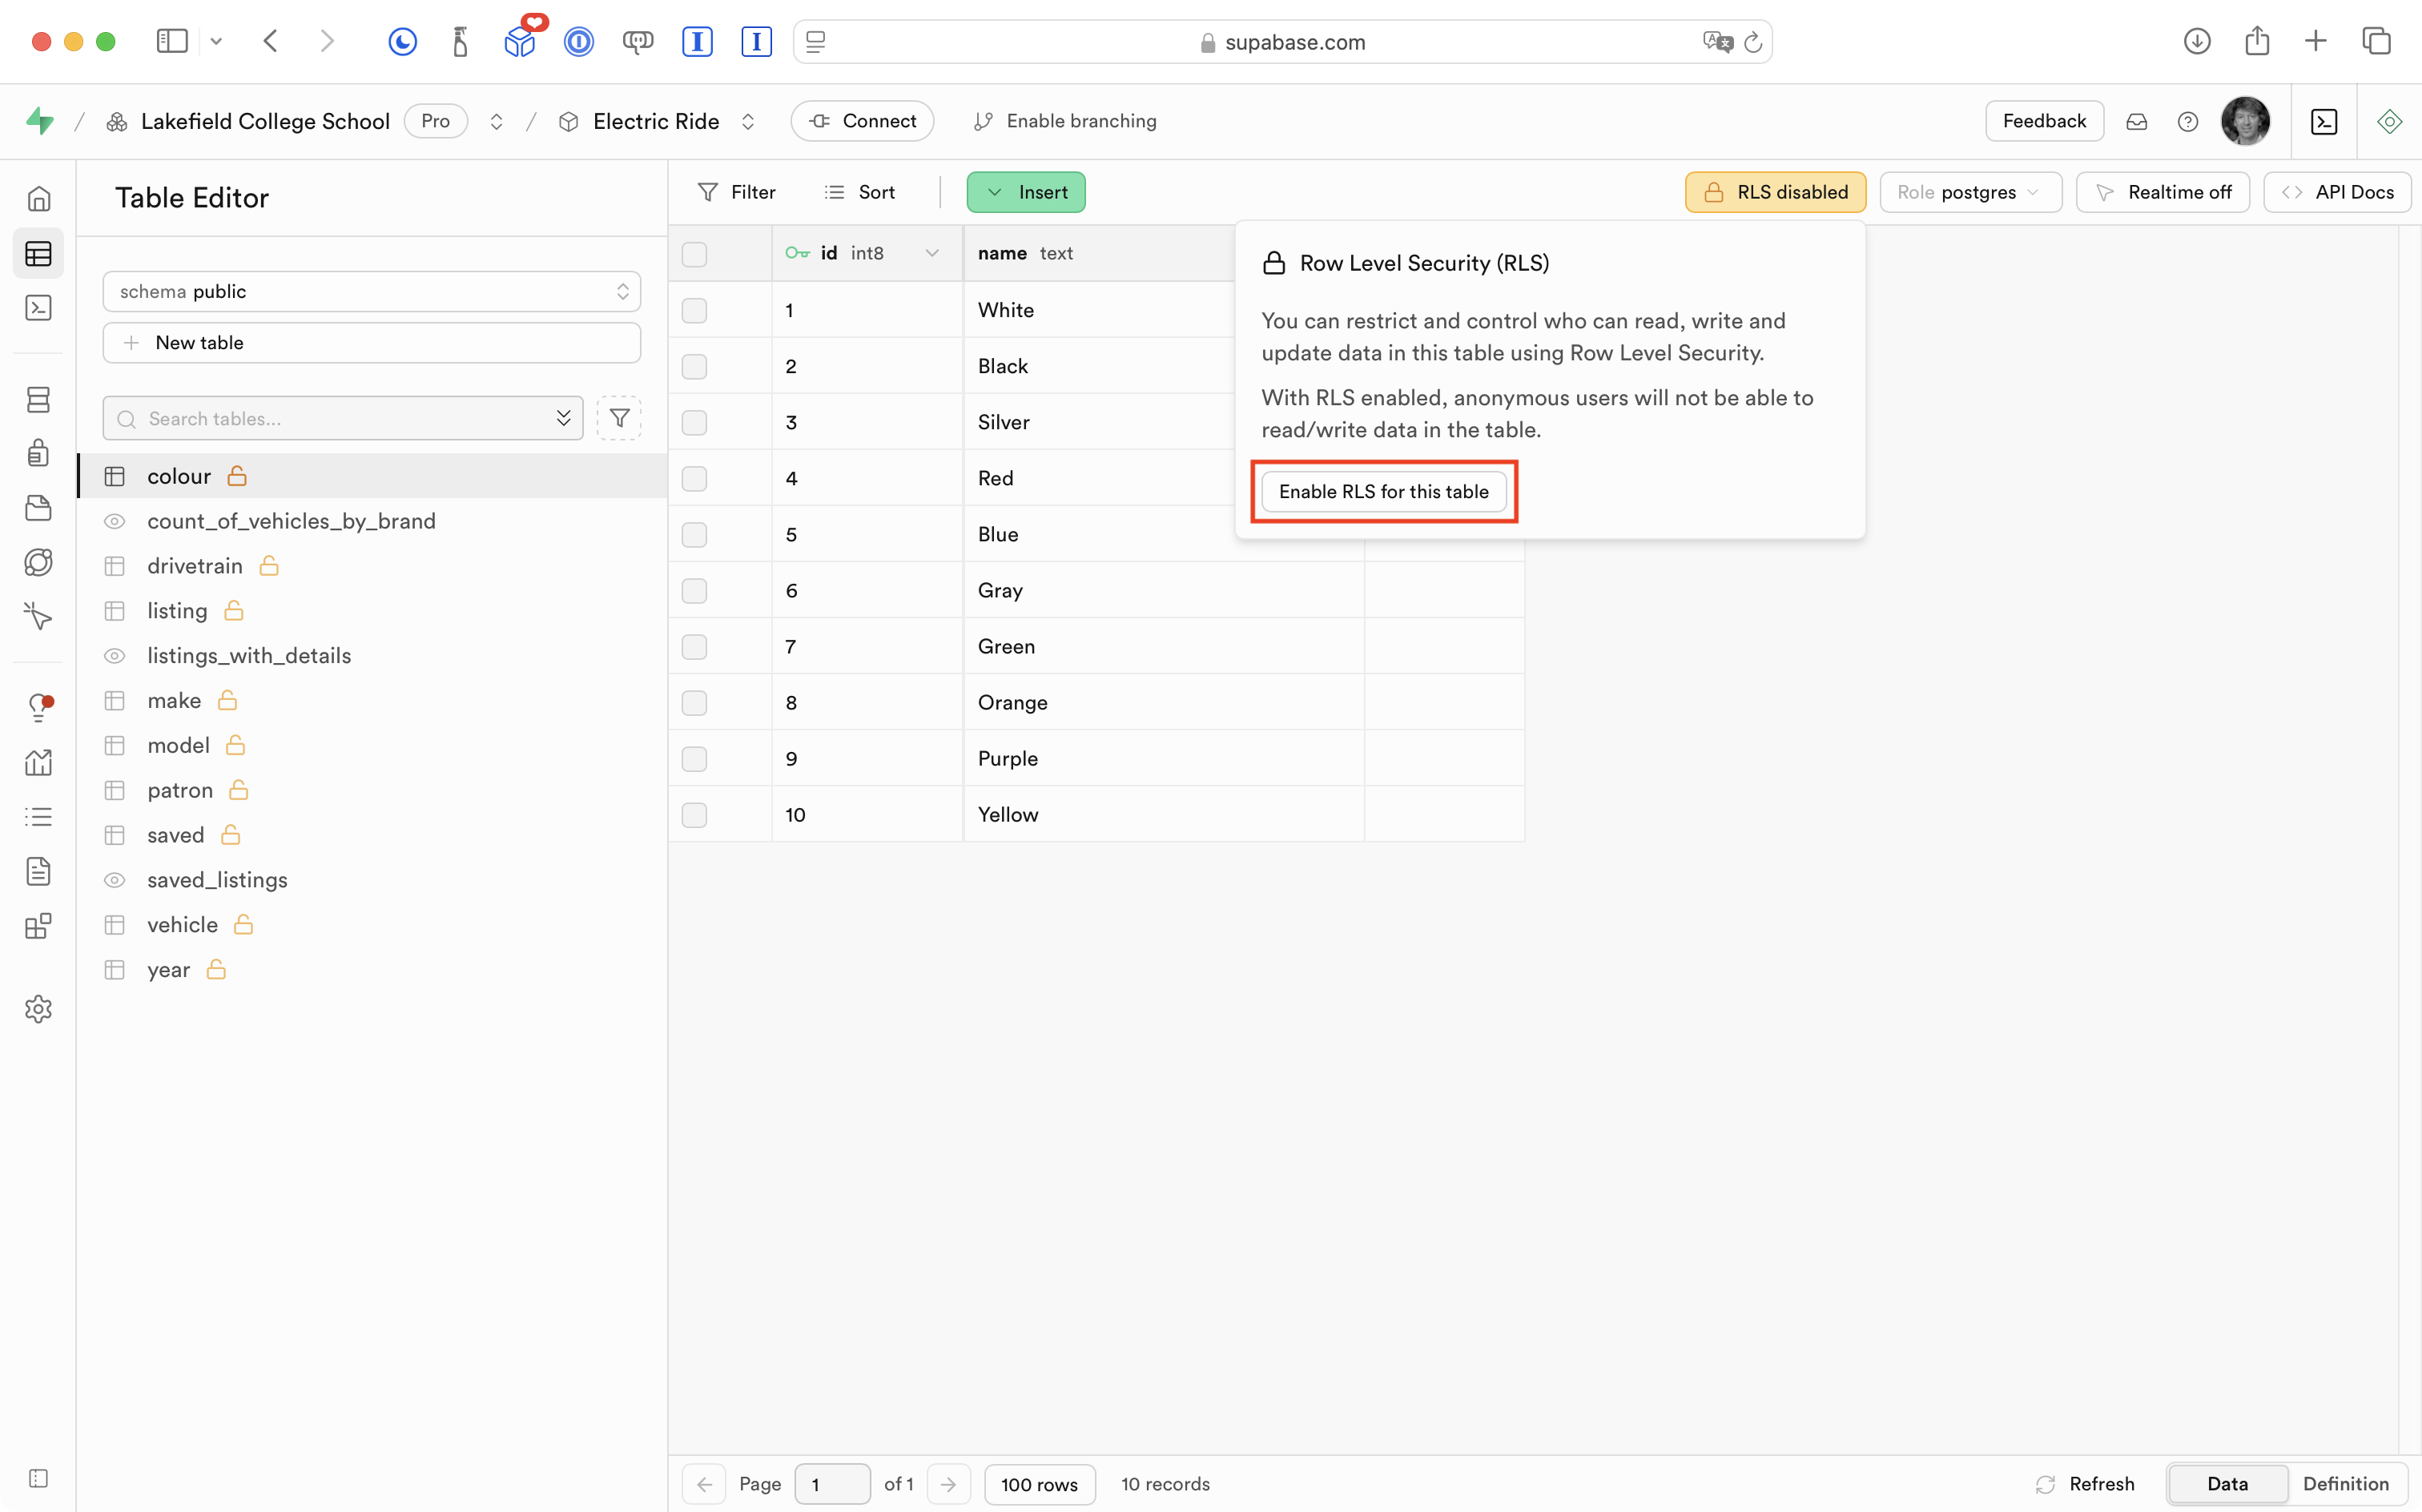
Then, he continues and presses the Enable RLS for this table button:
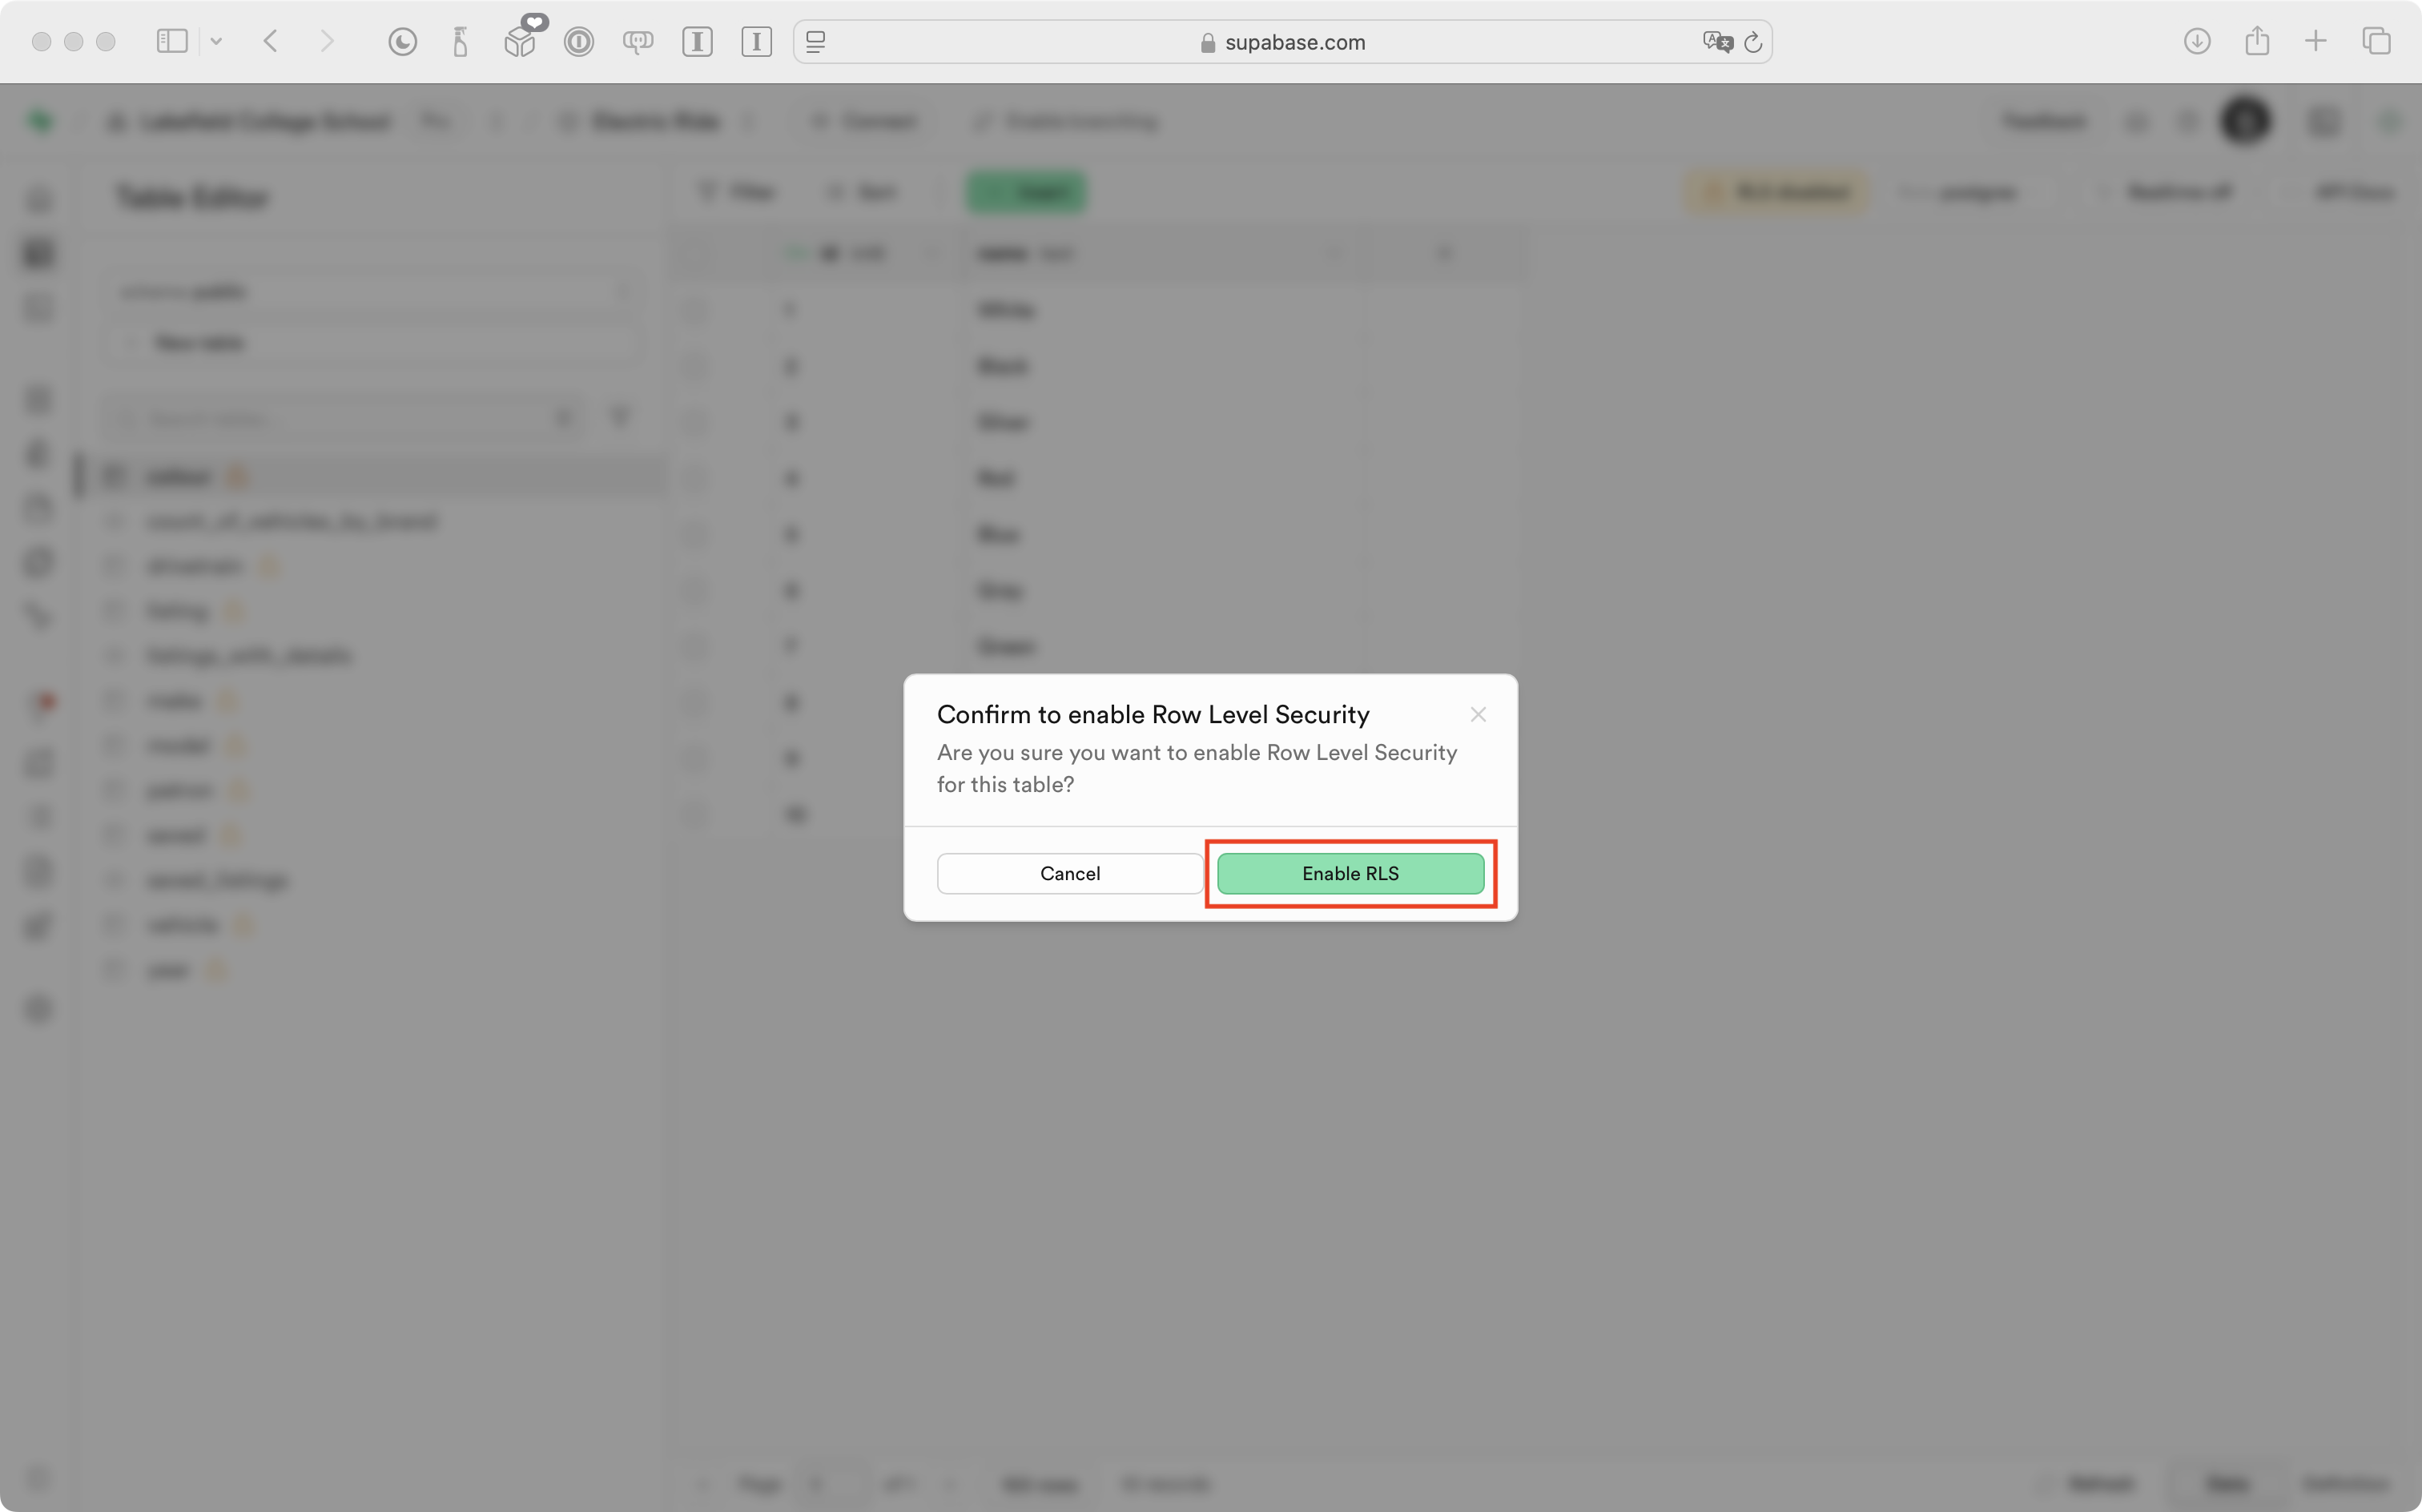
Finally, he confirms that he wants to enable RLS for the table:
After a moment, the “open lock” icon beside the colour table disappears:
TIP
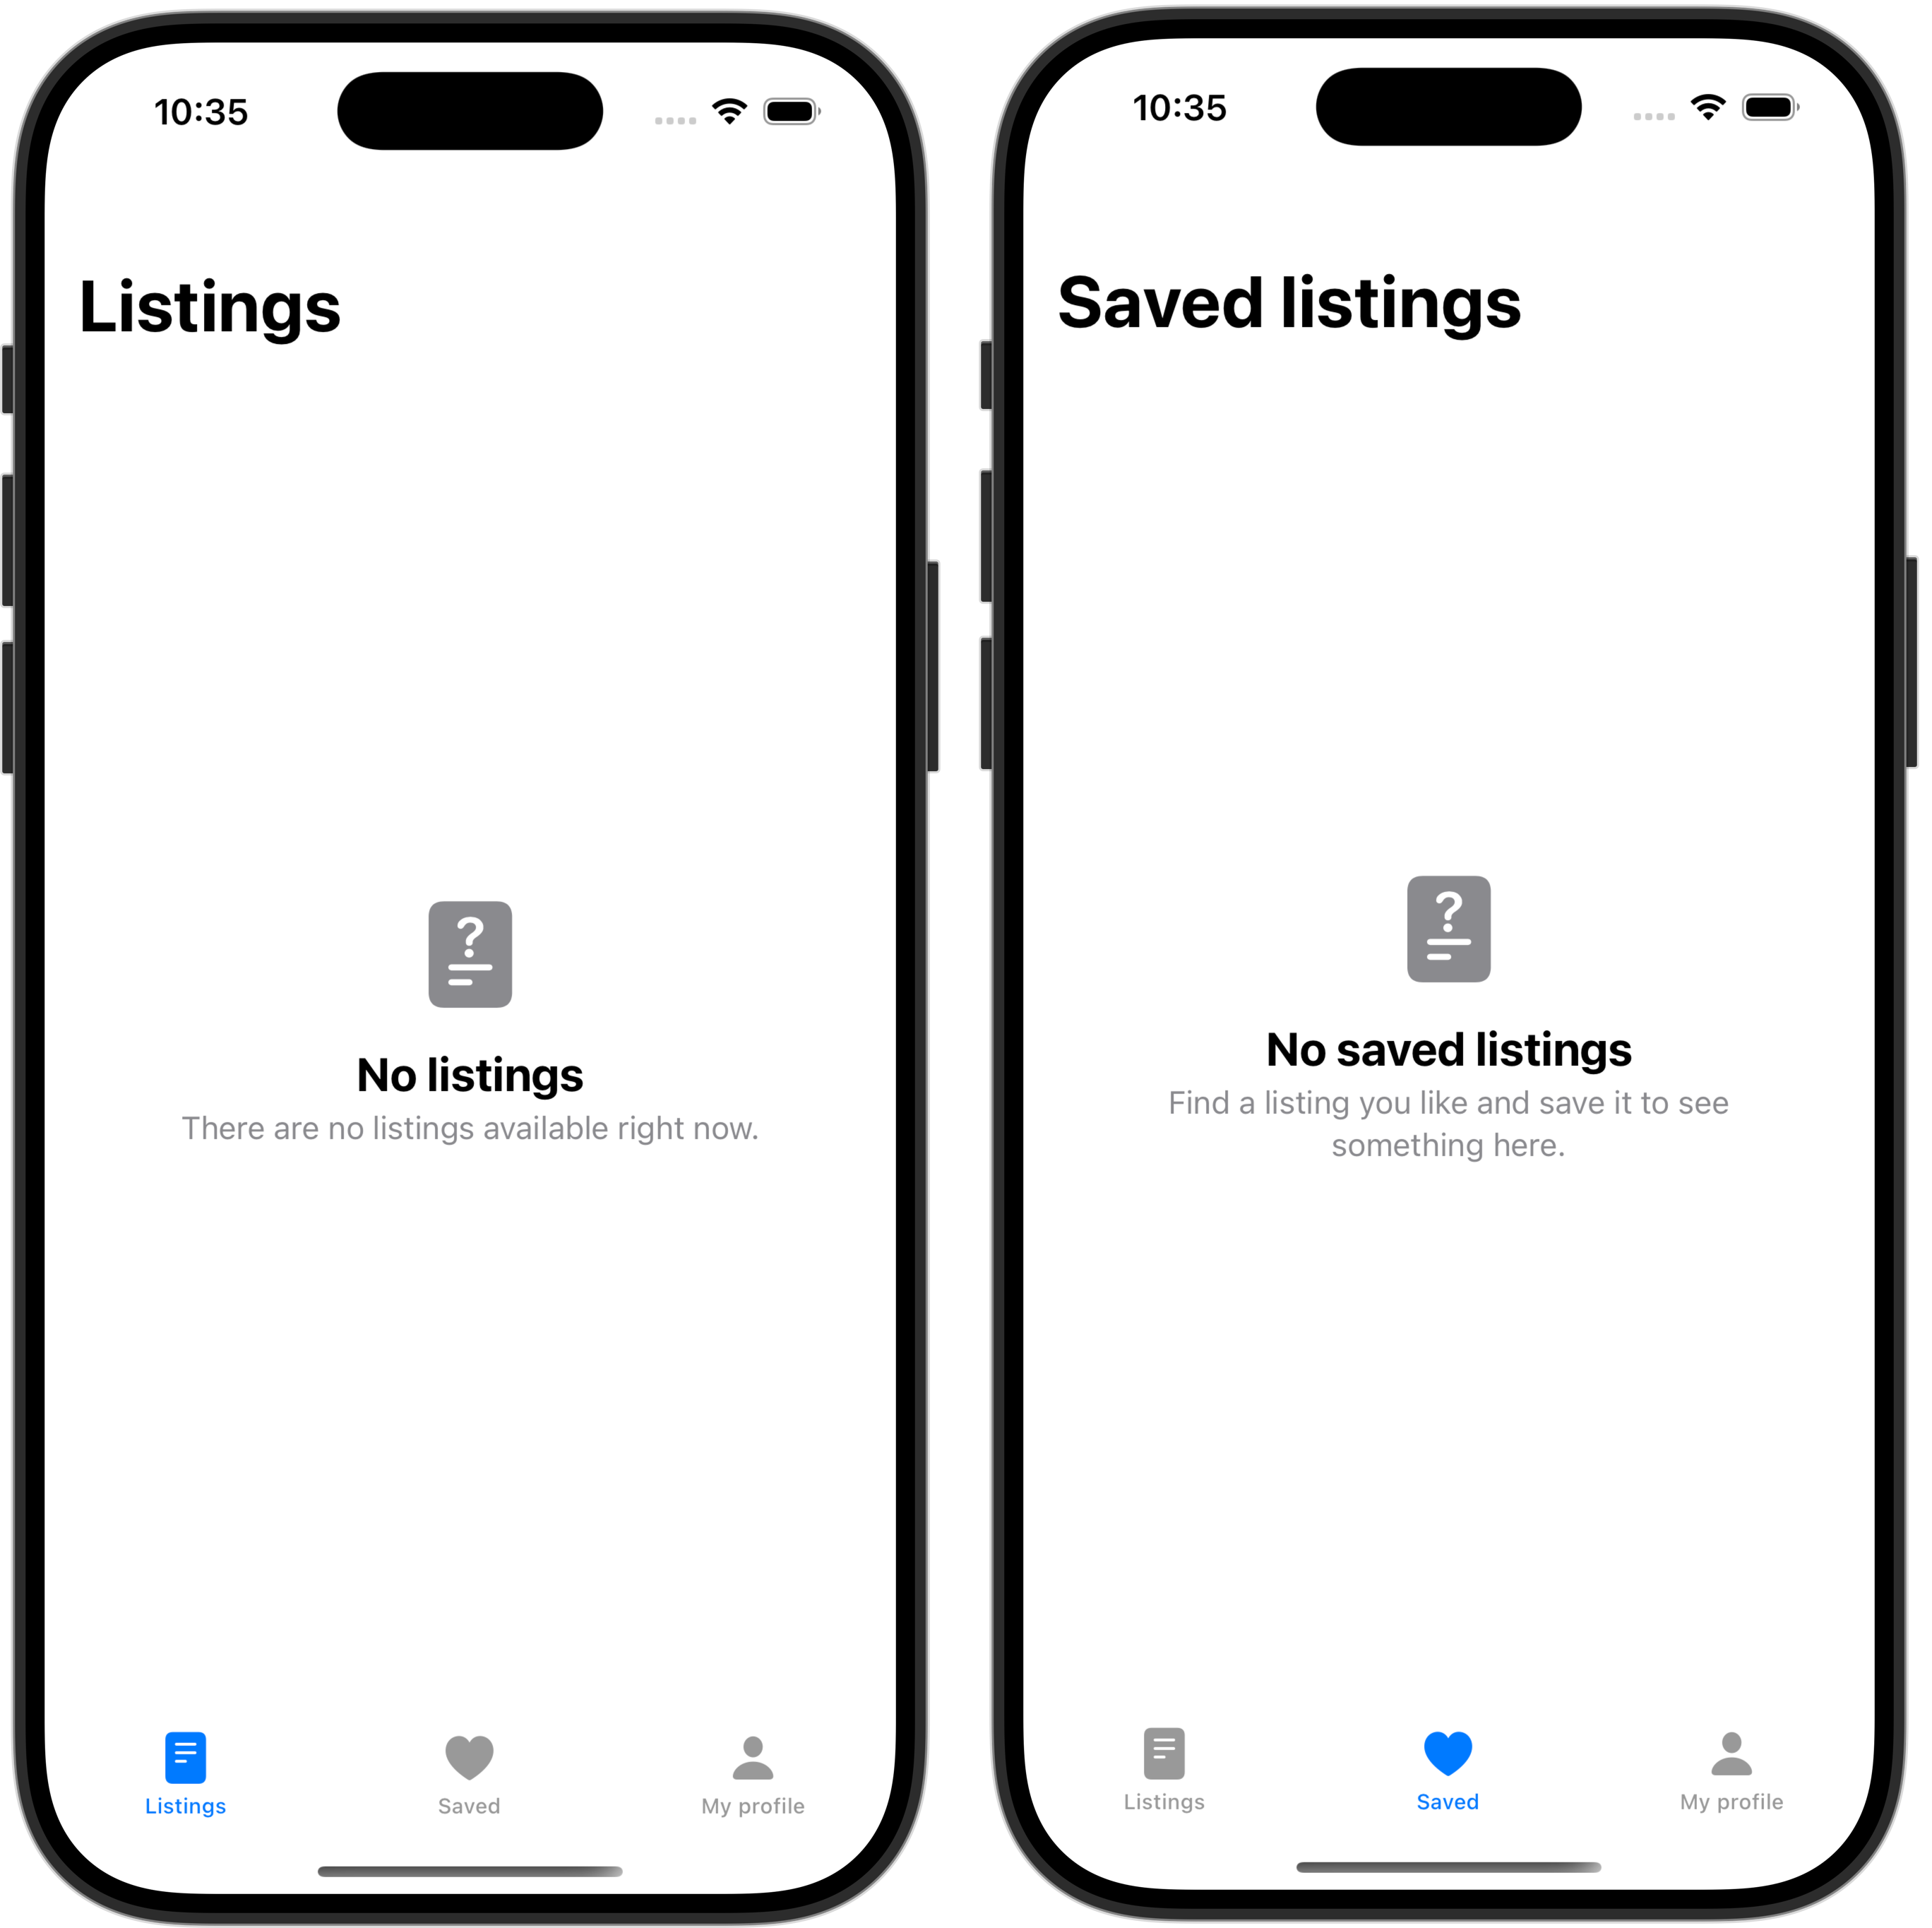
After enabling RLS on just one table – colour – in the database for Electric Ride, now, when running the app, queries that used to work no longer work – they show no data. For example, the WelcomeView screen that is supposed to show a summary of cars available by brand shows instead that there are no listings available:
Further, if a simulated sign-in is completed, it appears that no vehicle listings are available, and that no saved listings exist:
This is expected behaviour.
The data required for that screen to show its information is built upon a couple of database views that join several tables together to obtain results.
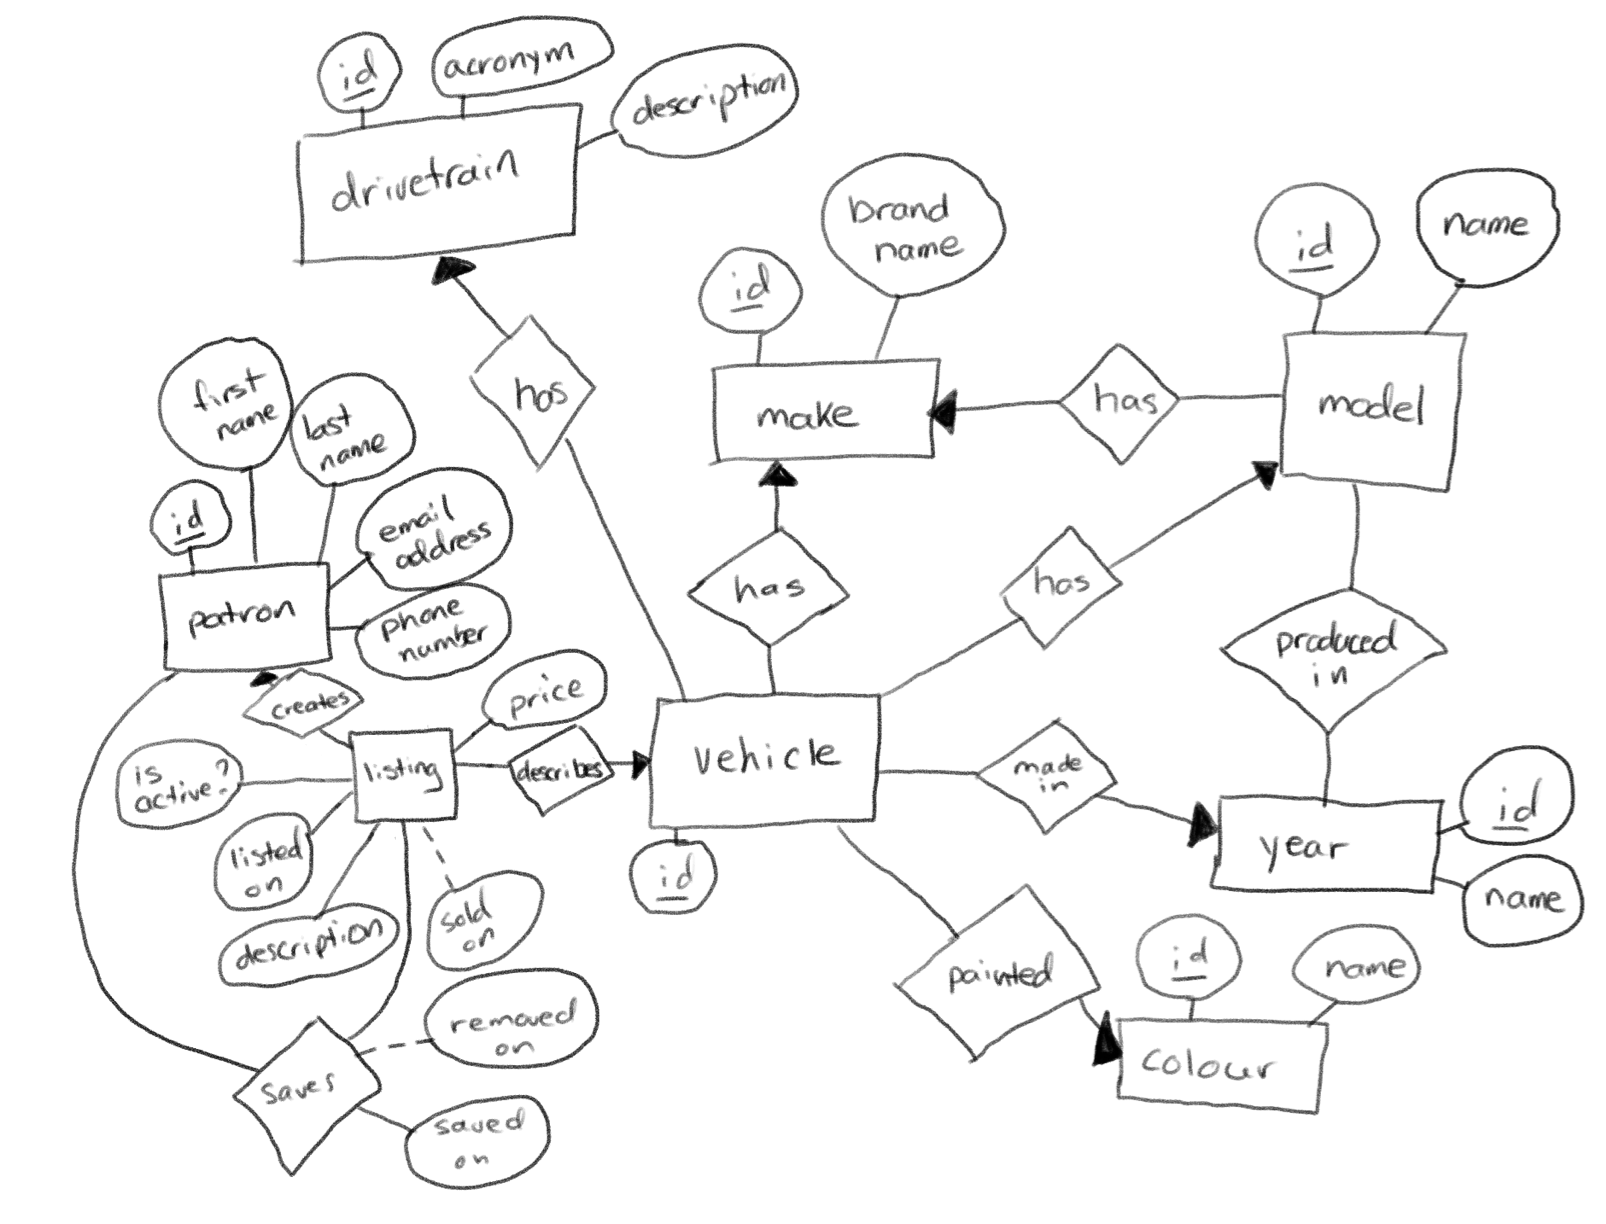
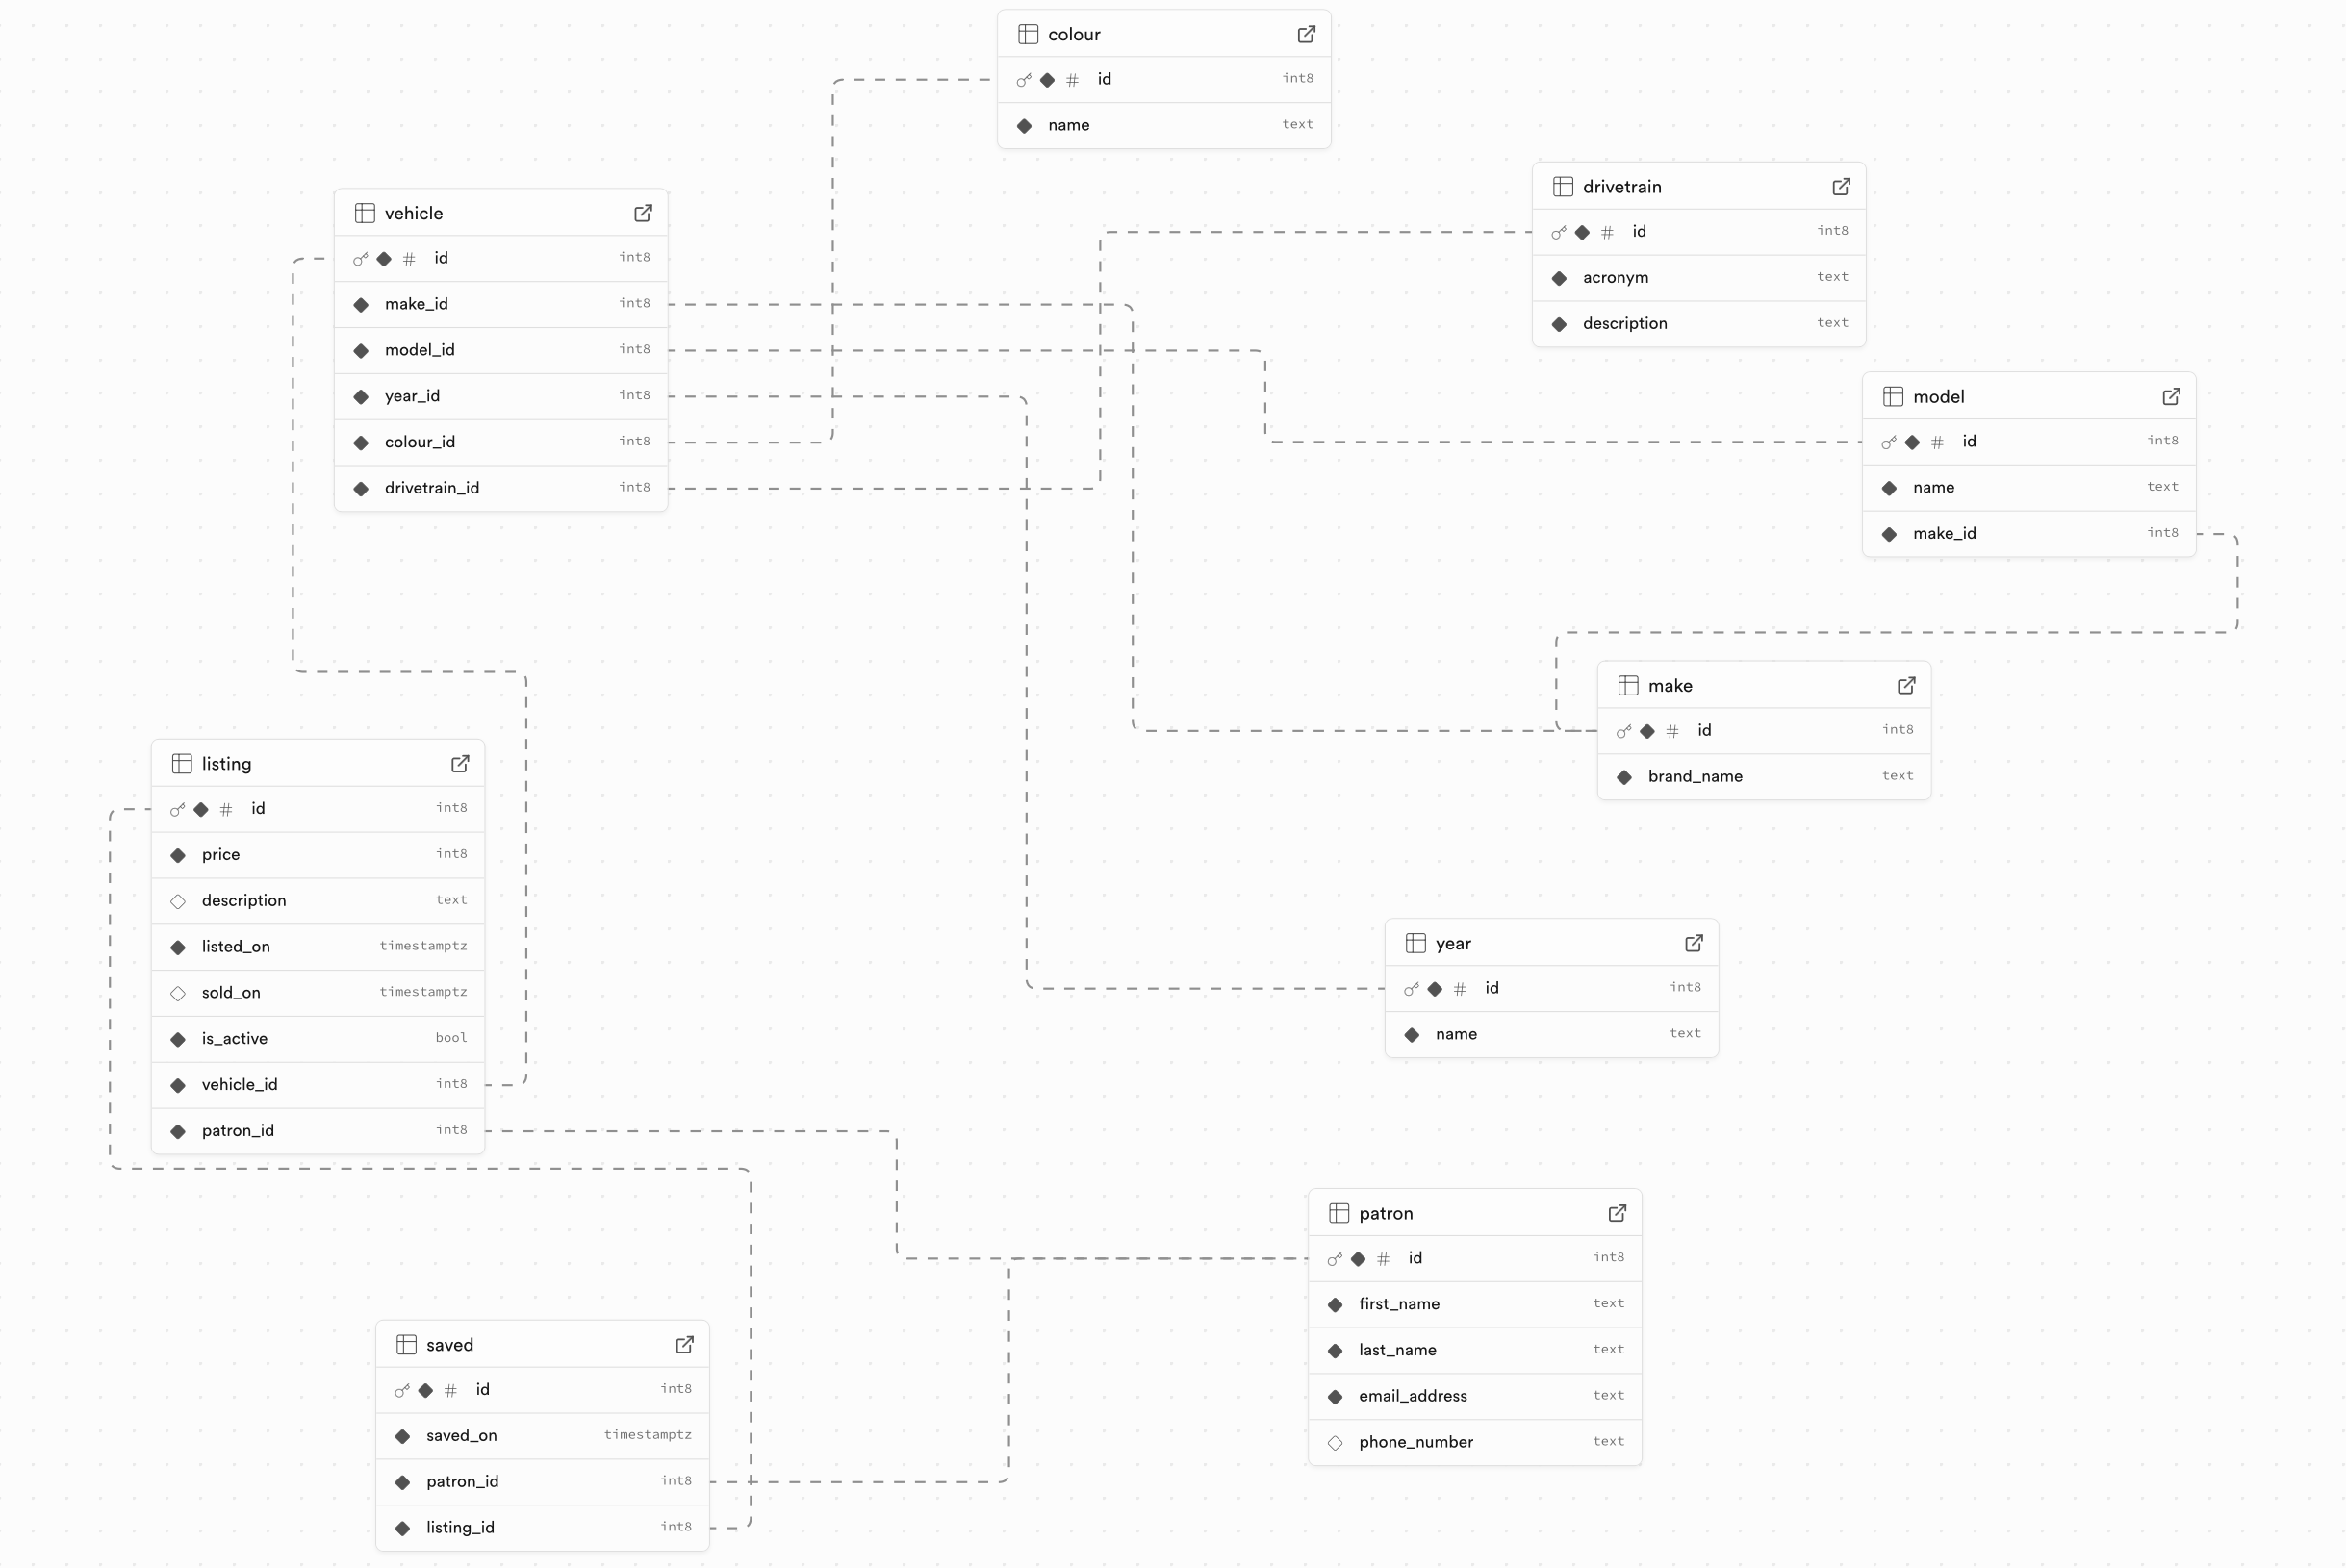
Remember, there are many entities in the entity-relationship diagram, or overall data model, for Electric Ride:
That ER diagram results in many tables that reference each other’s data based on unique identifiers (primary keys and foreign keys):
Since access to one table – colour – is now restricted – the database views that join the colour table together with other tables to show detailed listings and a summary of cars available by brand no longer work.
They will start to work again once we get authentication enabled in the app.
Mr. Gordon then enabled RLS on all the remaining tables in his database:
Note that it’s no longer even possible to use the app:
Again, this is expected behaviour.
We have locked down the database by enabling row-level security, but we have not yet:
defined RLS policies (which let us control when a user can see a given table, based on whether they are authenticated – whether they have signed in yet, or not)
added the ability to authenticate using Sign in with Google
Define RLS policies
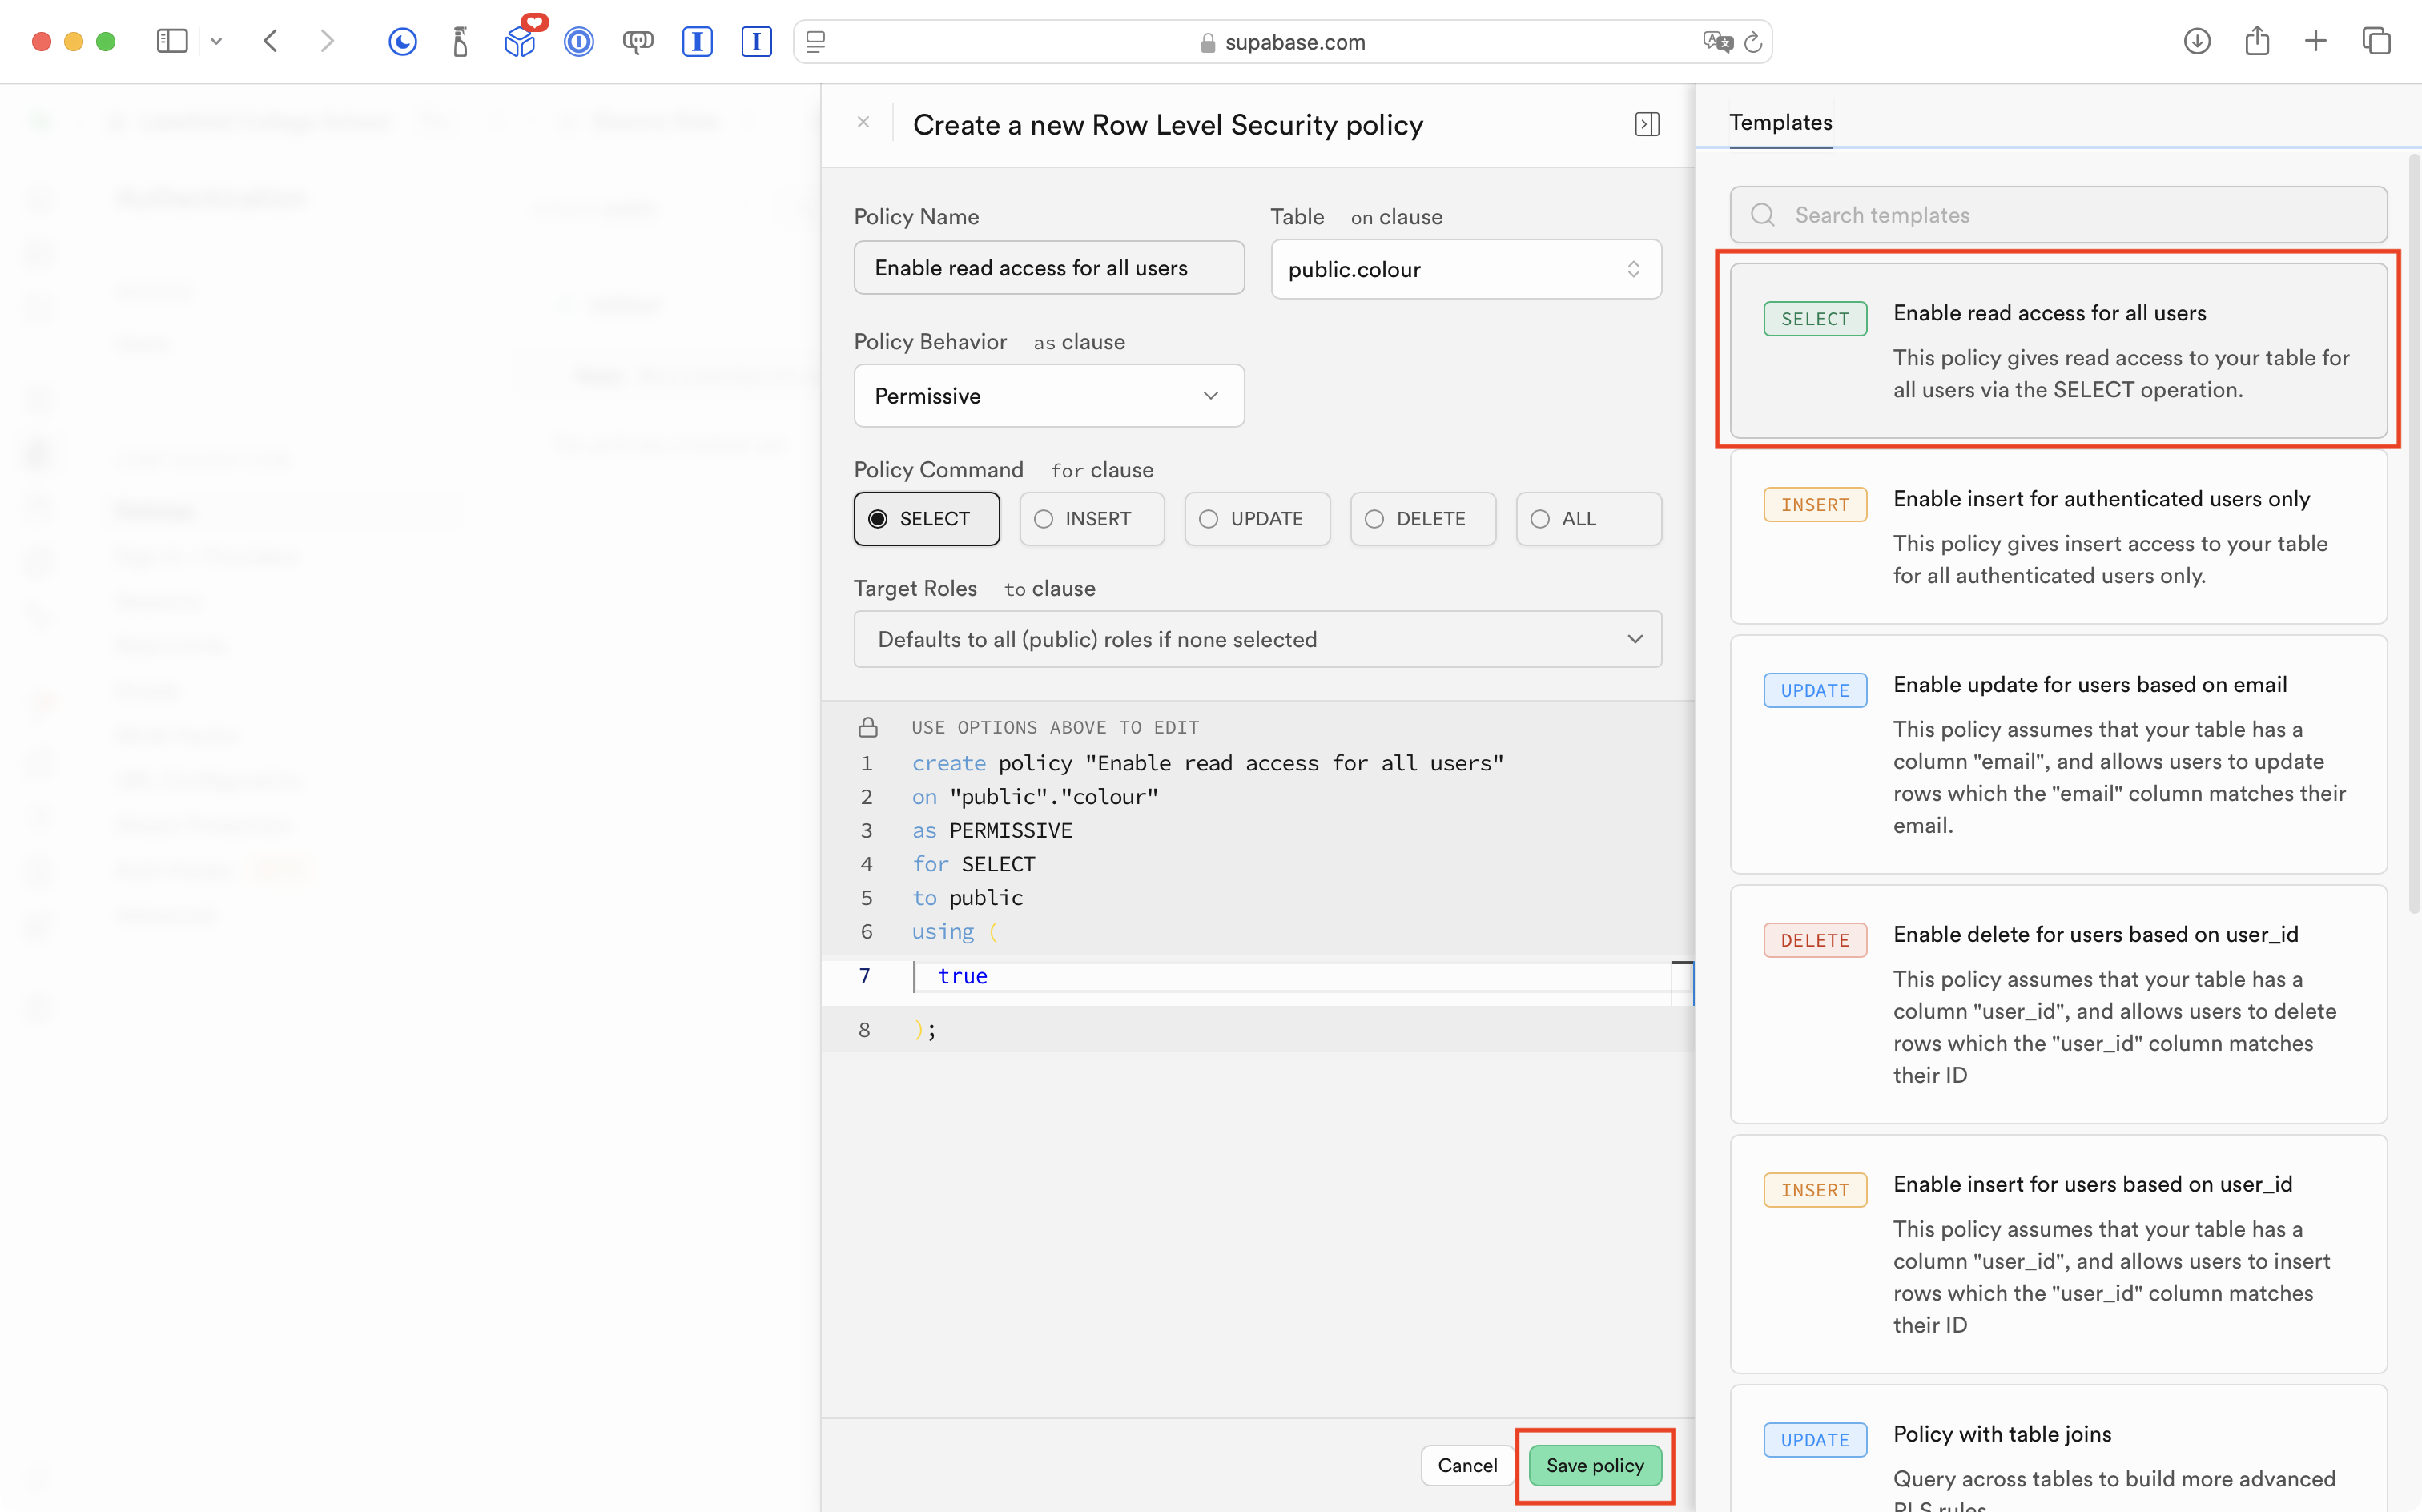
To understand how RLS policies work, let’s first enable read-only access for all users on each table.
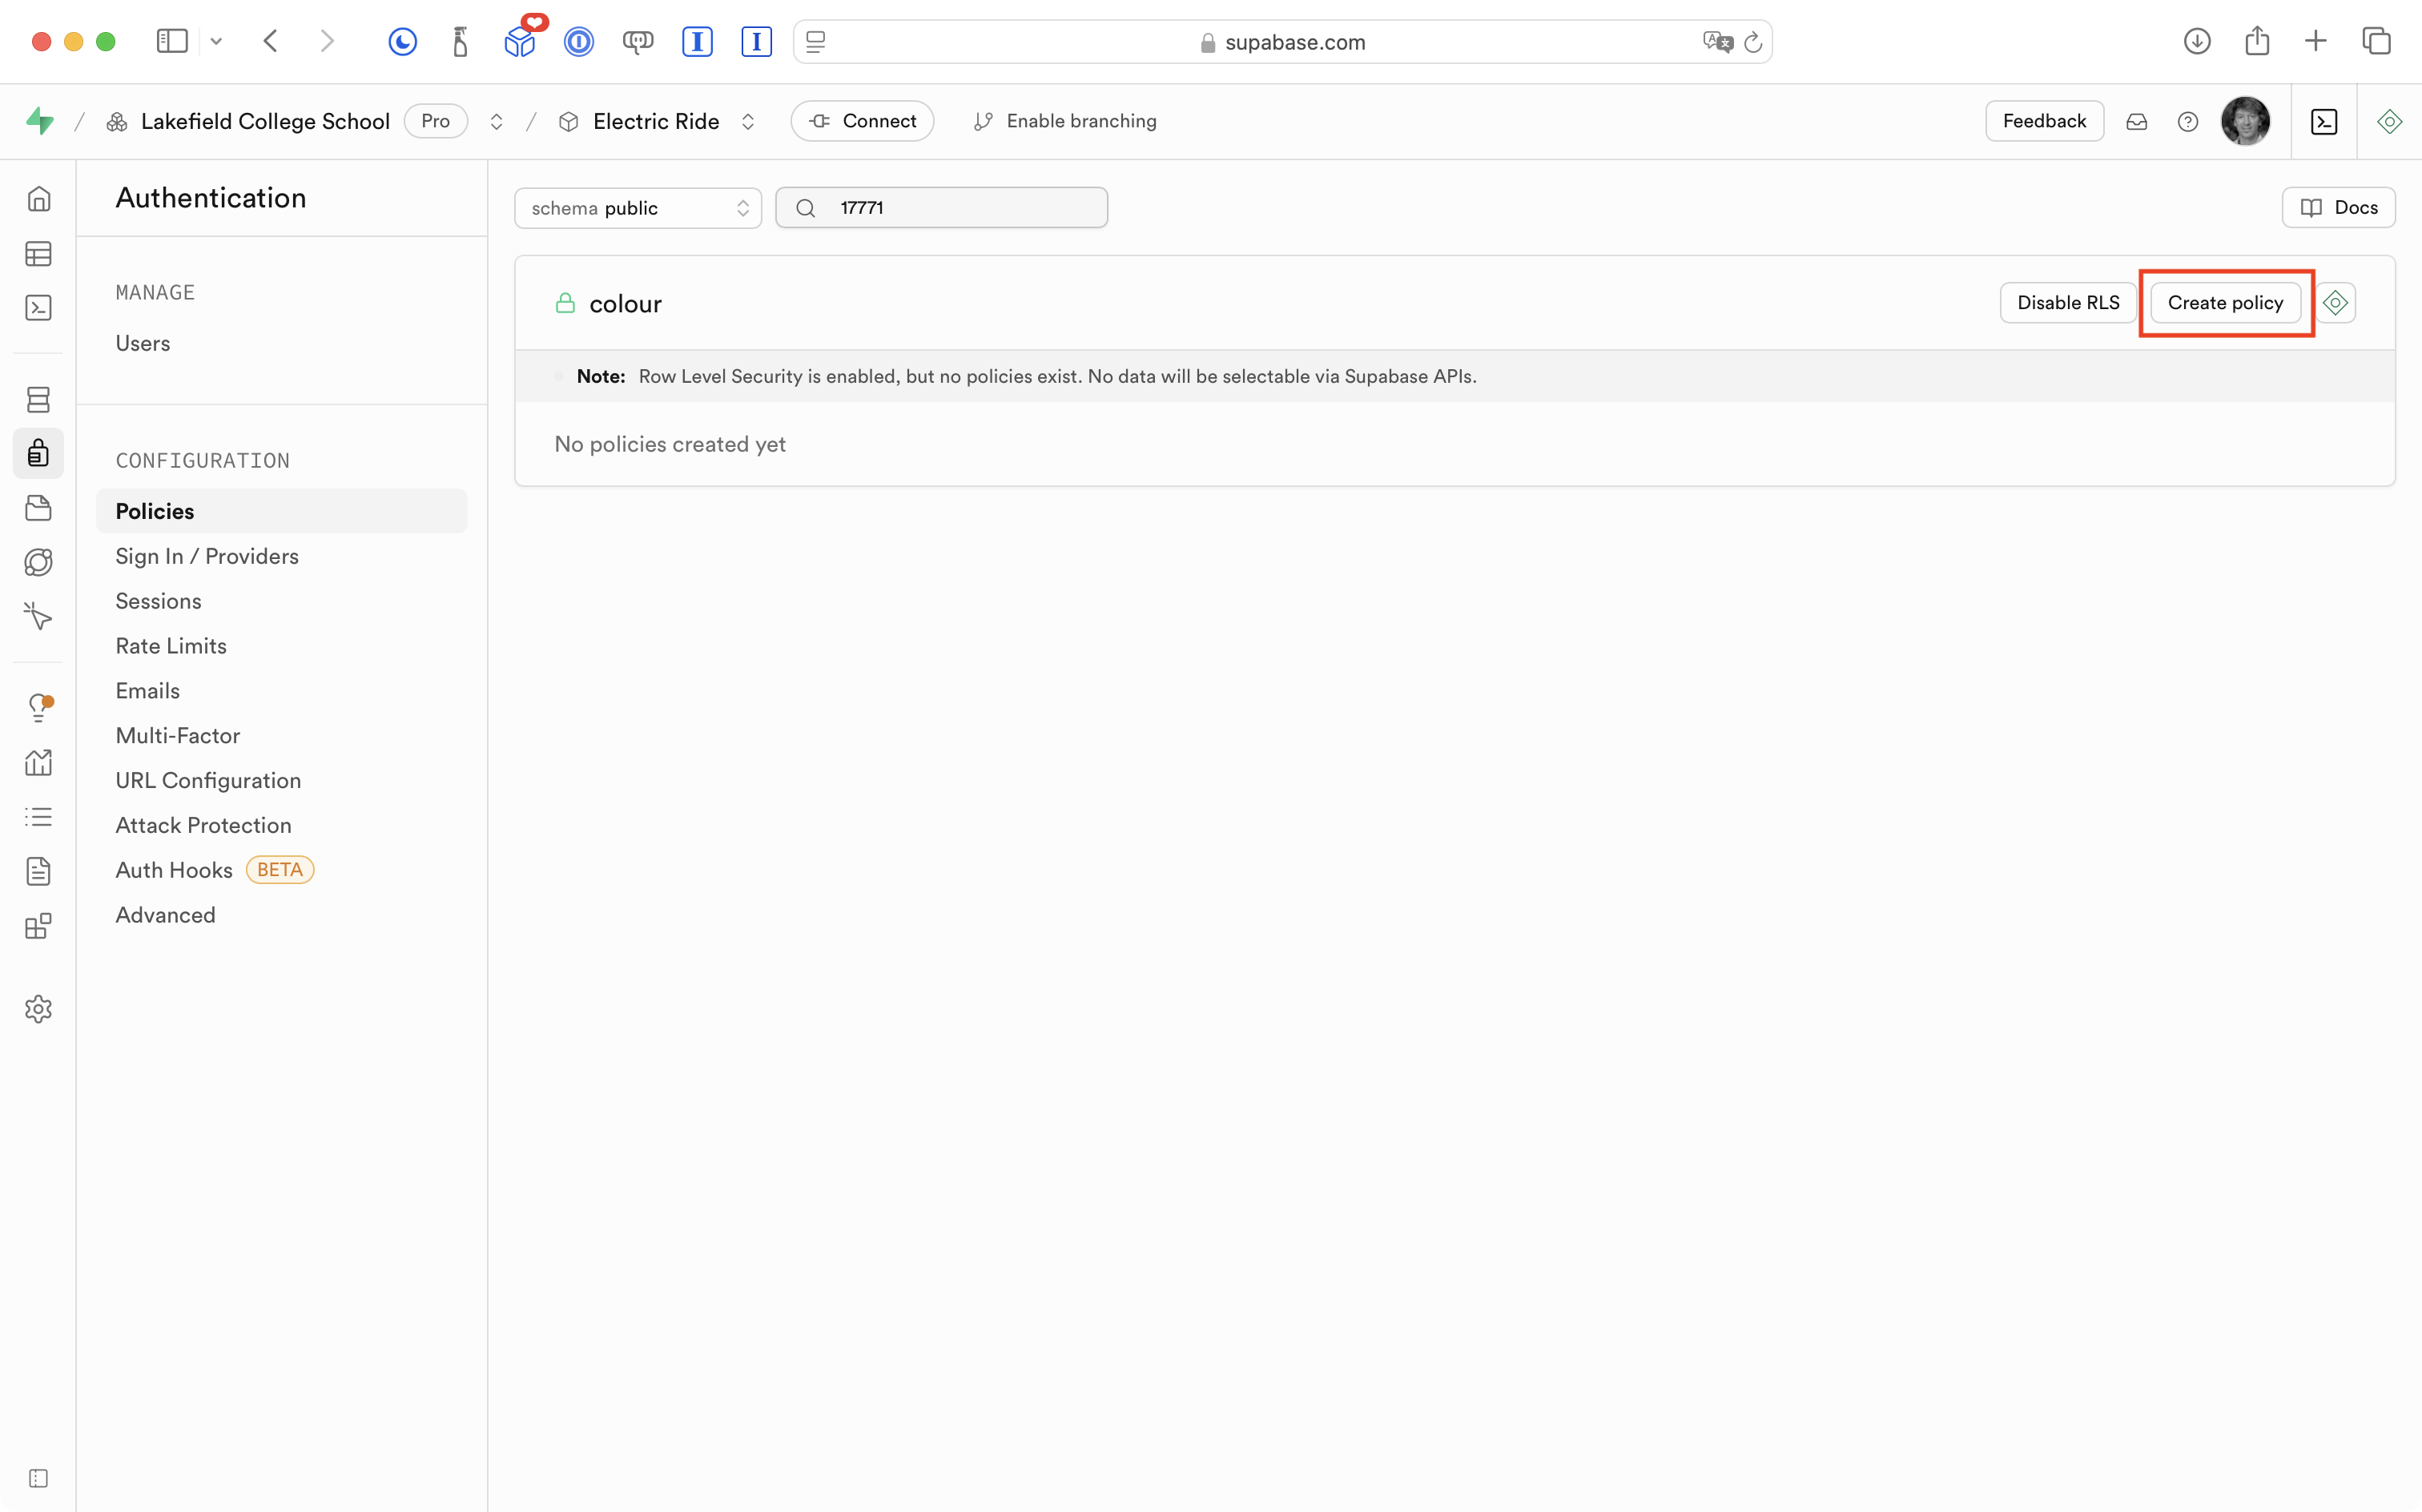
Starting with the colour table, Mr. Gordon can do this by pressing the Add RLS policy button:
On the next screen, he presses the Create policy button:
Supabase provides a variety of pre-set policies that will meet most of our needs. For now, Mr. Gordon chooses the Enable read access for all users option then presses the Save policy button:
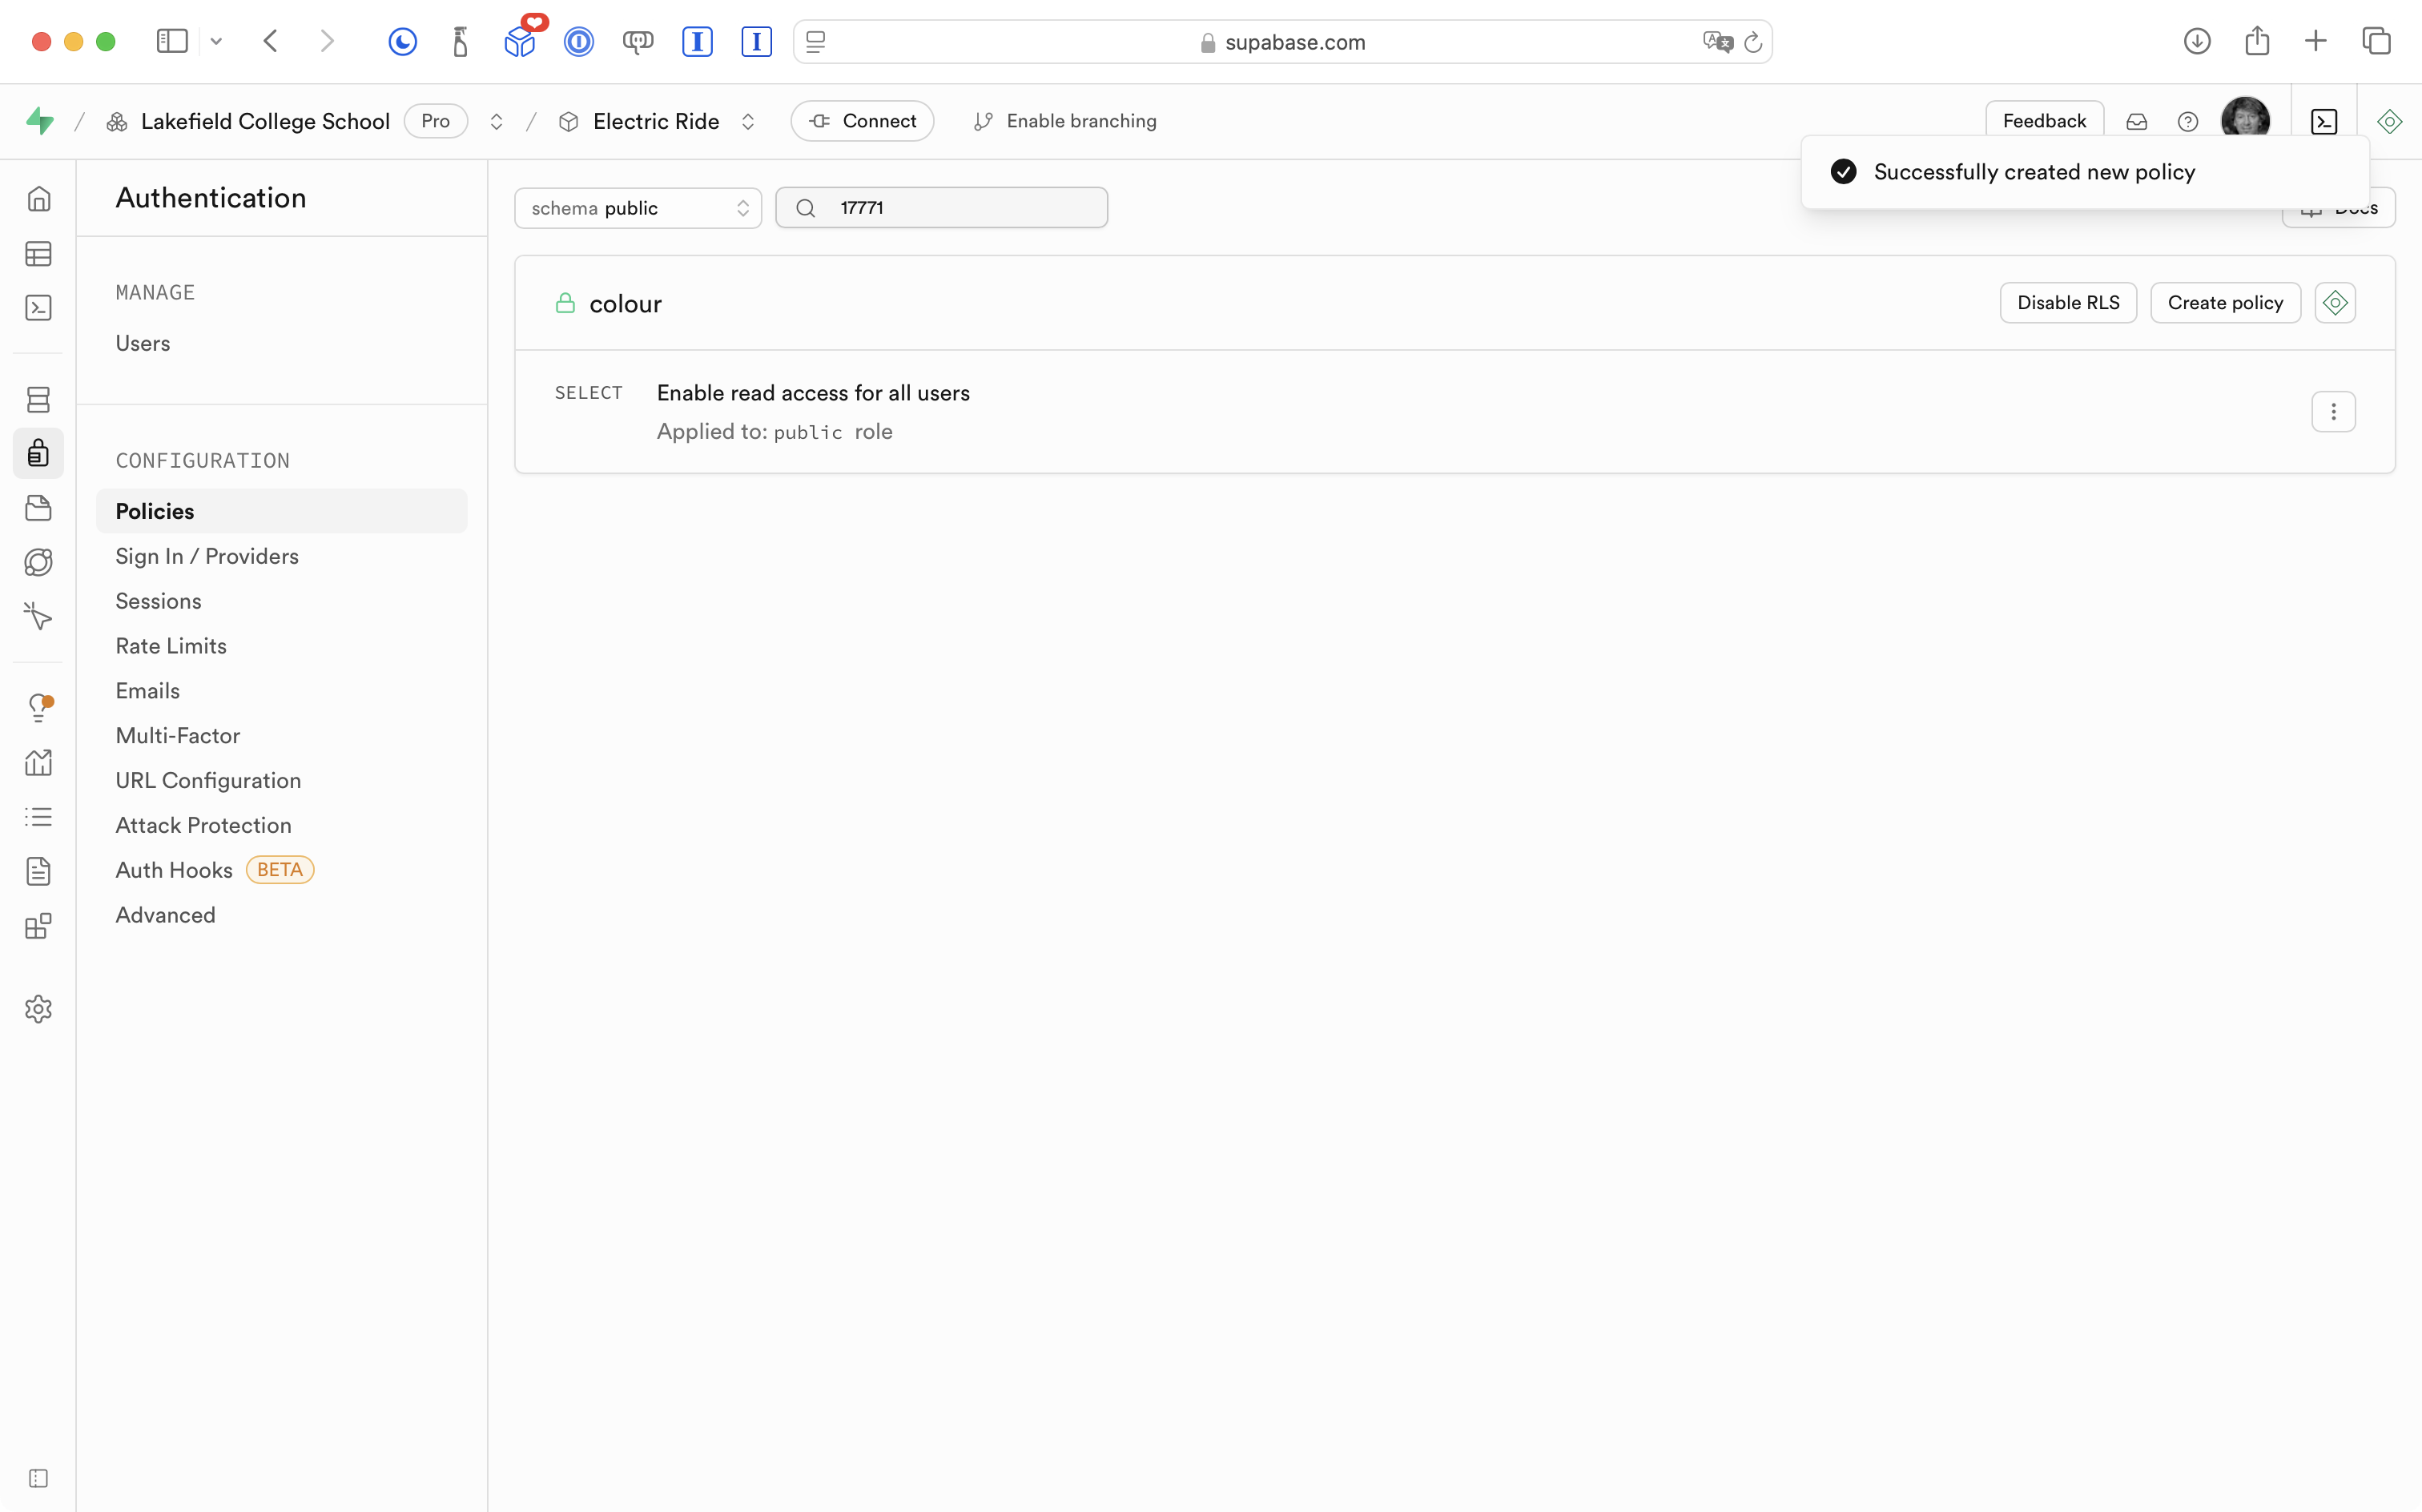
After a moment, he sees this screen indicating the policy was created:
Mr. Gordon has enabled read-only access to just the colour table in his database.
Back on the Table Editor page, Mr. Gordon can verify that the colour table does have an RLS policy defined:
He then repeats that process – enabling a read-only access policy for all (public) users – for all of the remaining tables in his database.
What this means is that the app now functions again as before – mostly:
In that very brief video, we are now able to see (read) information again.
However, when a user tries to save a listing, in Xcode (behind the Simulator) we see a message from Supabase indicating that information could not be saved:
We can read information from the database because we allowed this for public (non-authenticated) users on all tables in the database:
We cannot write (save a listing) to the saved table because we set up the RLS policy to be read-only.
Of course, the way the RLS policies have been defined so far is not what we want.
Right now, public users (users who are not authenticated) can again read information from the database.
For the most part, we want to restrict the ability to read data to users who are authenticated (have signed in).
However, what we have now is still an improvement over not having row-level-security defined at all. At this point, even if someone had our database URL and API key – they can now no longer delete or create data.
Refine RLS policies
It’s really important to grasp how RLS policies work before enabling authentication within your app.
So let’s examine this a bit further.
Read/write for public roles
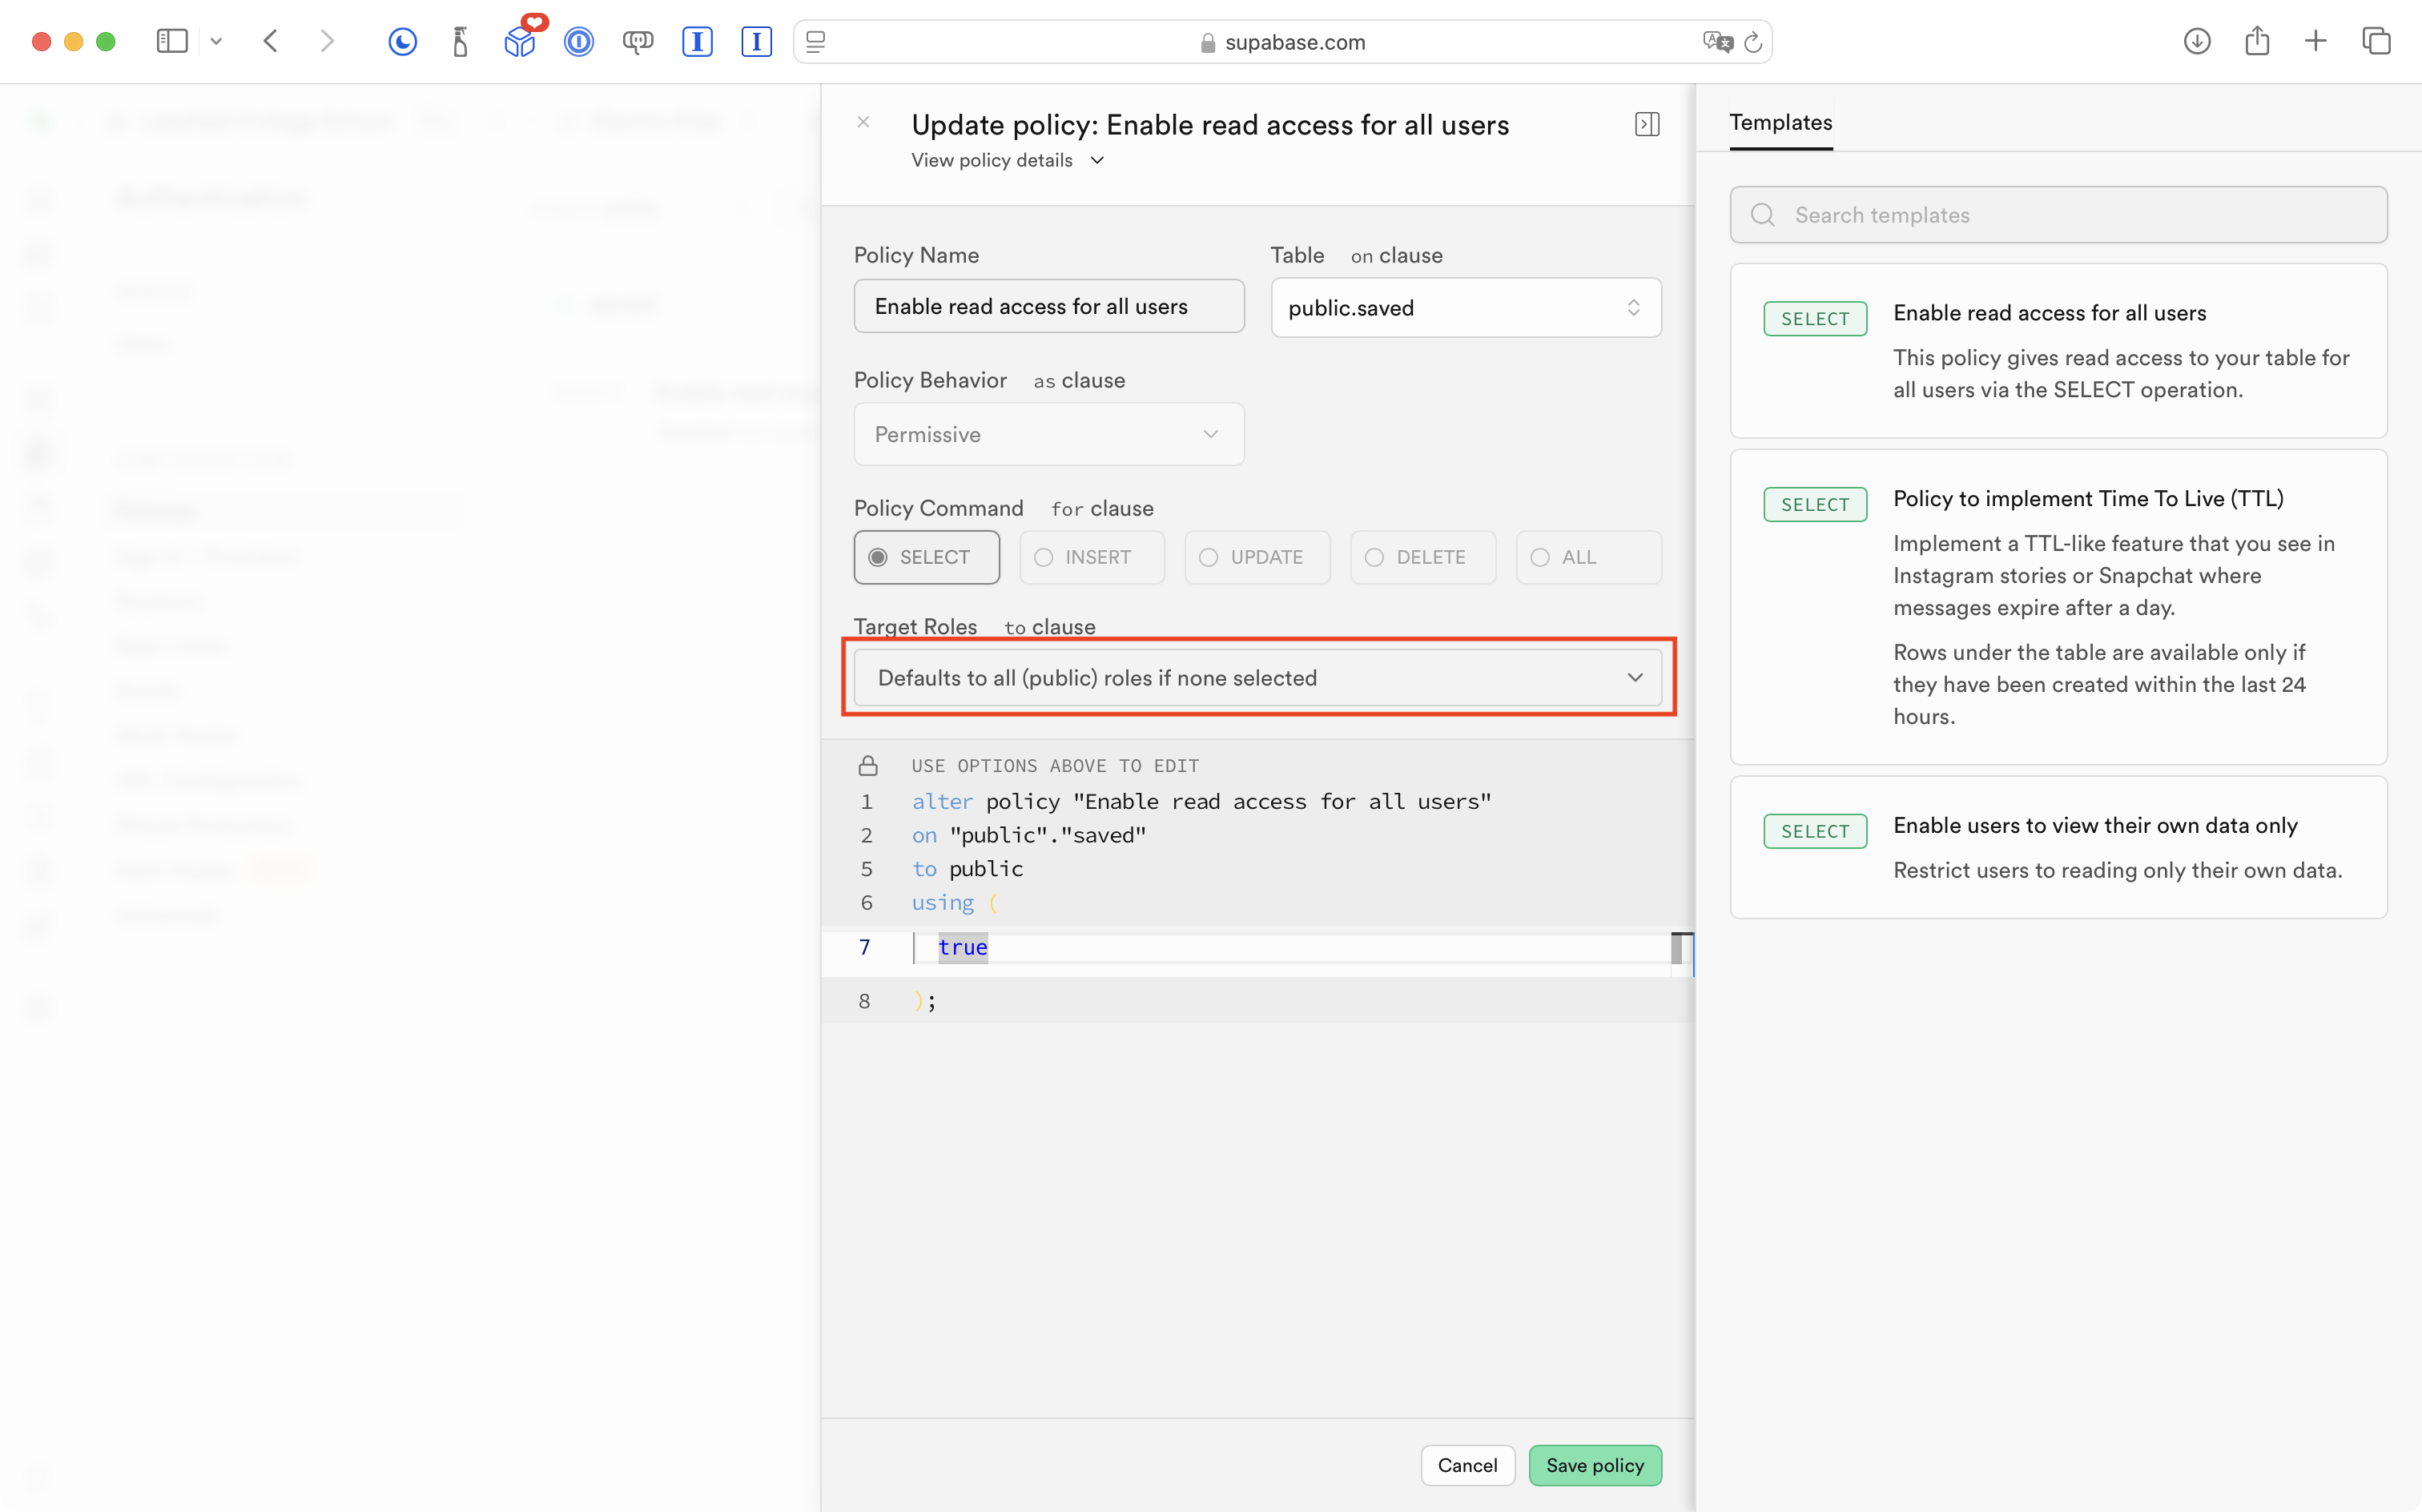
Mr. Gordon deleted the existing RLS policy for the saved table which tracks listings that users have saved for future reference.
He then created a new policy that allows all row-level operations:
SELECT
INSERT
UPDATE
DELETE
… to users who are not authenticated – public users:
This means the app “works” again:
… but it is still not what we want.
We’ve restricted access to most tables so that it is read-only, and made it possible for non-authenticated users to add (insert) data into the saved table.
Of course, what we really need is for all of these policies to apply not to non-authenticated users, but to instead apply to authenticated users.
Put another way, users shouldn’t be able to see much of anything in this app until they have signed in.
Restrict to authenticated roles
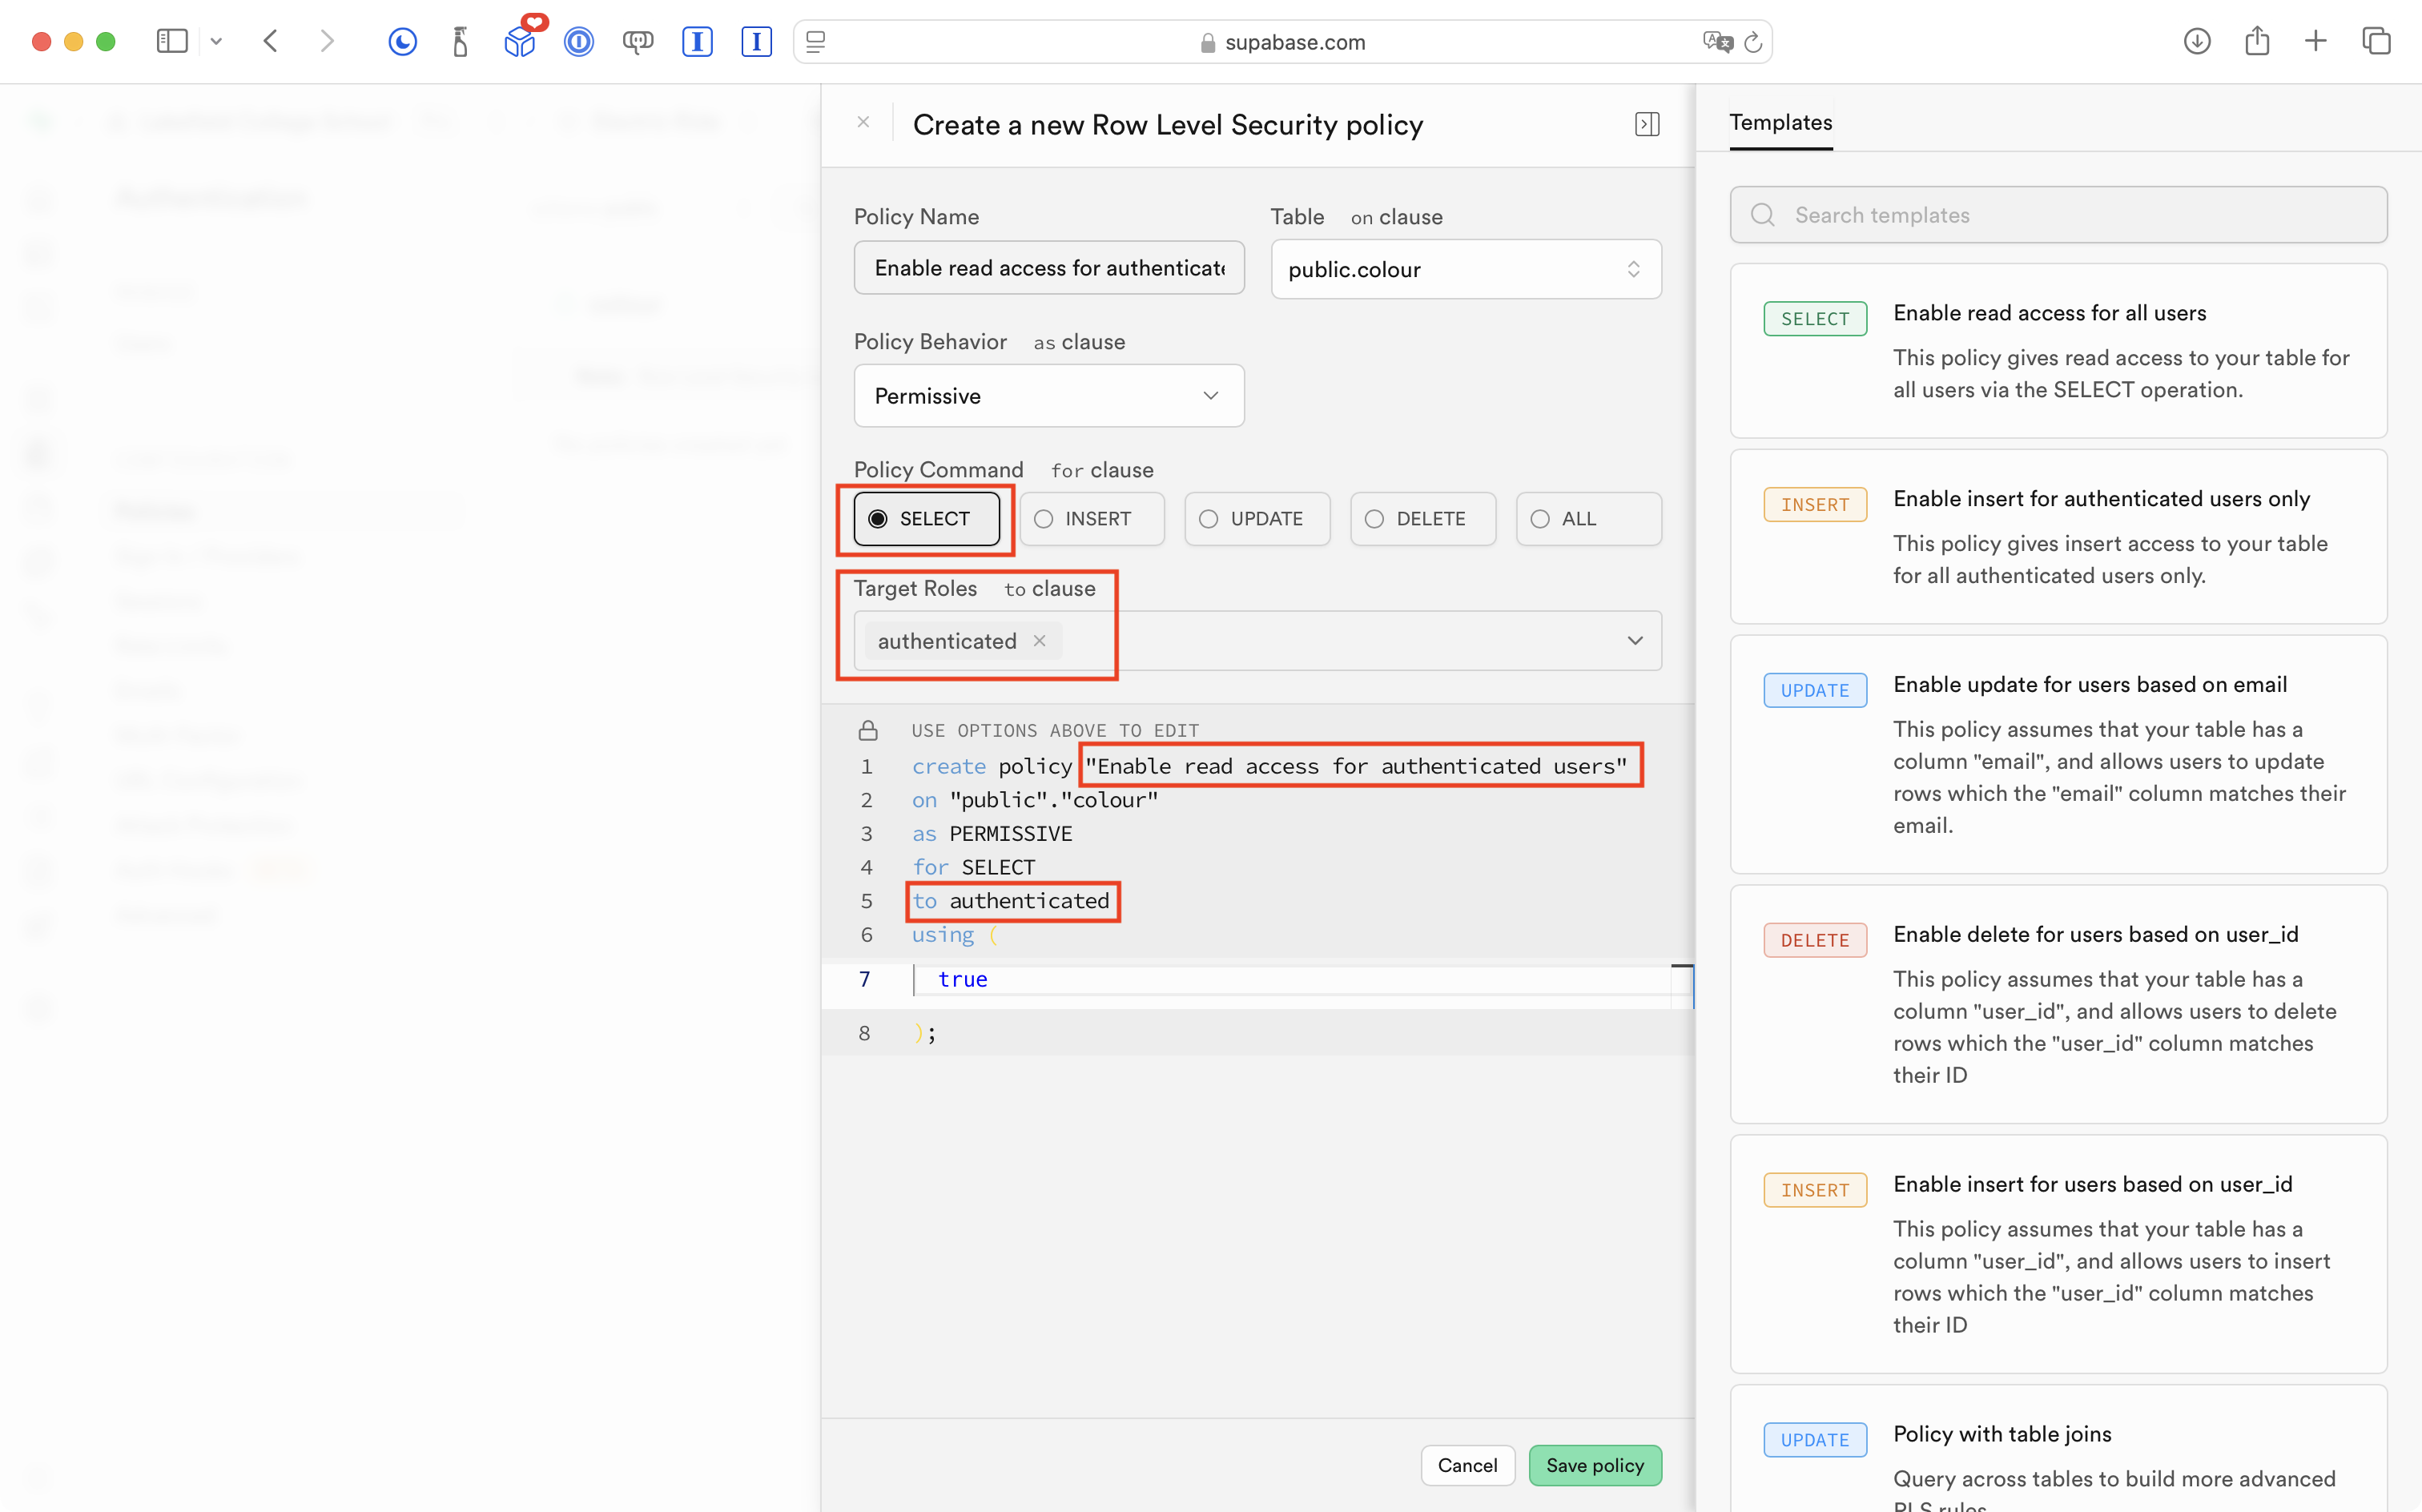
Mr. Gordon deleted the existing policy on the colour table and changed it to the following – it is the same as before – read-only access – but restricted to authenticated users only:
He changed the RLS policies on all the other tables the same way – read-only access – restricted to authenticated users.
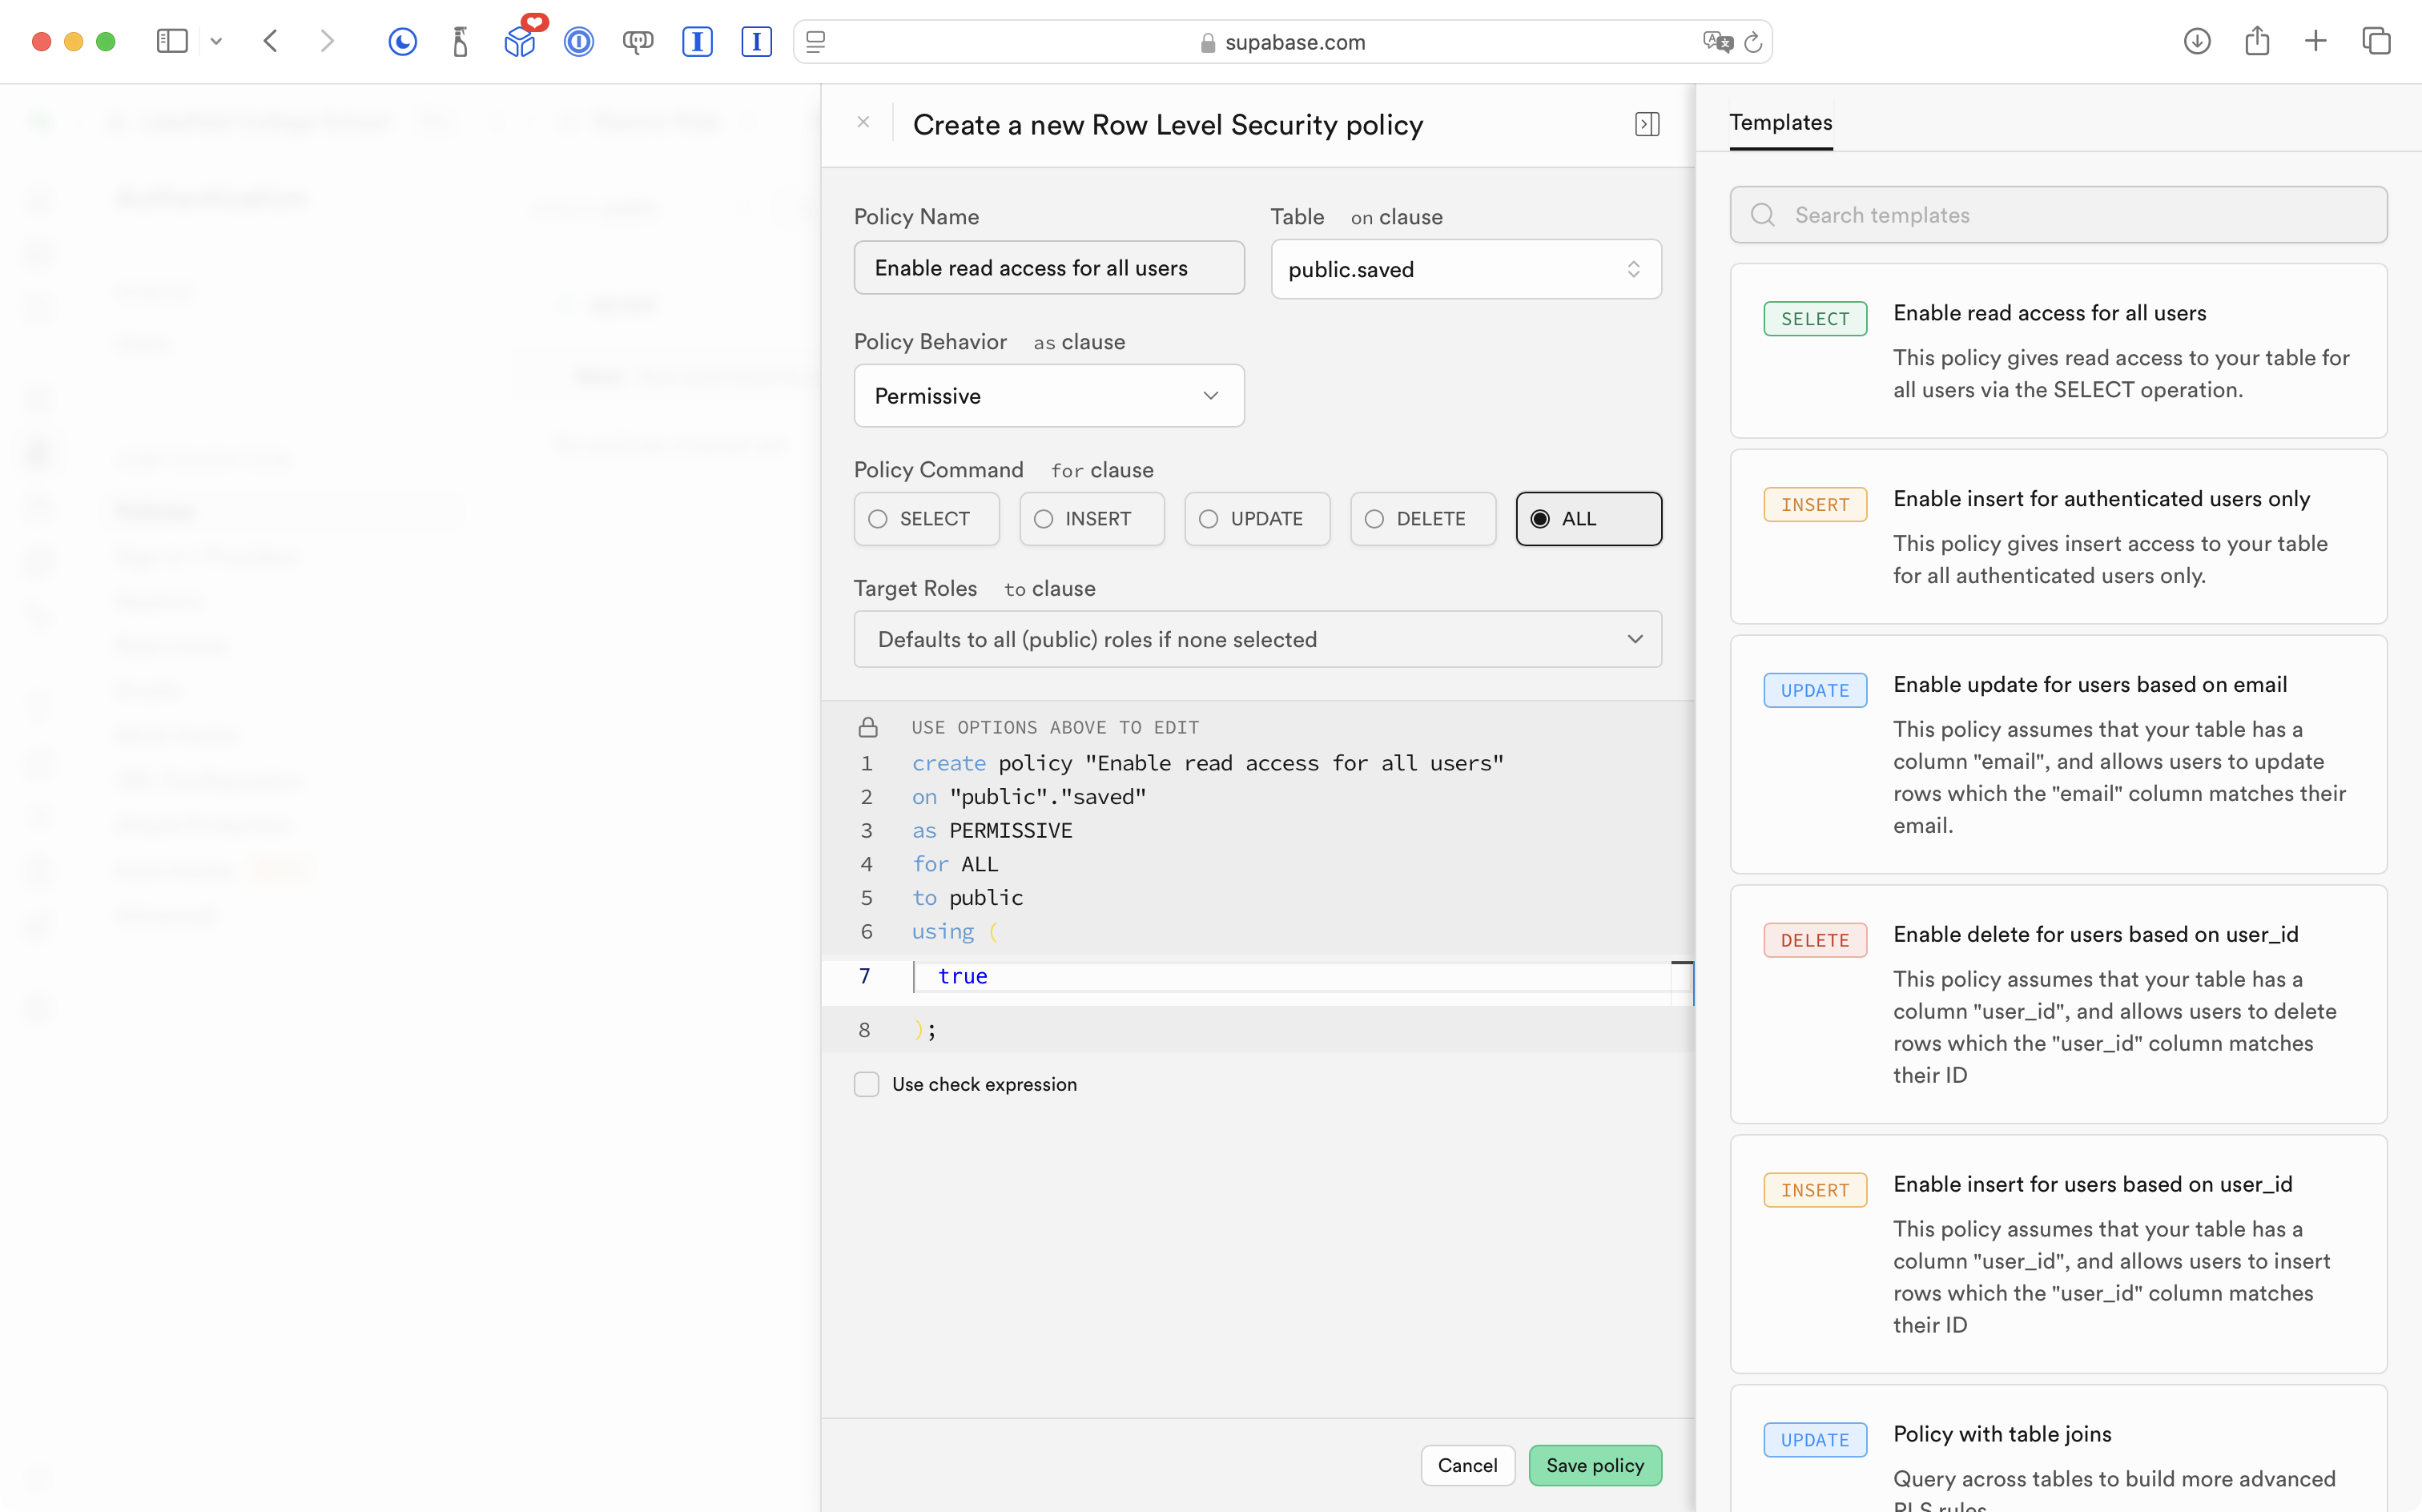
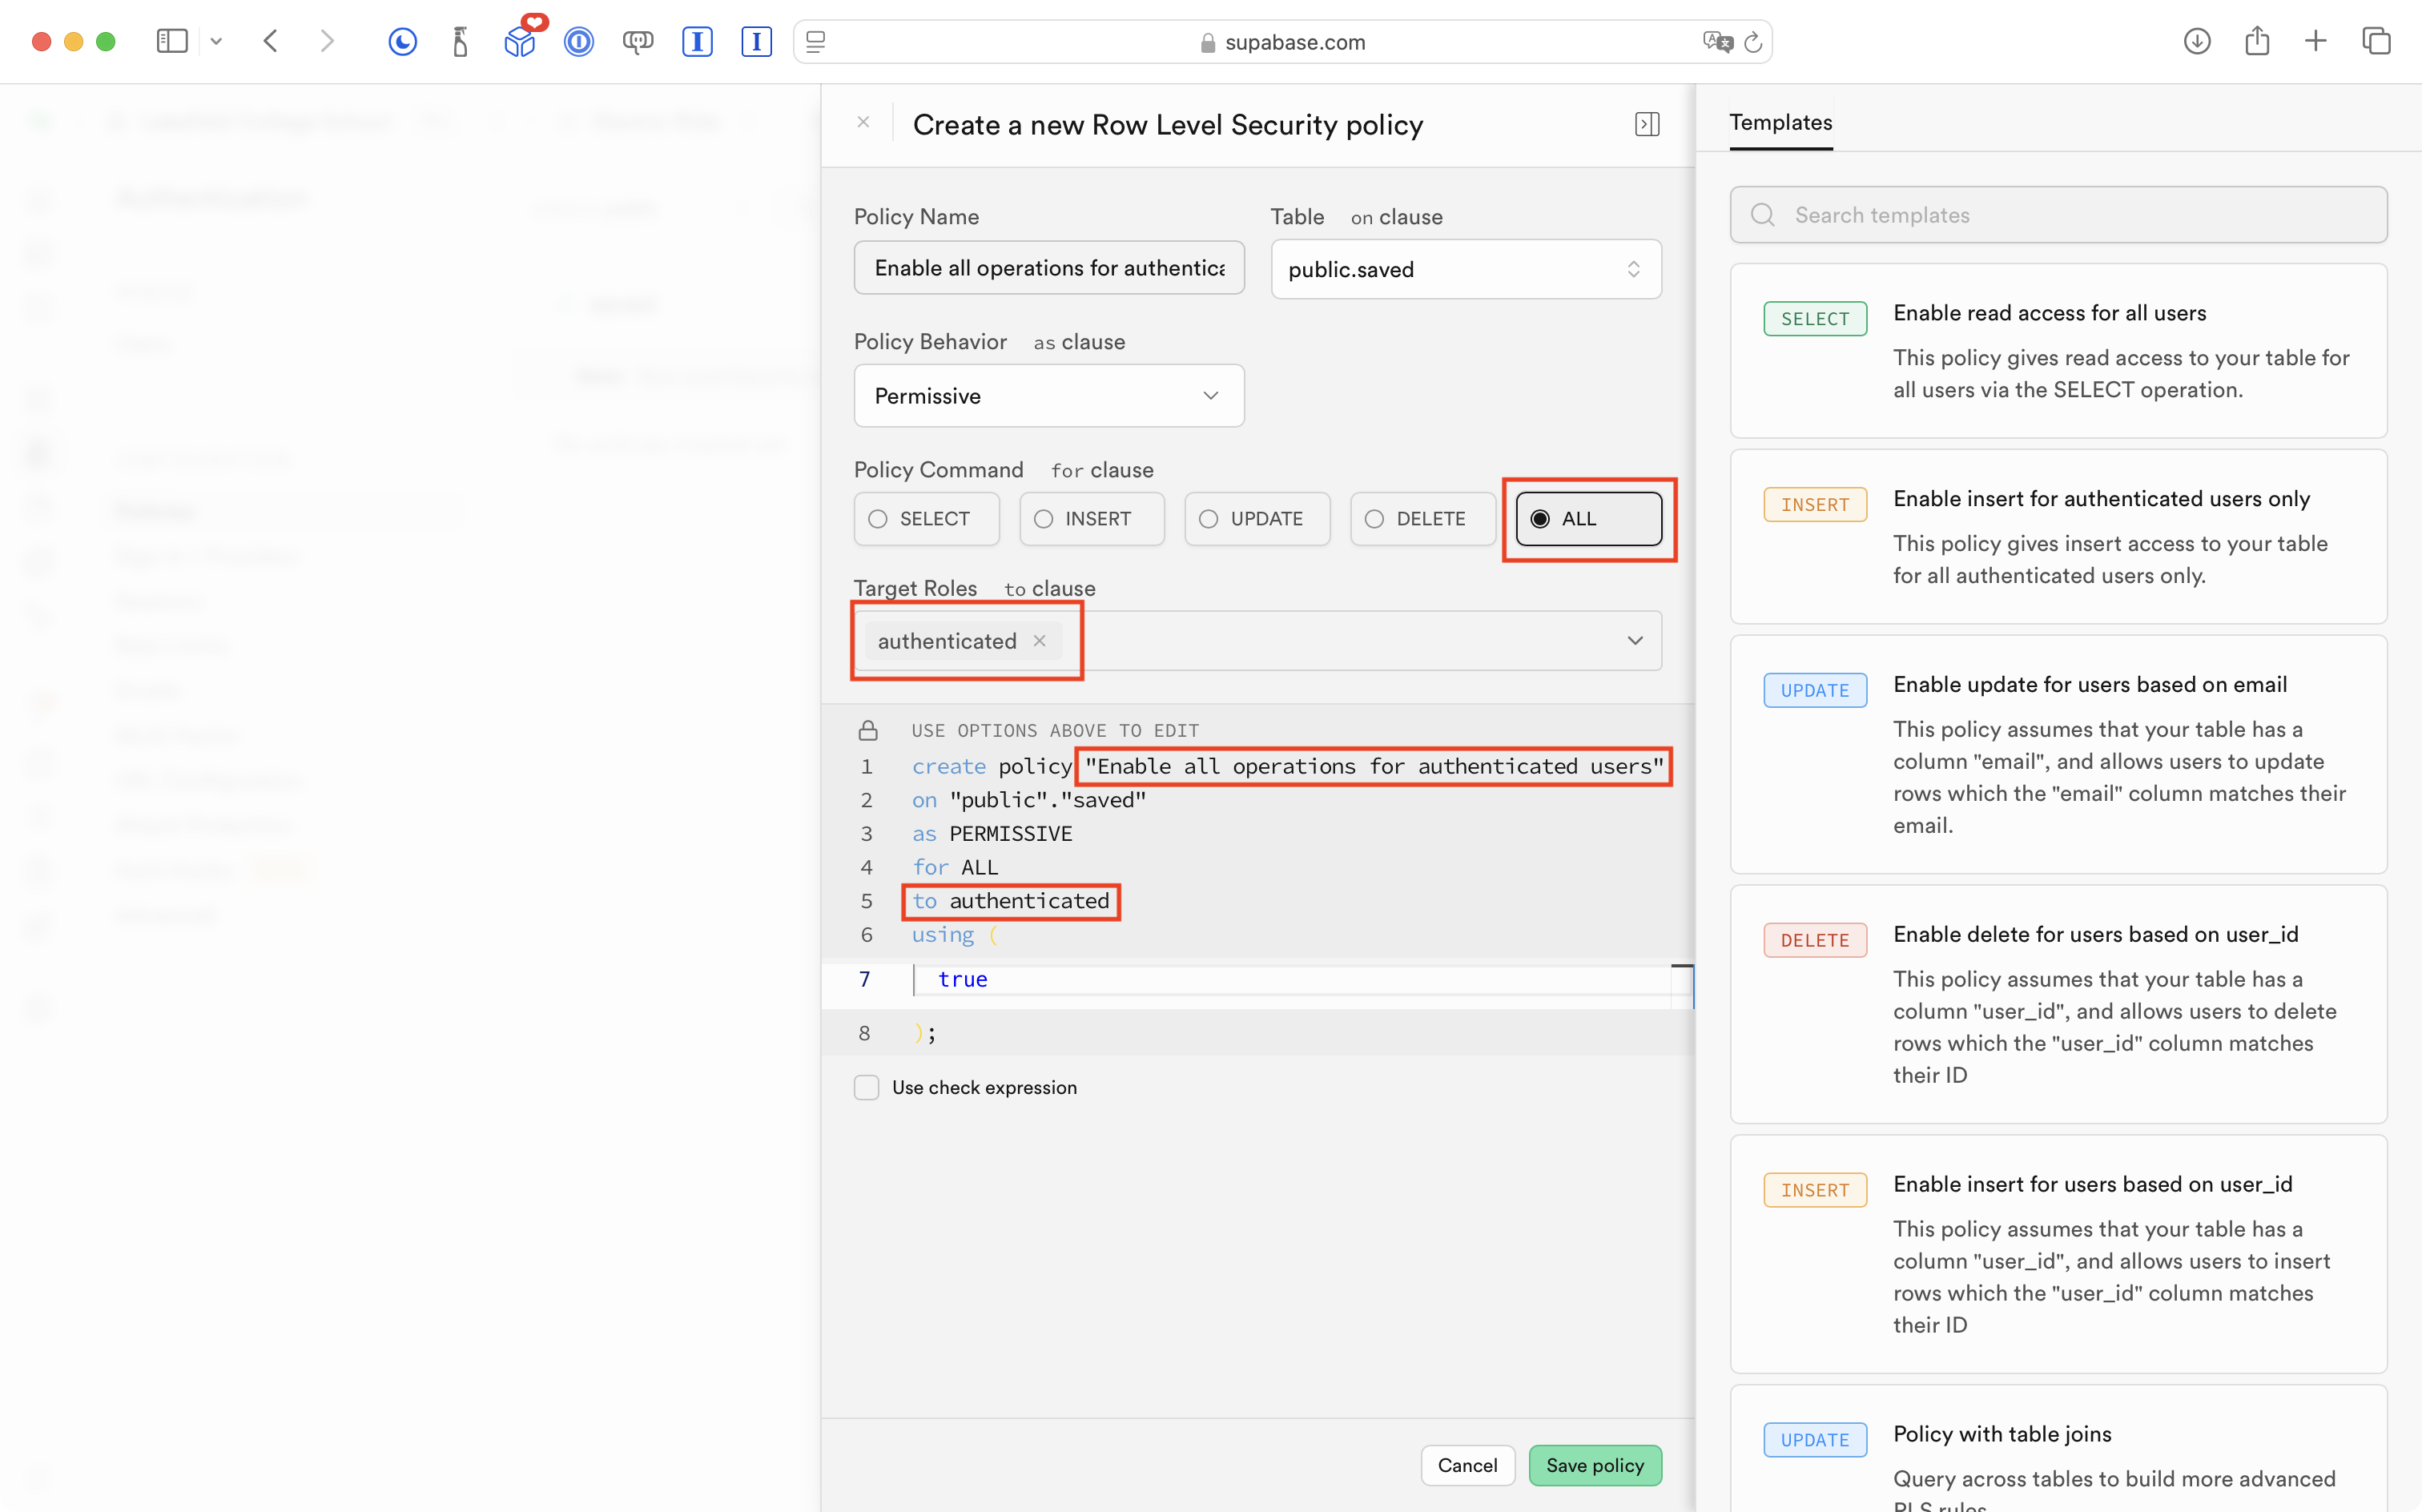
The exception was the saved table upon which he made it possible for authenticated users to perform all operations, not just reading information:
As expected, this means that we cannot use the app at all at the moment, because users have no way to authenticate themselves to Supabase:
So, it is time to add authentication to this app, using the Sign in with Google third-party service.
Adding social sign-in
We will use the third-party Sign in with Google social sign-in service to authenticate users to our database, hosted at Supabase.
The approach used here relies on Supabase’s own auth server to manage the entire sign-in process. When a user taps Sign in with Google, the app hands control to Supabase, which opens a browser for the user to sign in with their Google account, then hands control back to the app once that is complete.
NOTE
An alternate approach would use a separate Google-provided software package to talk to Google directly. This Supabase-native approach means we need no additional packages beyond the Supabase Swift SDK that we already have in our project.
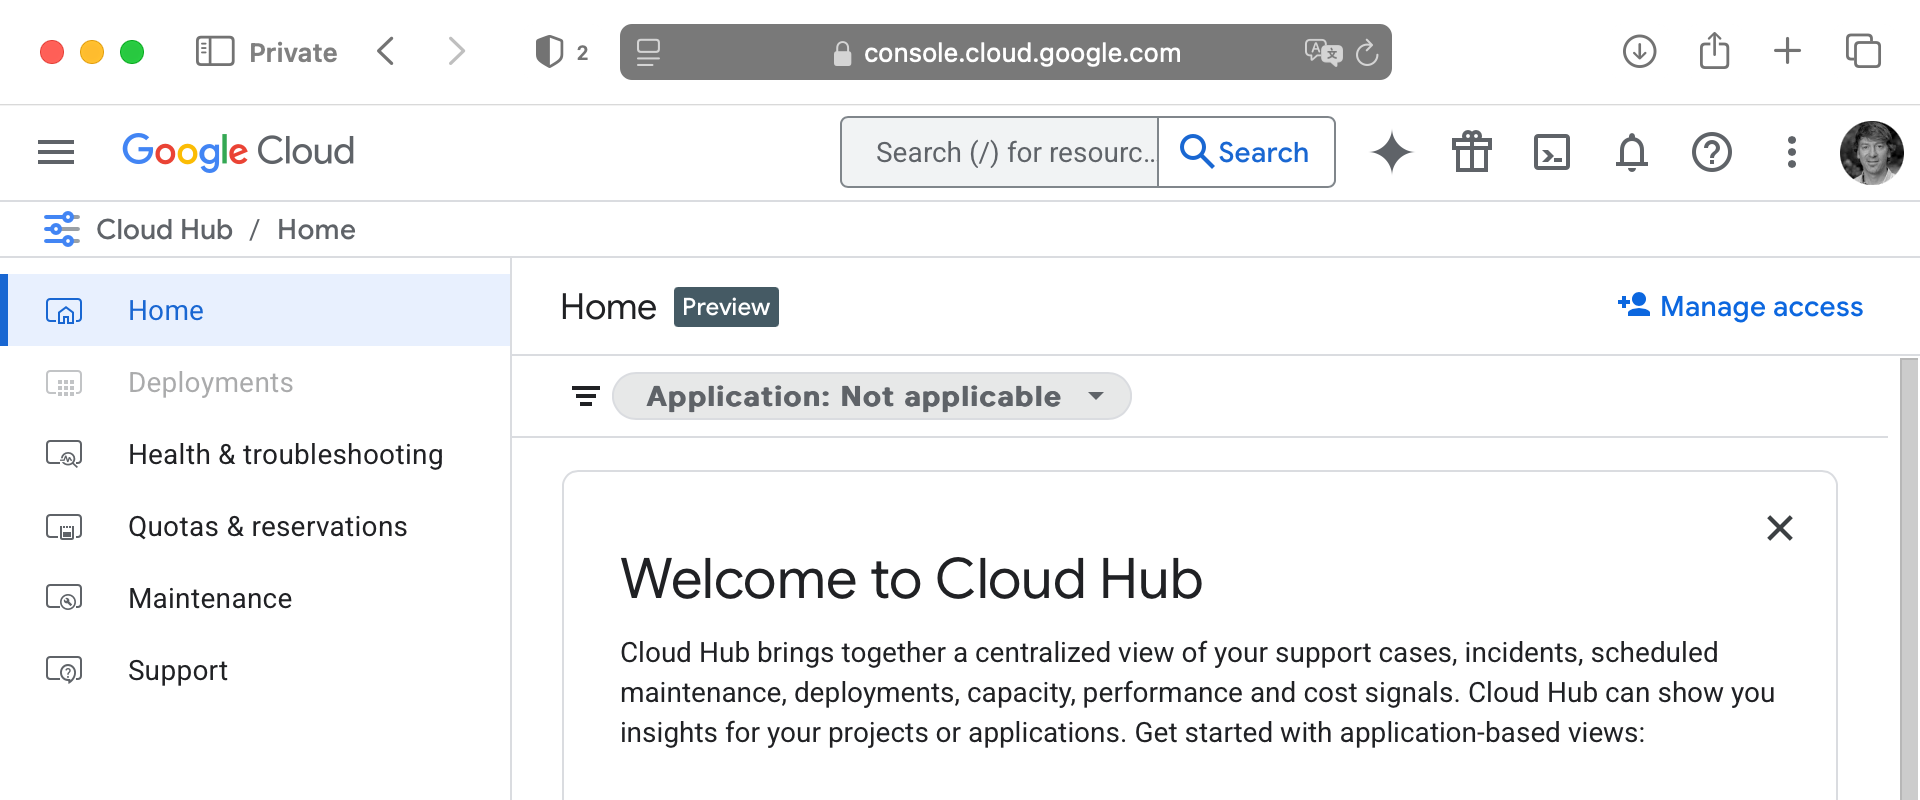
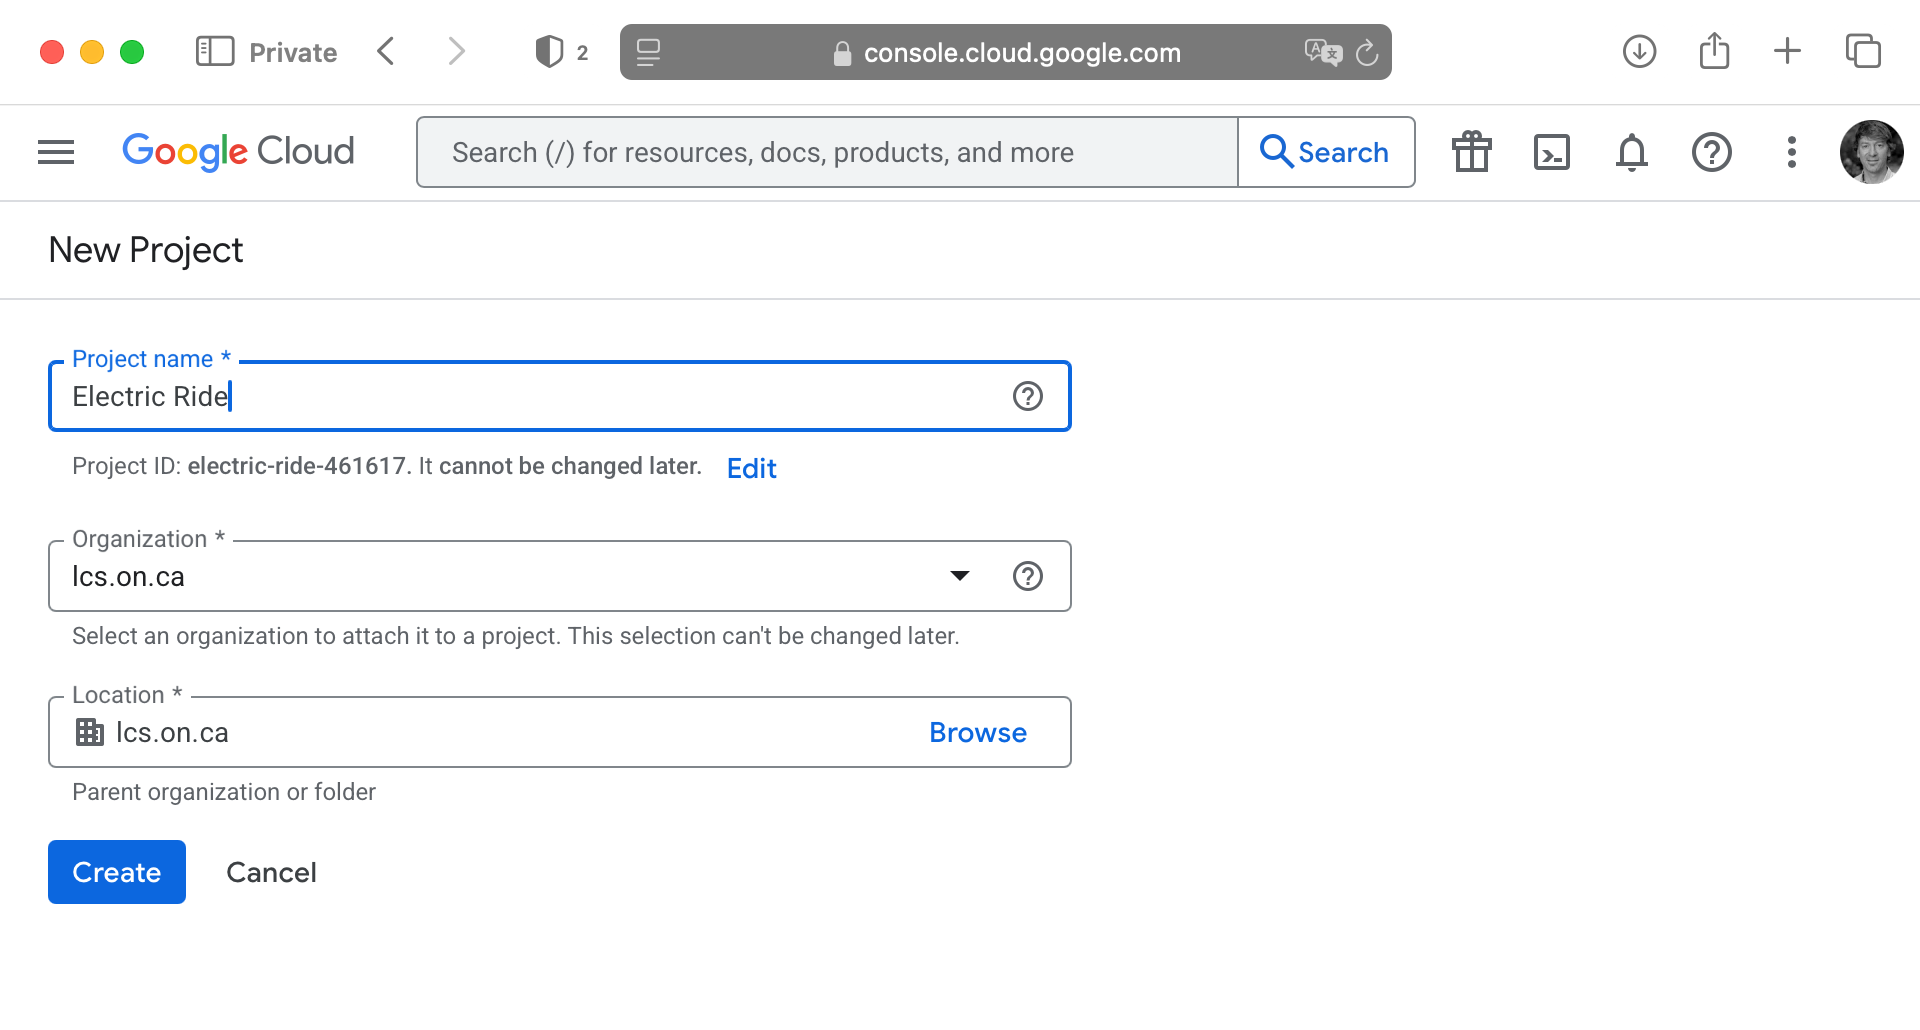
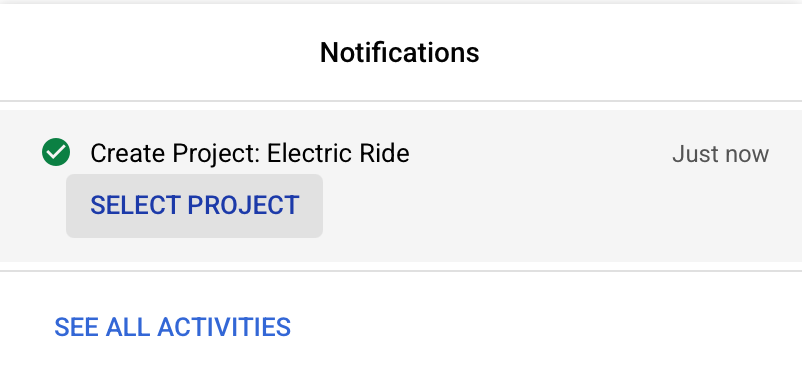
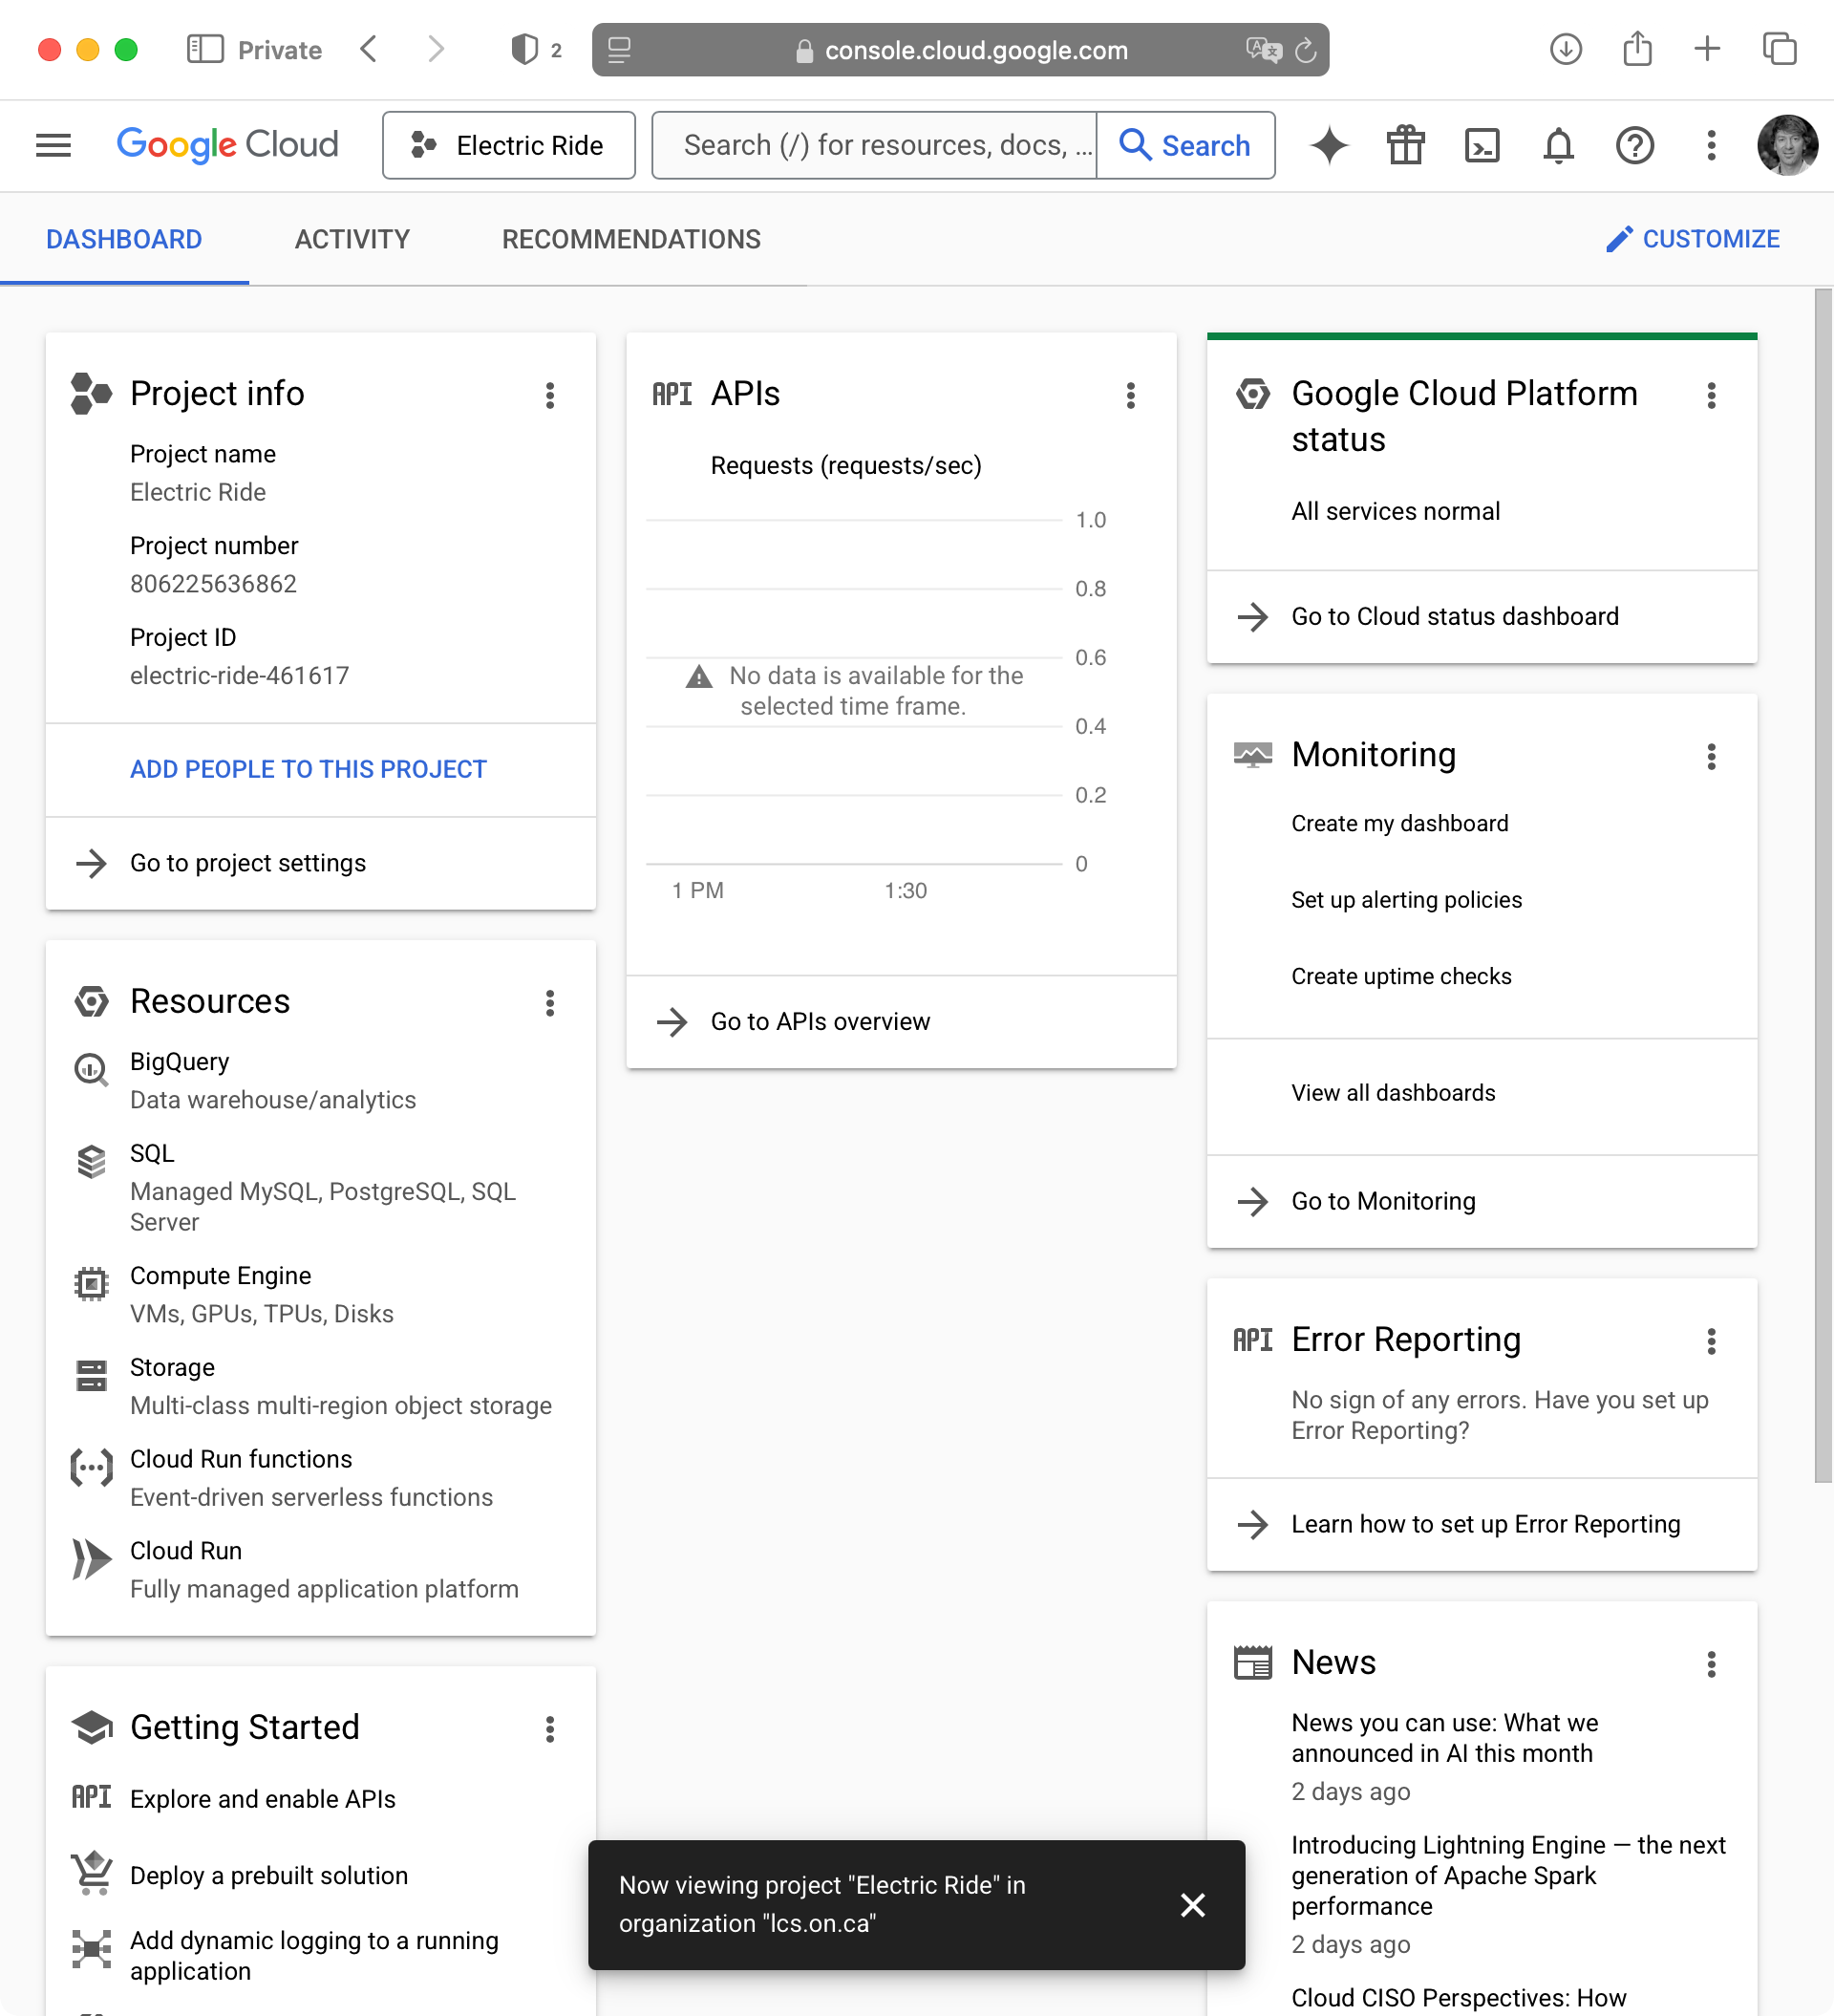
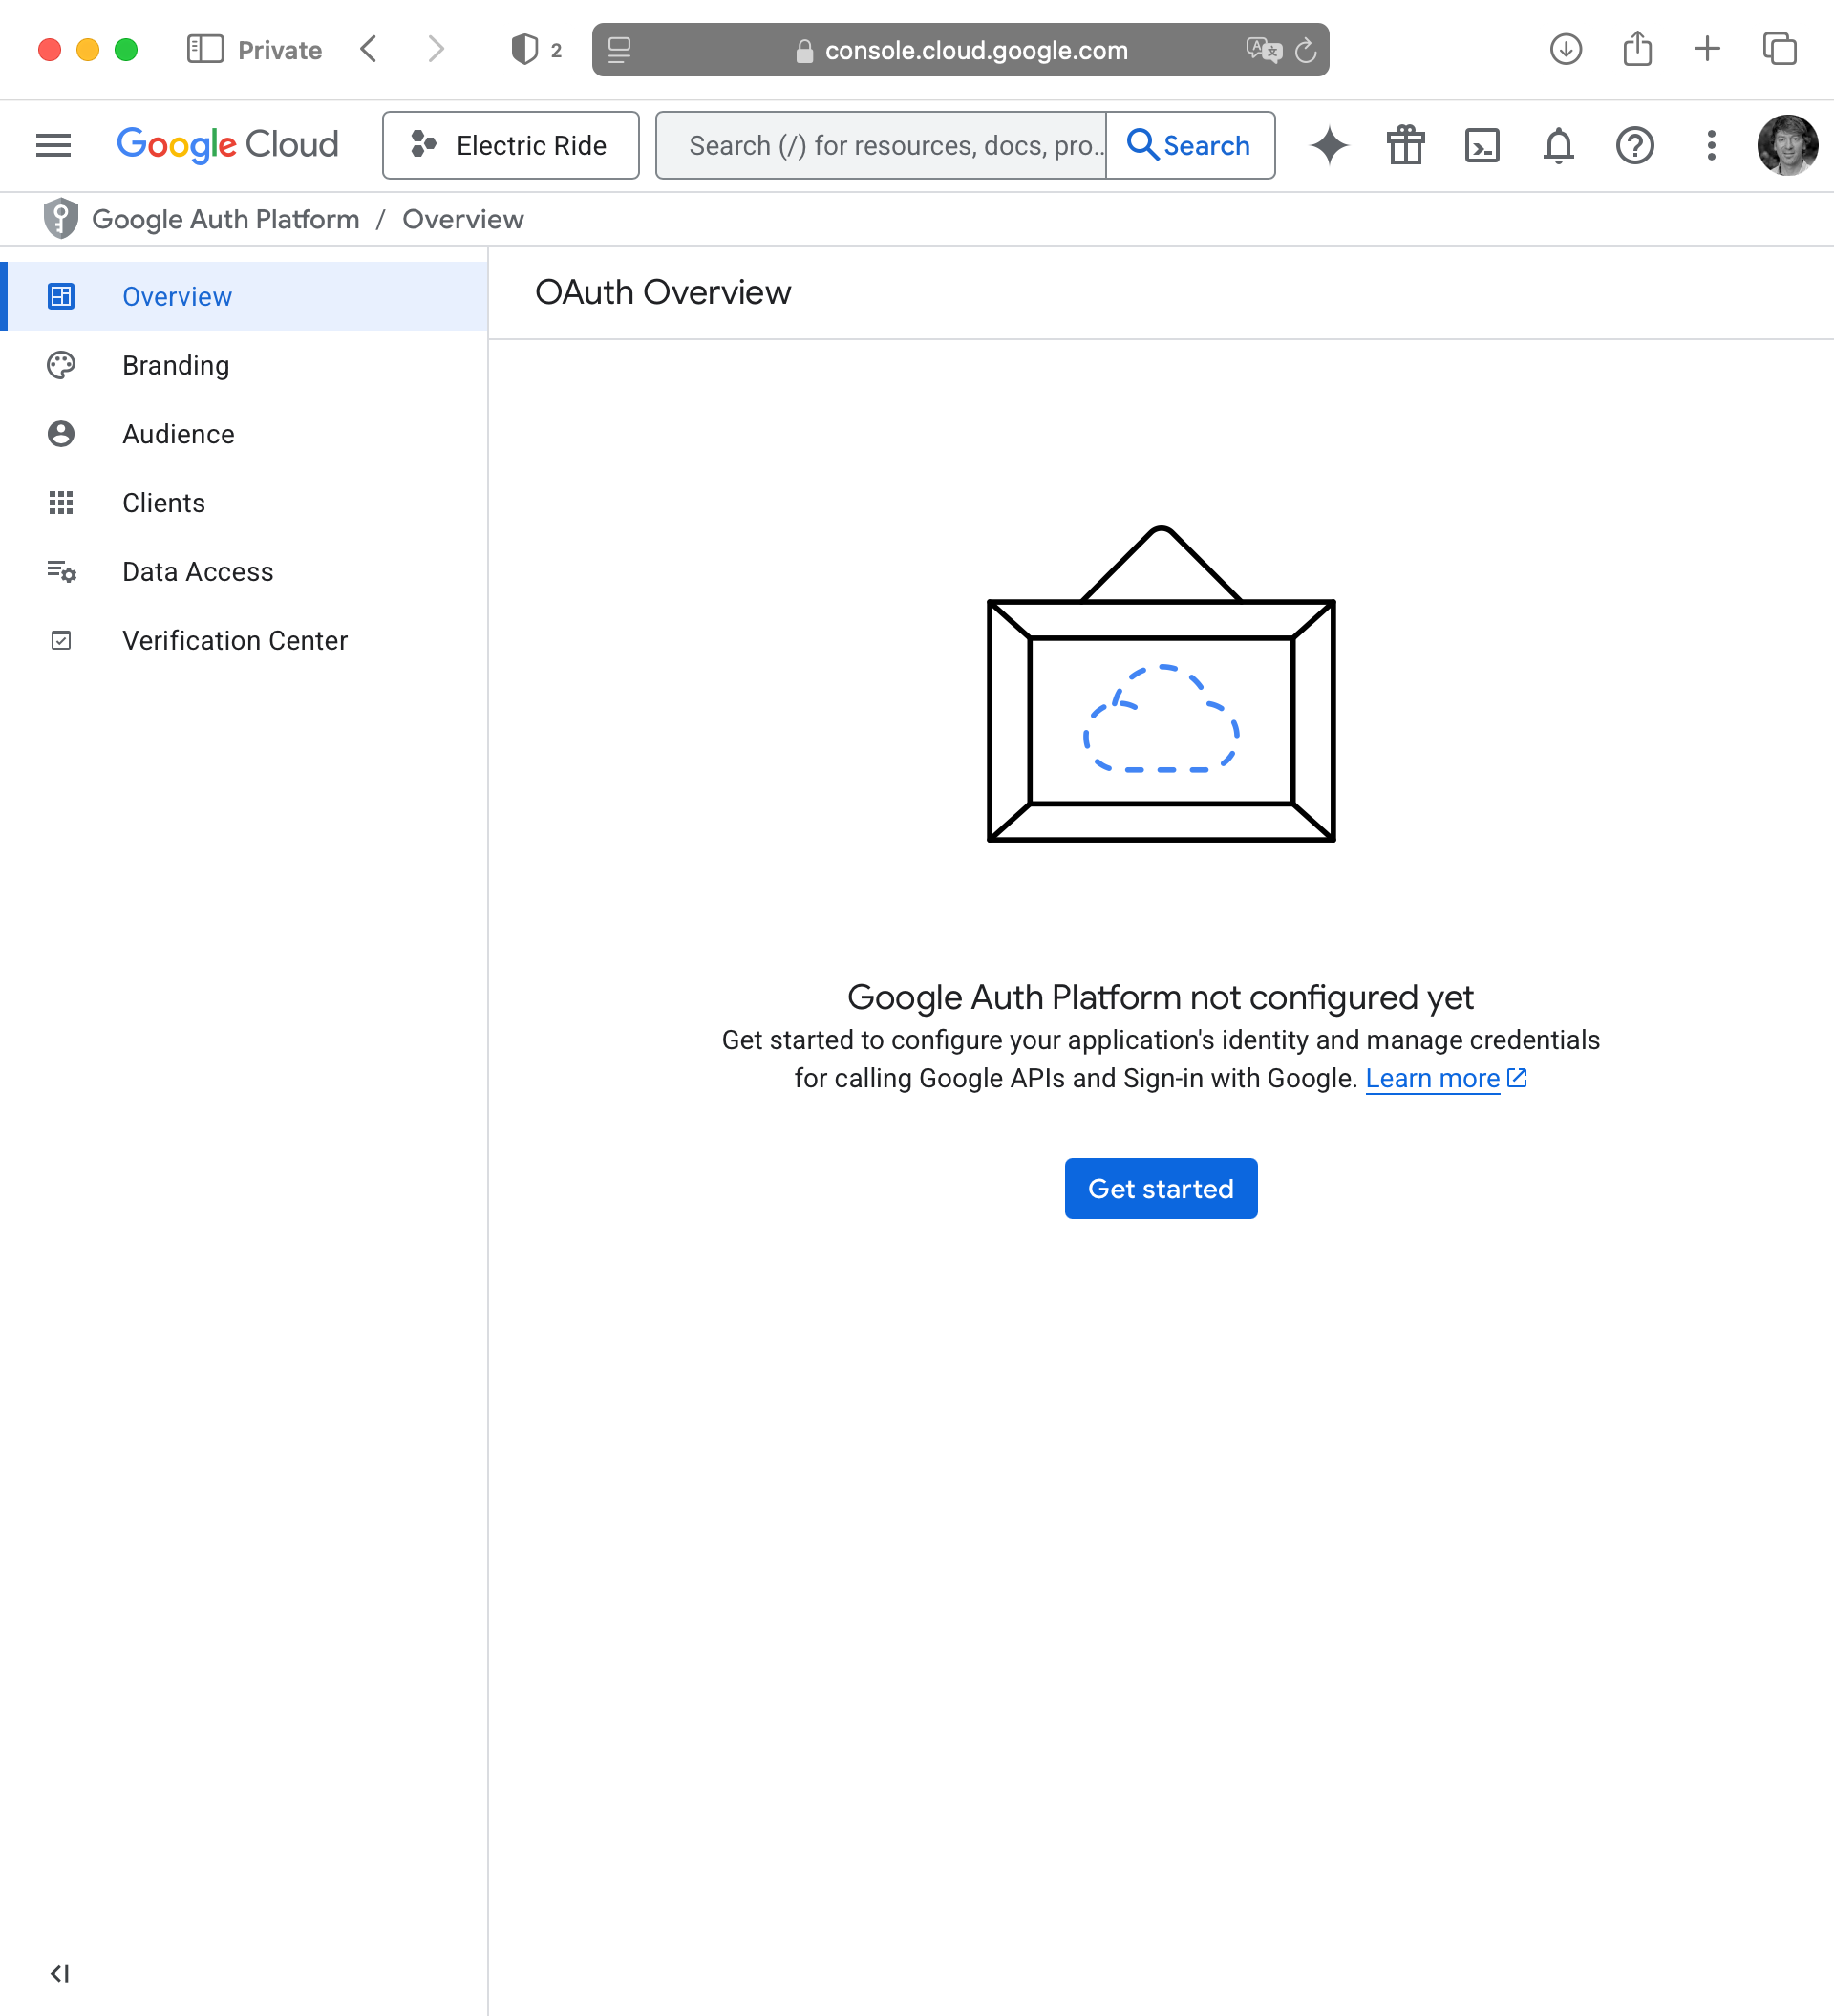
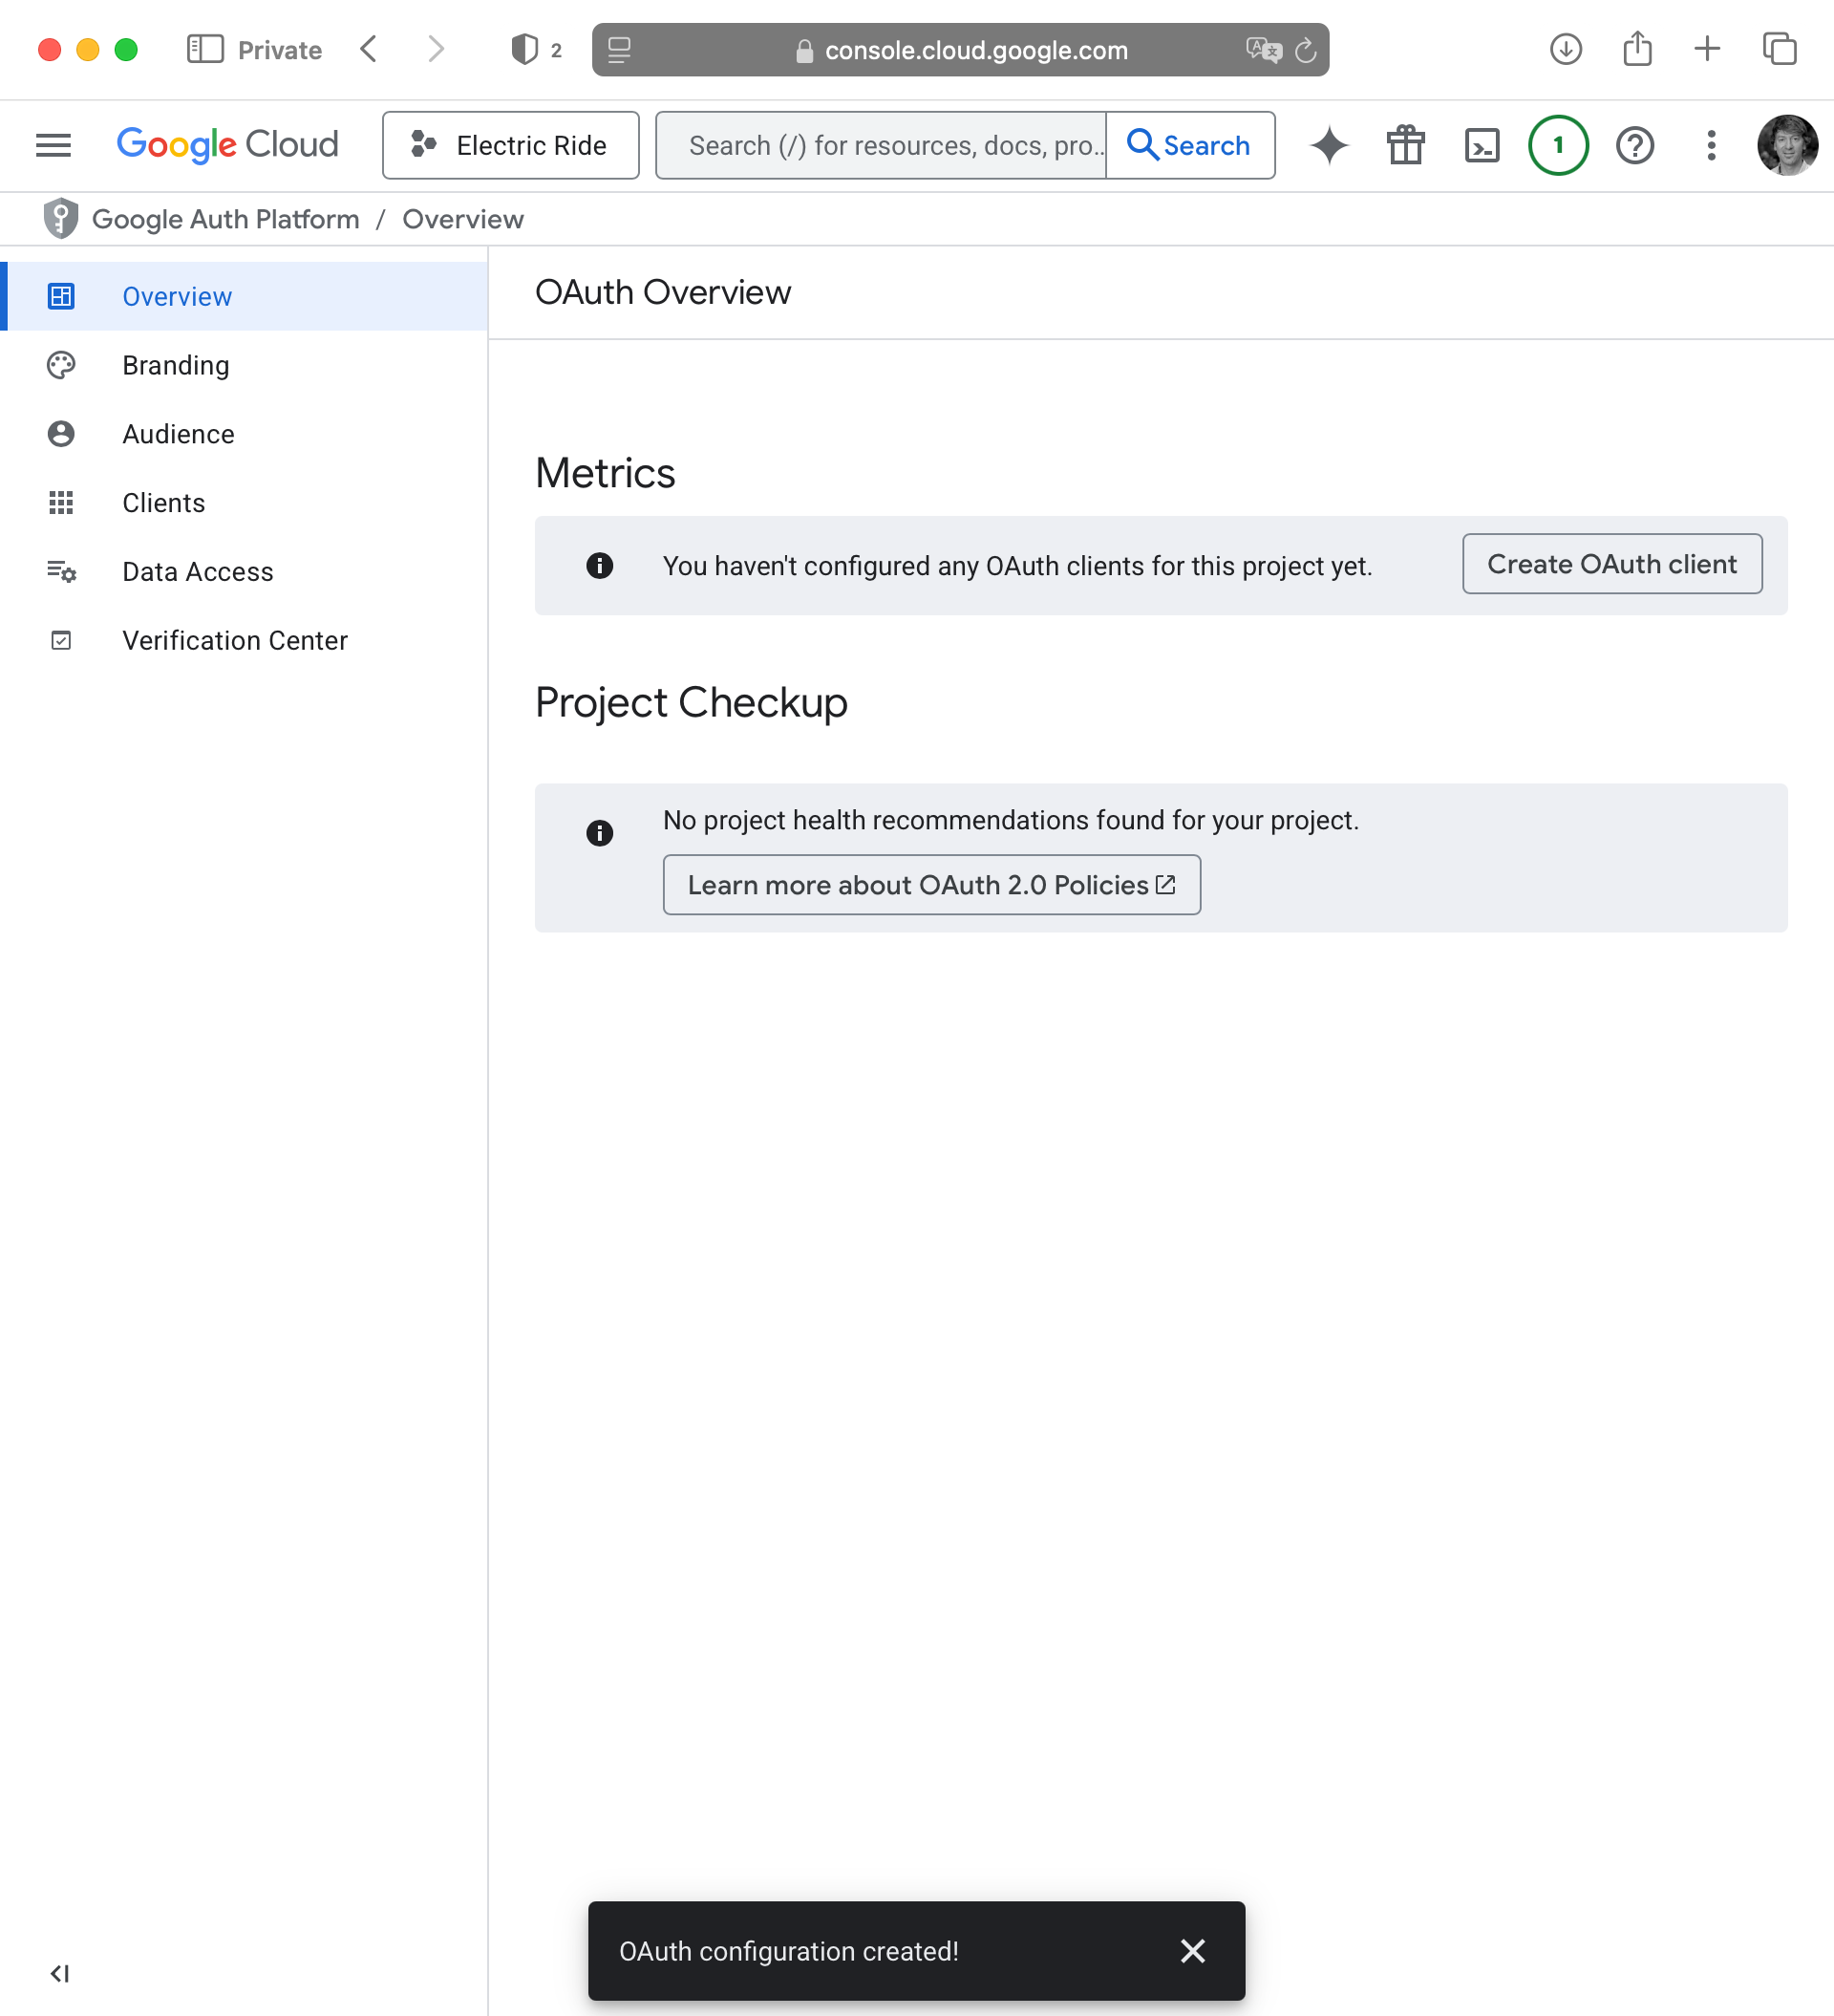
Create a Google project
We must first create a project in the Google Cloud service.
IMPORTANT
The following steps may not work for your LCS email address, which is hosted by Google.
If that is the case for you, please try temporarily using a personal Gmail account.
That will be fine for the purposes of your culminating task.
If your app gets to the point where it is used publicly and published on the App Store, we will re-configure social sign-in for your app so that it is not tied to your personal email address, but instead, to an account connected to LCS.
We need to configure “open authentication” or OAuth.
What is OAuth? It’s beyond the scope of this tutorial or course to explain in much detail, but OAuth is a standard that allows third-party providers to offer social sign-in services.
By configuring the OAuth consent screen, we are going to set up the information that shows up when a user signs in to their Google account to use our app. It helps the user decide whether to trust your app – you have probably seen OAuth consent screens in the past when signing in to existing apps that you already use.
Press the blue Get started button in that screen above.
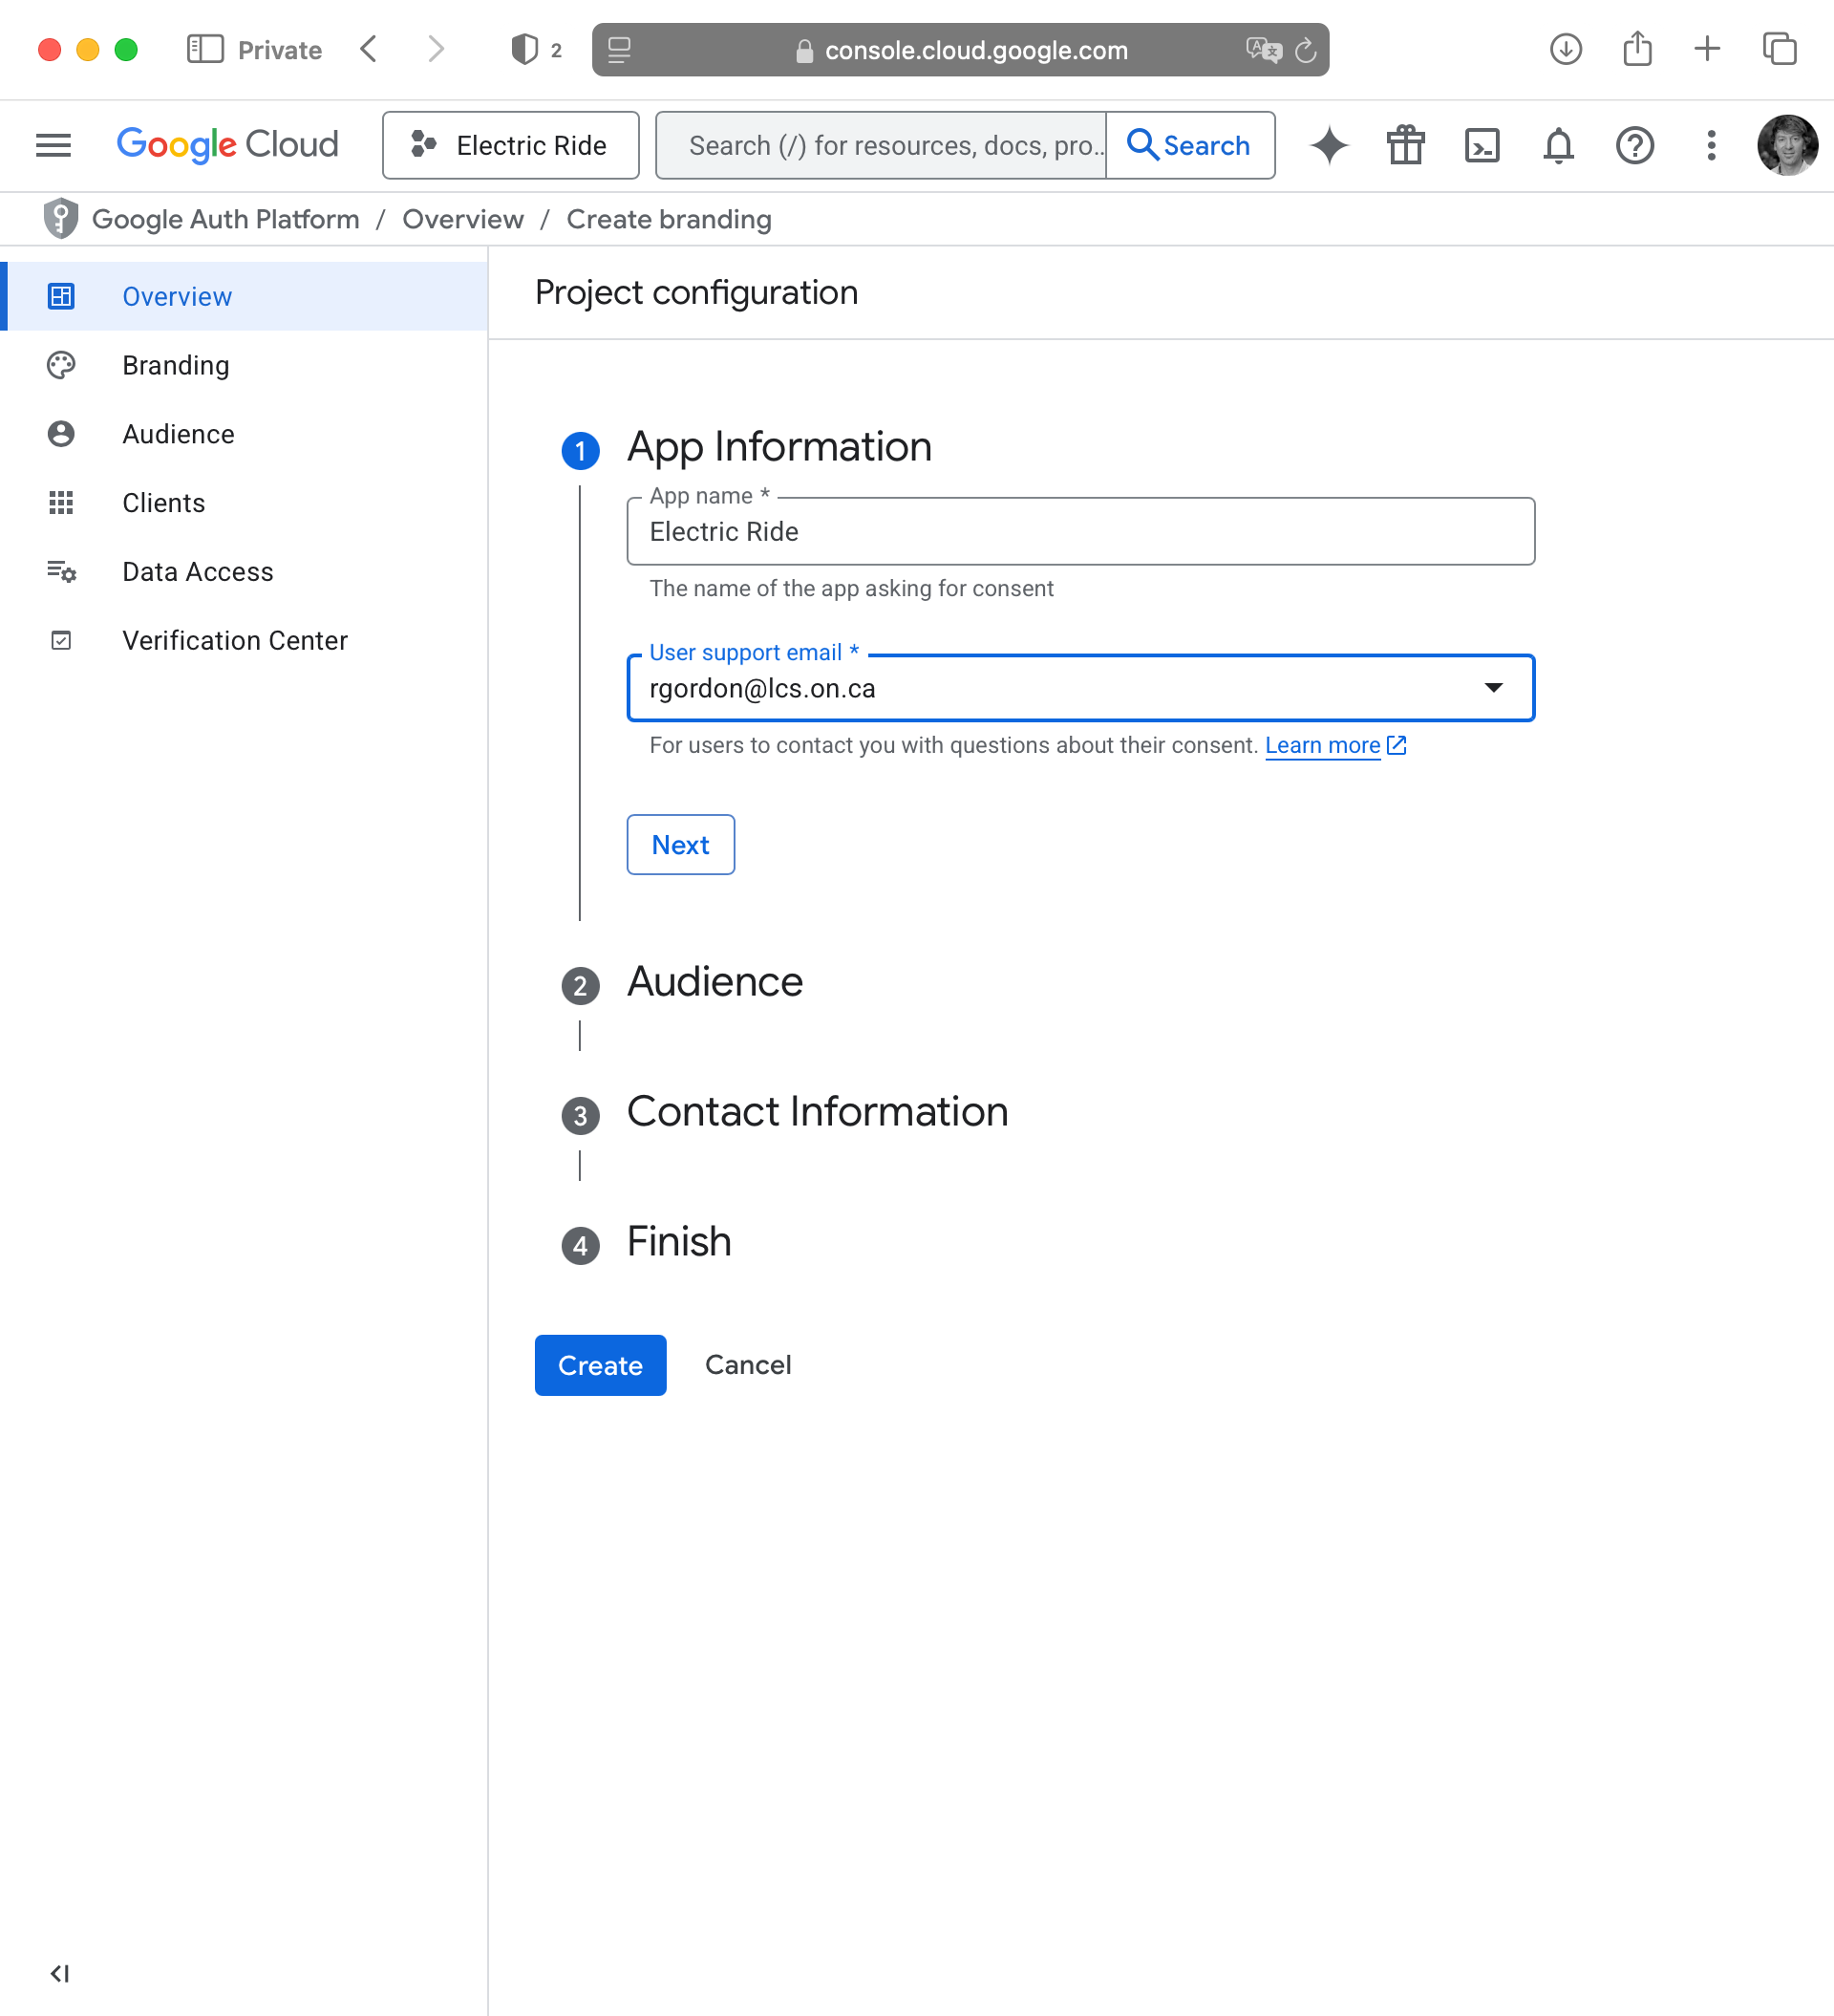
In the App Information step that appears, provide your app information and user support email address, then press Next:
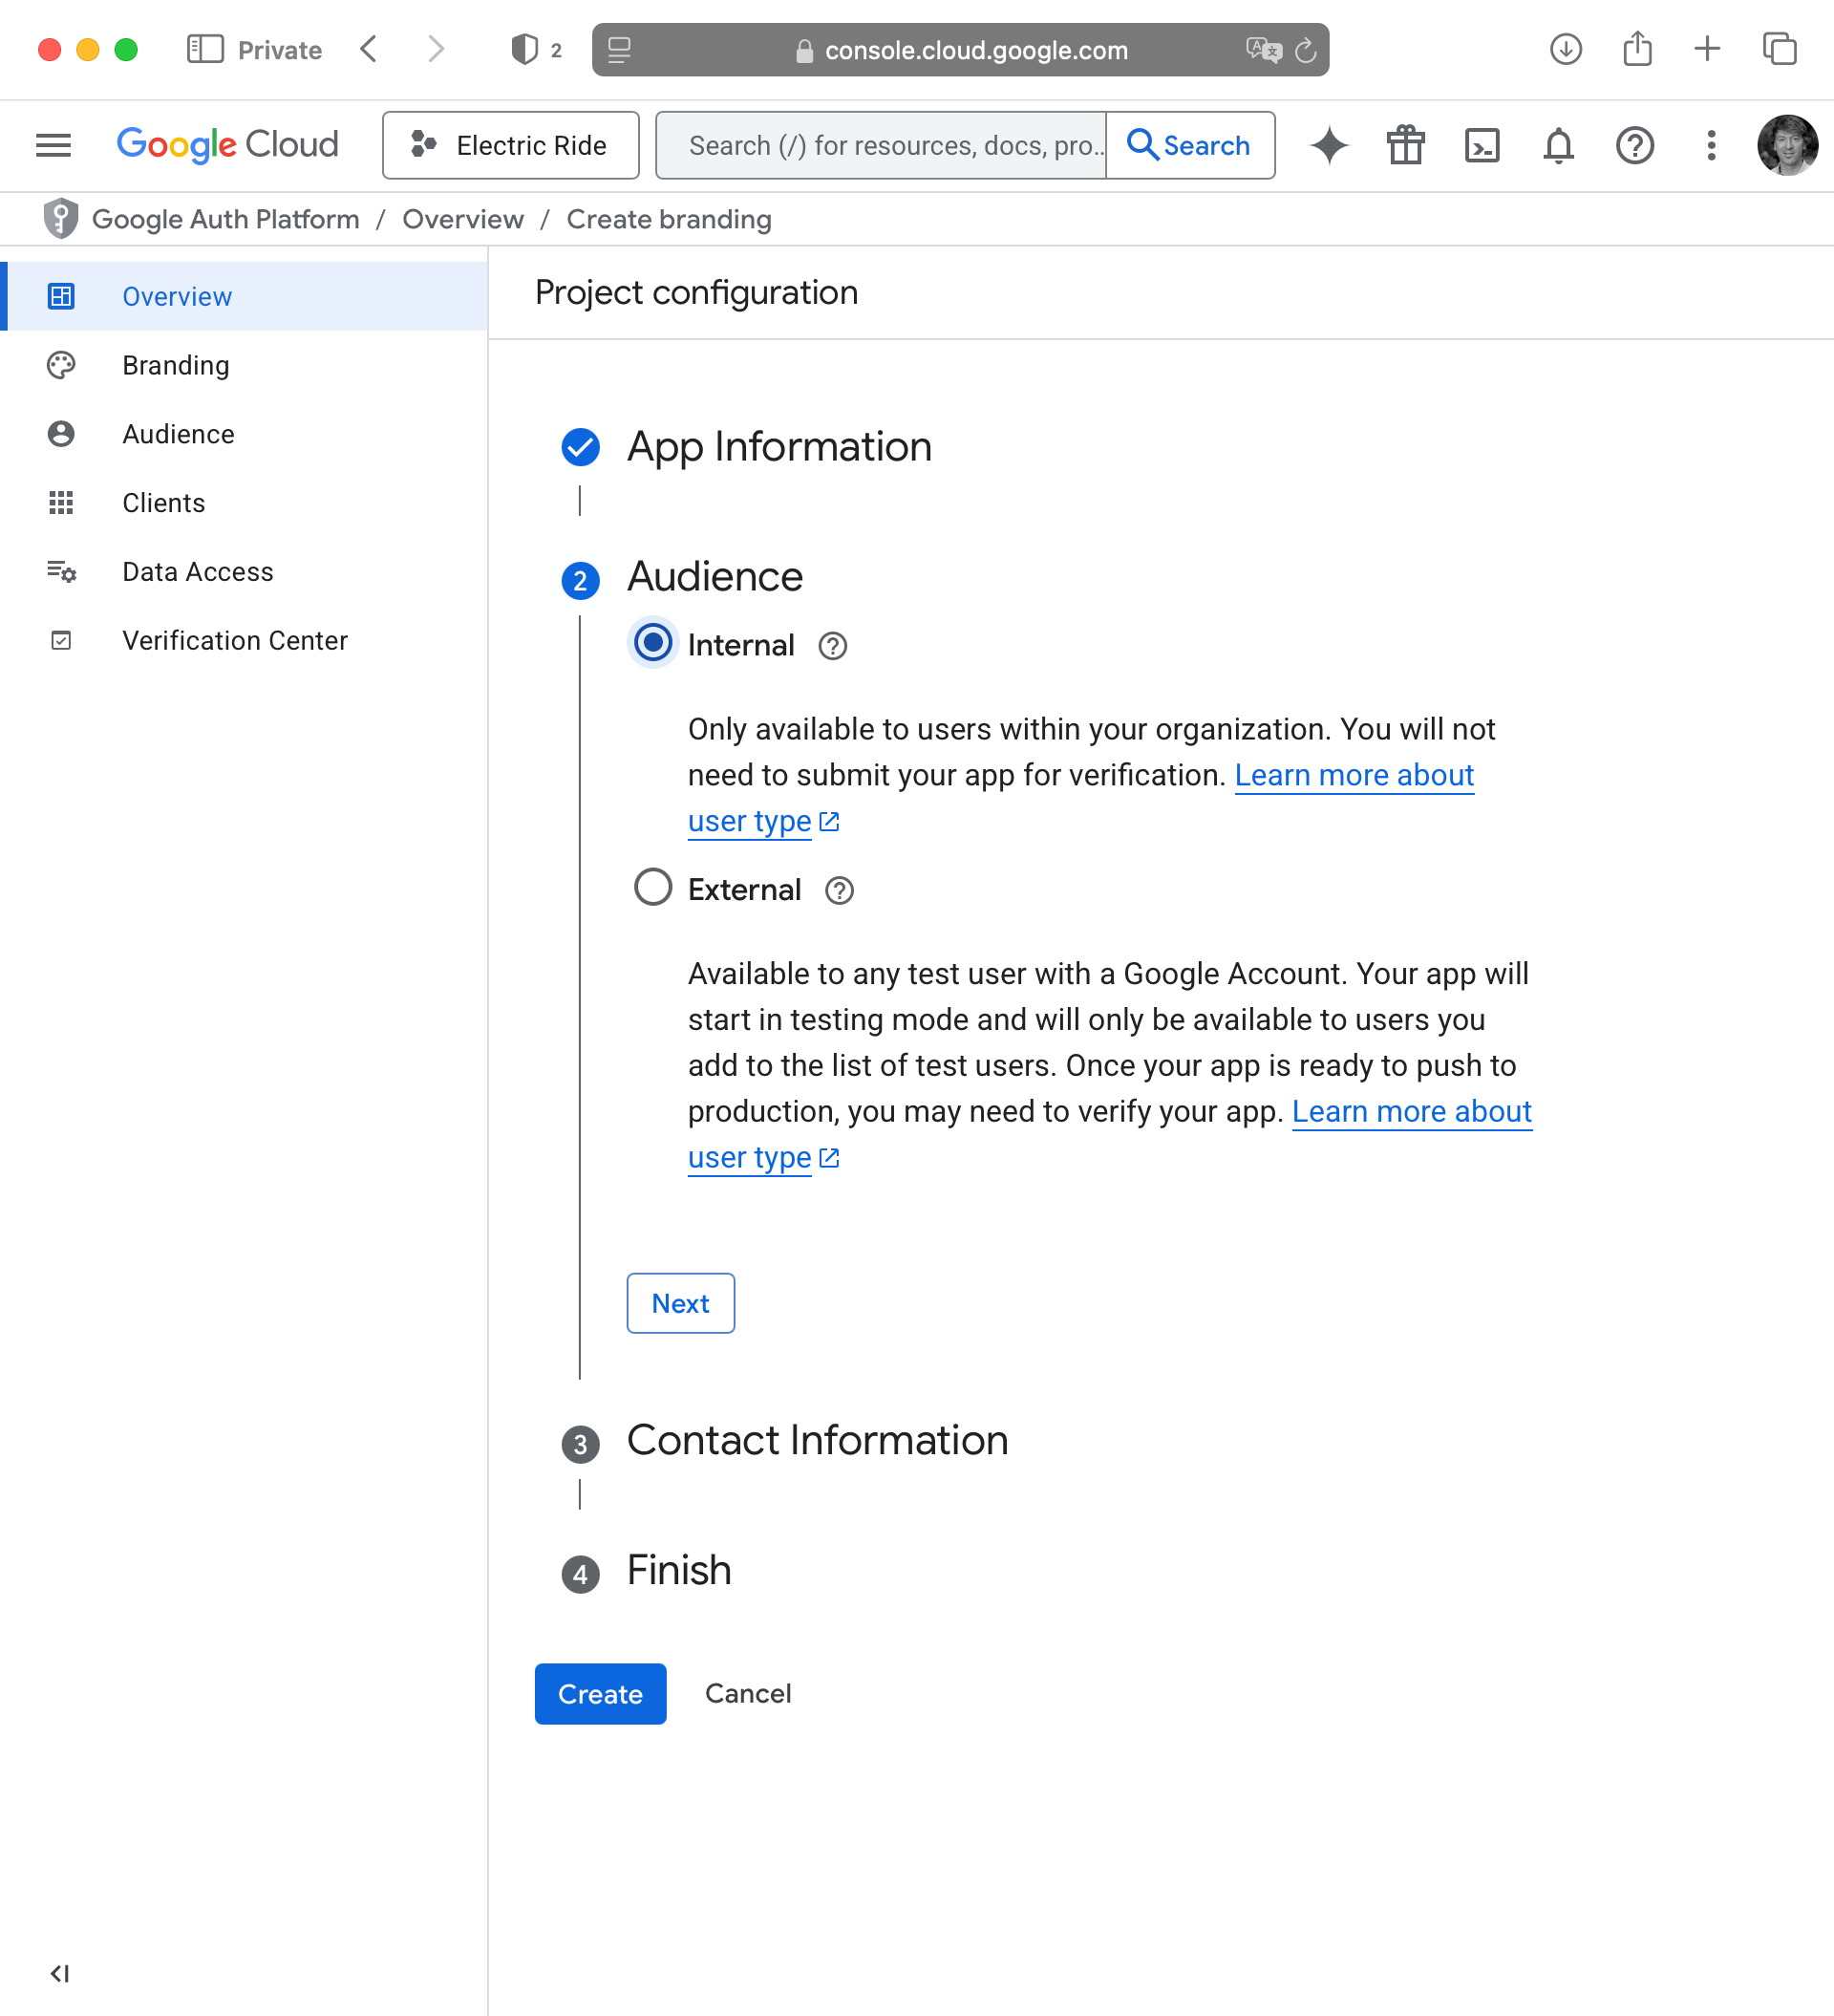
For the Audience step, choose Internal then press Next:
NOTE
This means that (for now) only users with LCS email addresses will be able to sign in to your app.
If your app is later published to the public App Store, we will revisit these settings and ensure that sign-in for your app is able to be used by anyone with any email address.
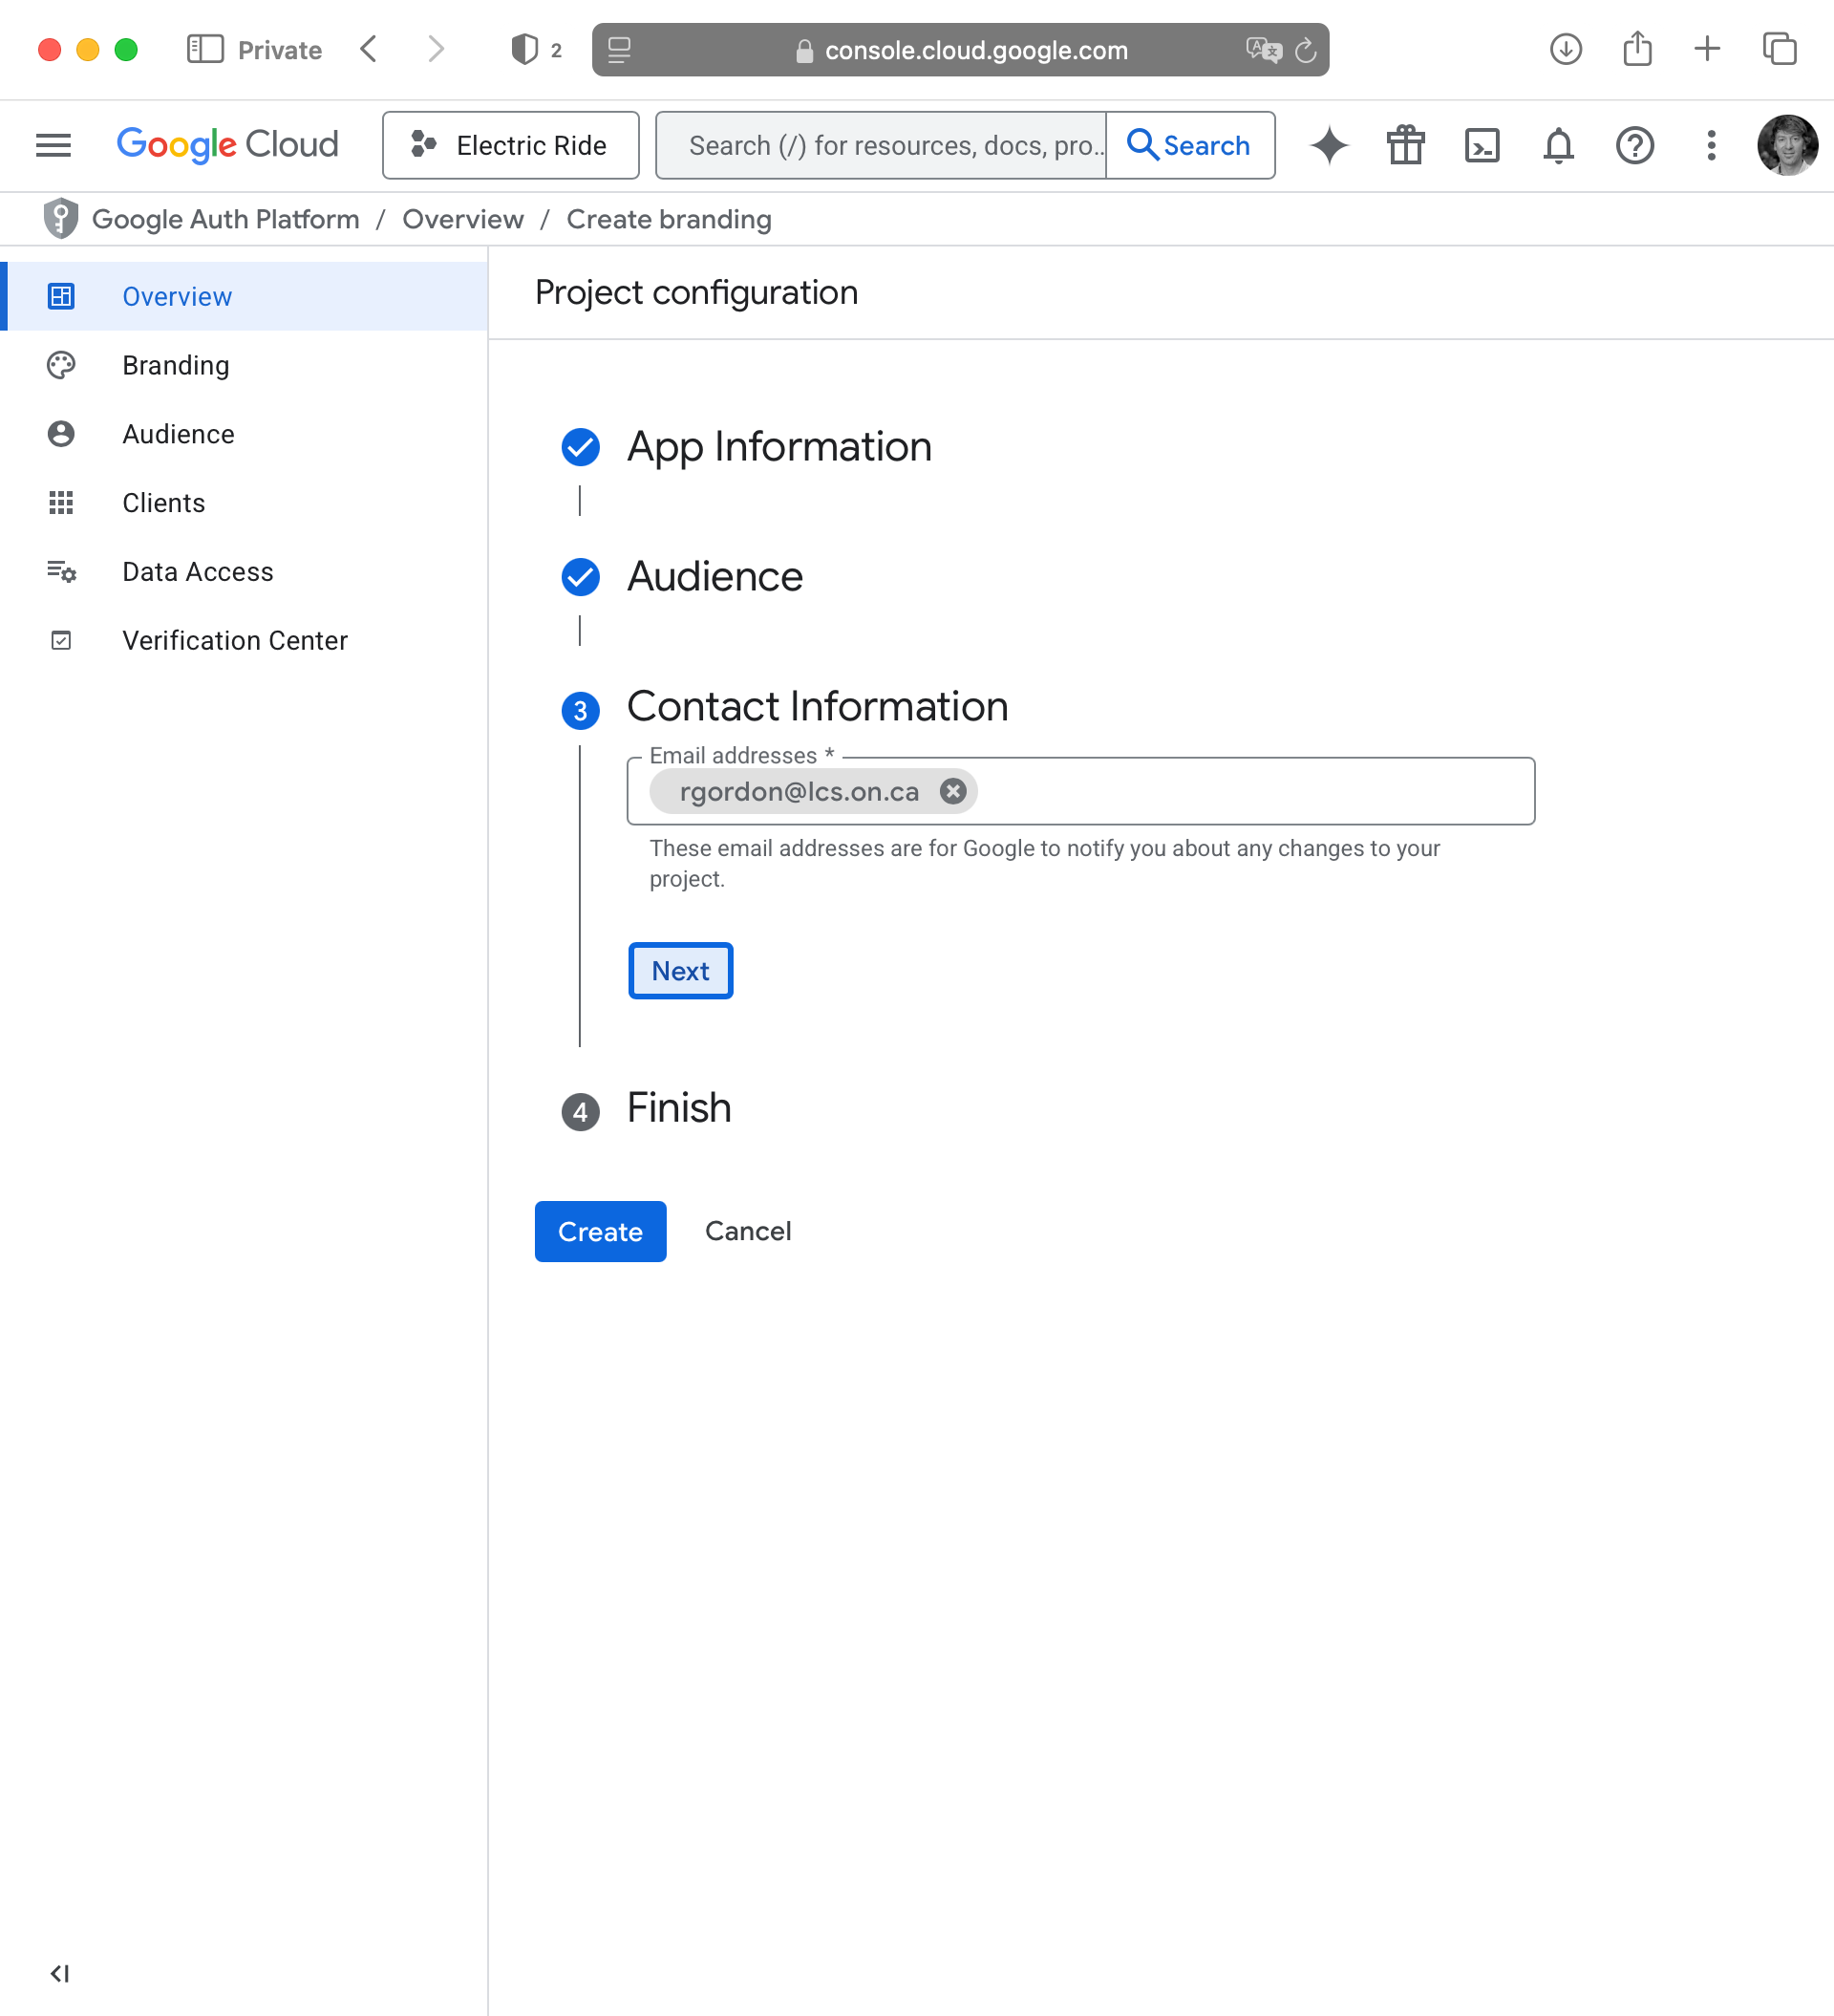
For Contact Information provide your LCS email address, then press Next:
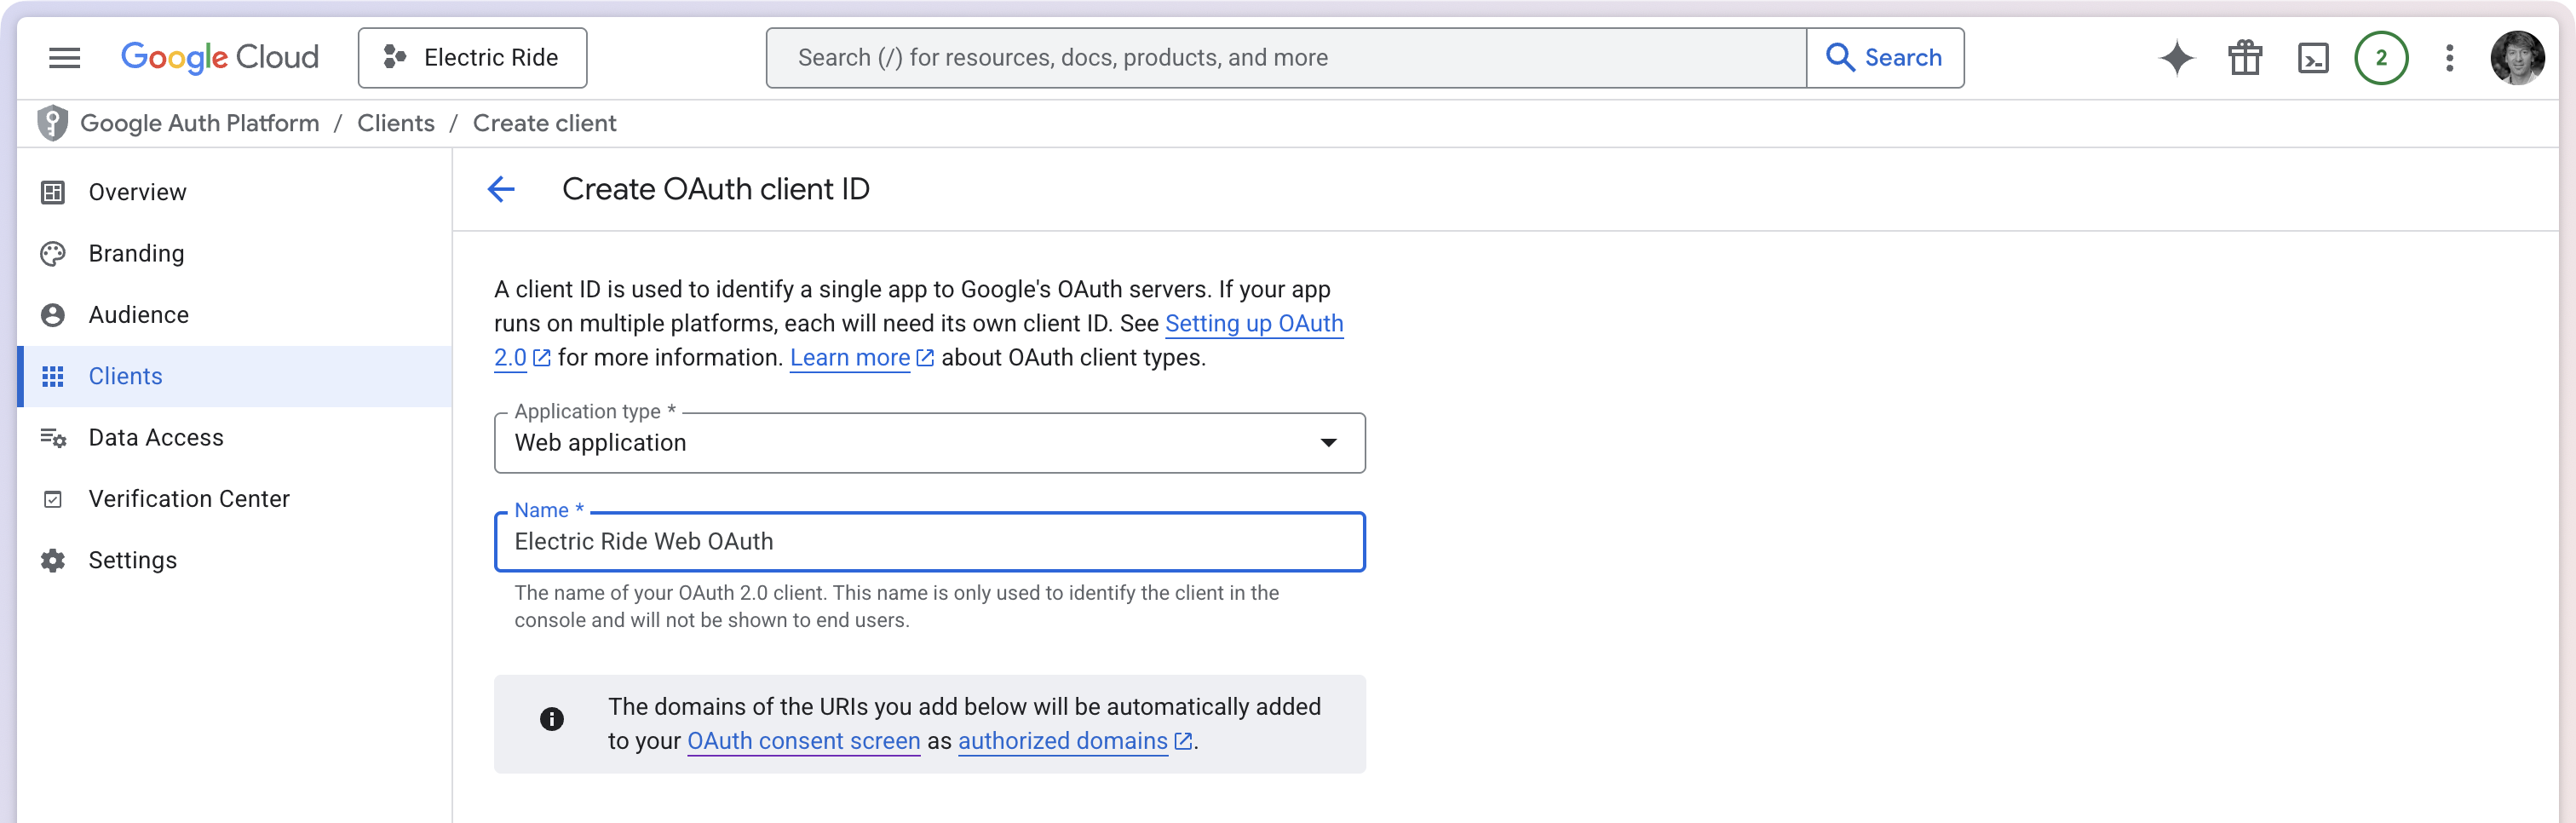
For the Application type, choose Web application – not iOS – then provide a reasonable name based on your app name:
NOTE
You might wonder why we choose Web application here instead of iOS. The reason is that in the approach we are using, Supabase’s own auth server receives the response from Google after sign-in – and because Supabase is a web server, not an iOS app, Google needs a web-style redirect URI to send the user back to.
If you previously created an iOS-type OAuth client for this project, you can ignore it. It won’t be used here.
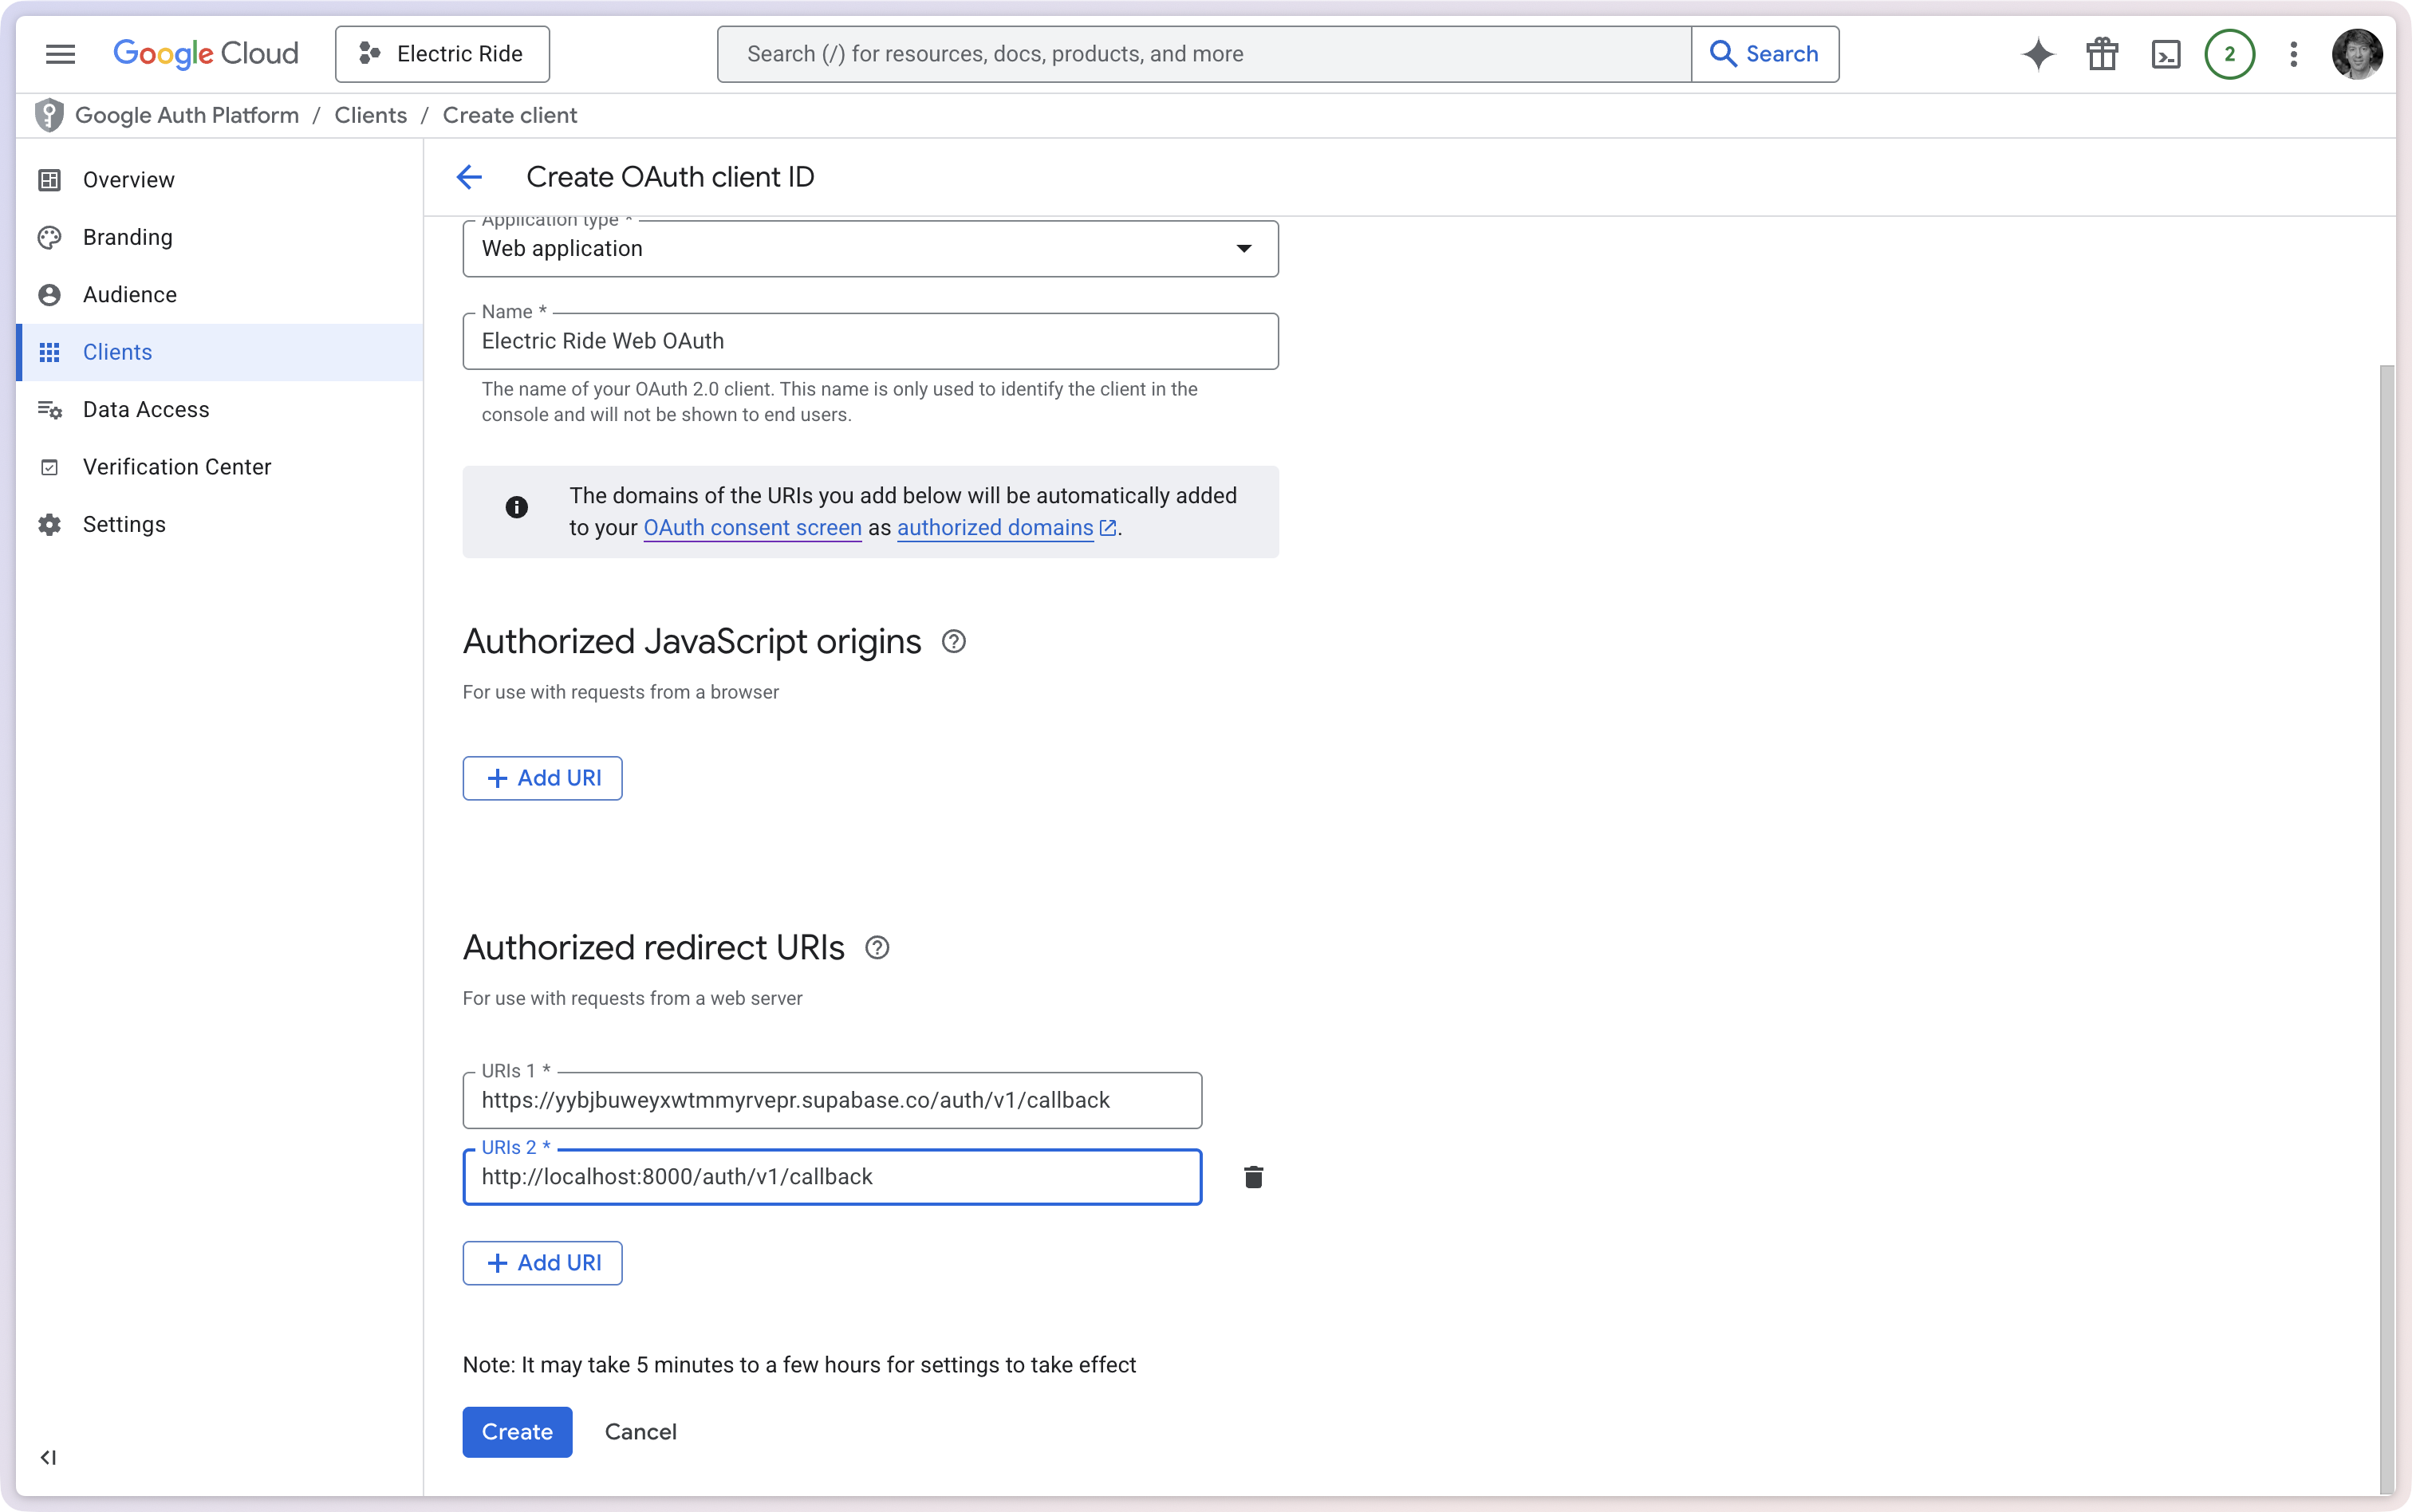
Scroll down to the Authorised redirect URIs section and add two URIs:
Your Supabase cloud project’s callback URL: https://YOUR_PROJECT_REF.supabase.co/auth/v1/callback
Your local development callback URL: http://localhost:8000/auth/v1/callback
Your project ref is the string of letters and numbers in your Supabase cloud dashboard URL:
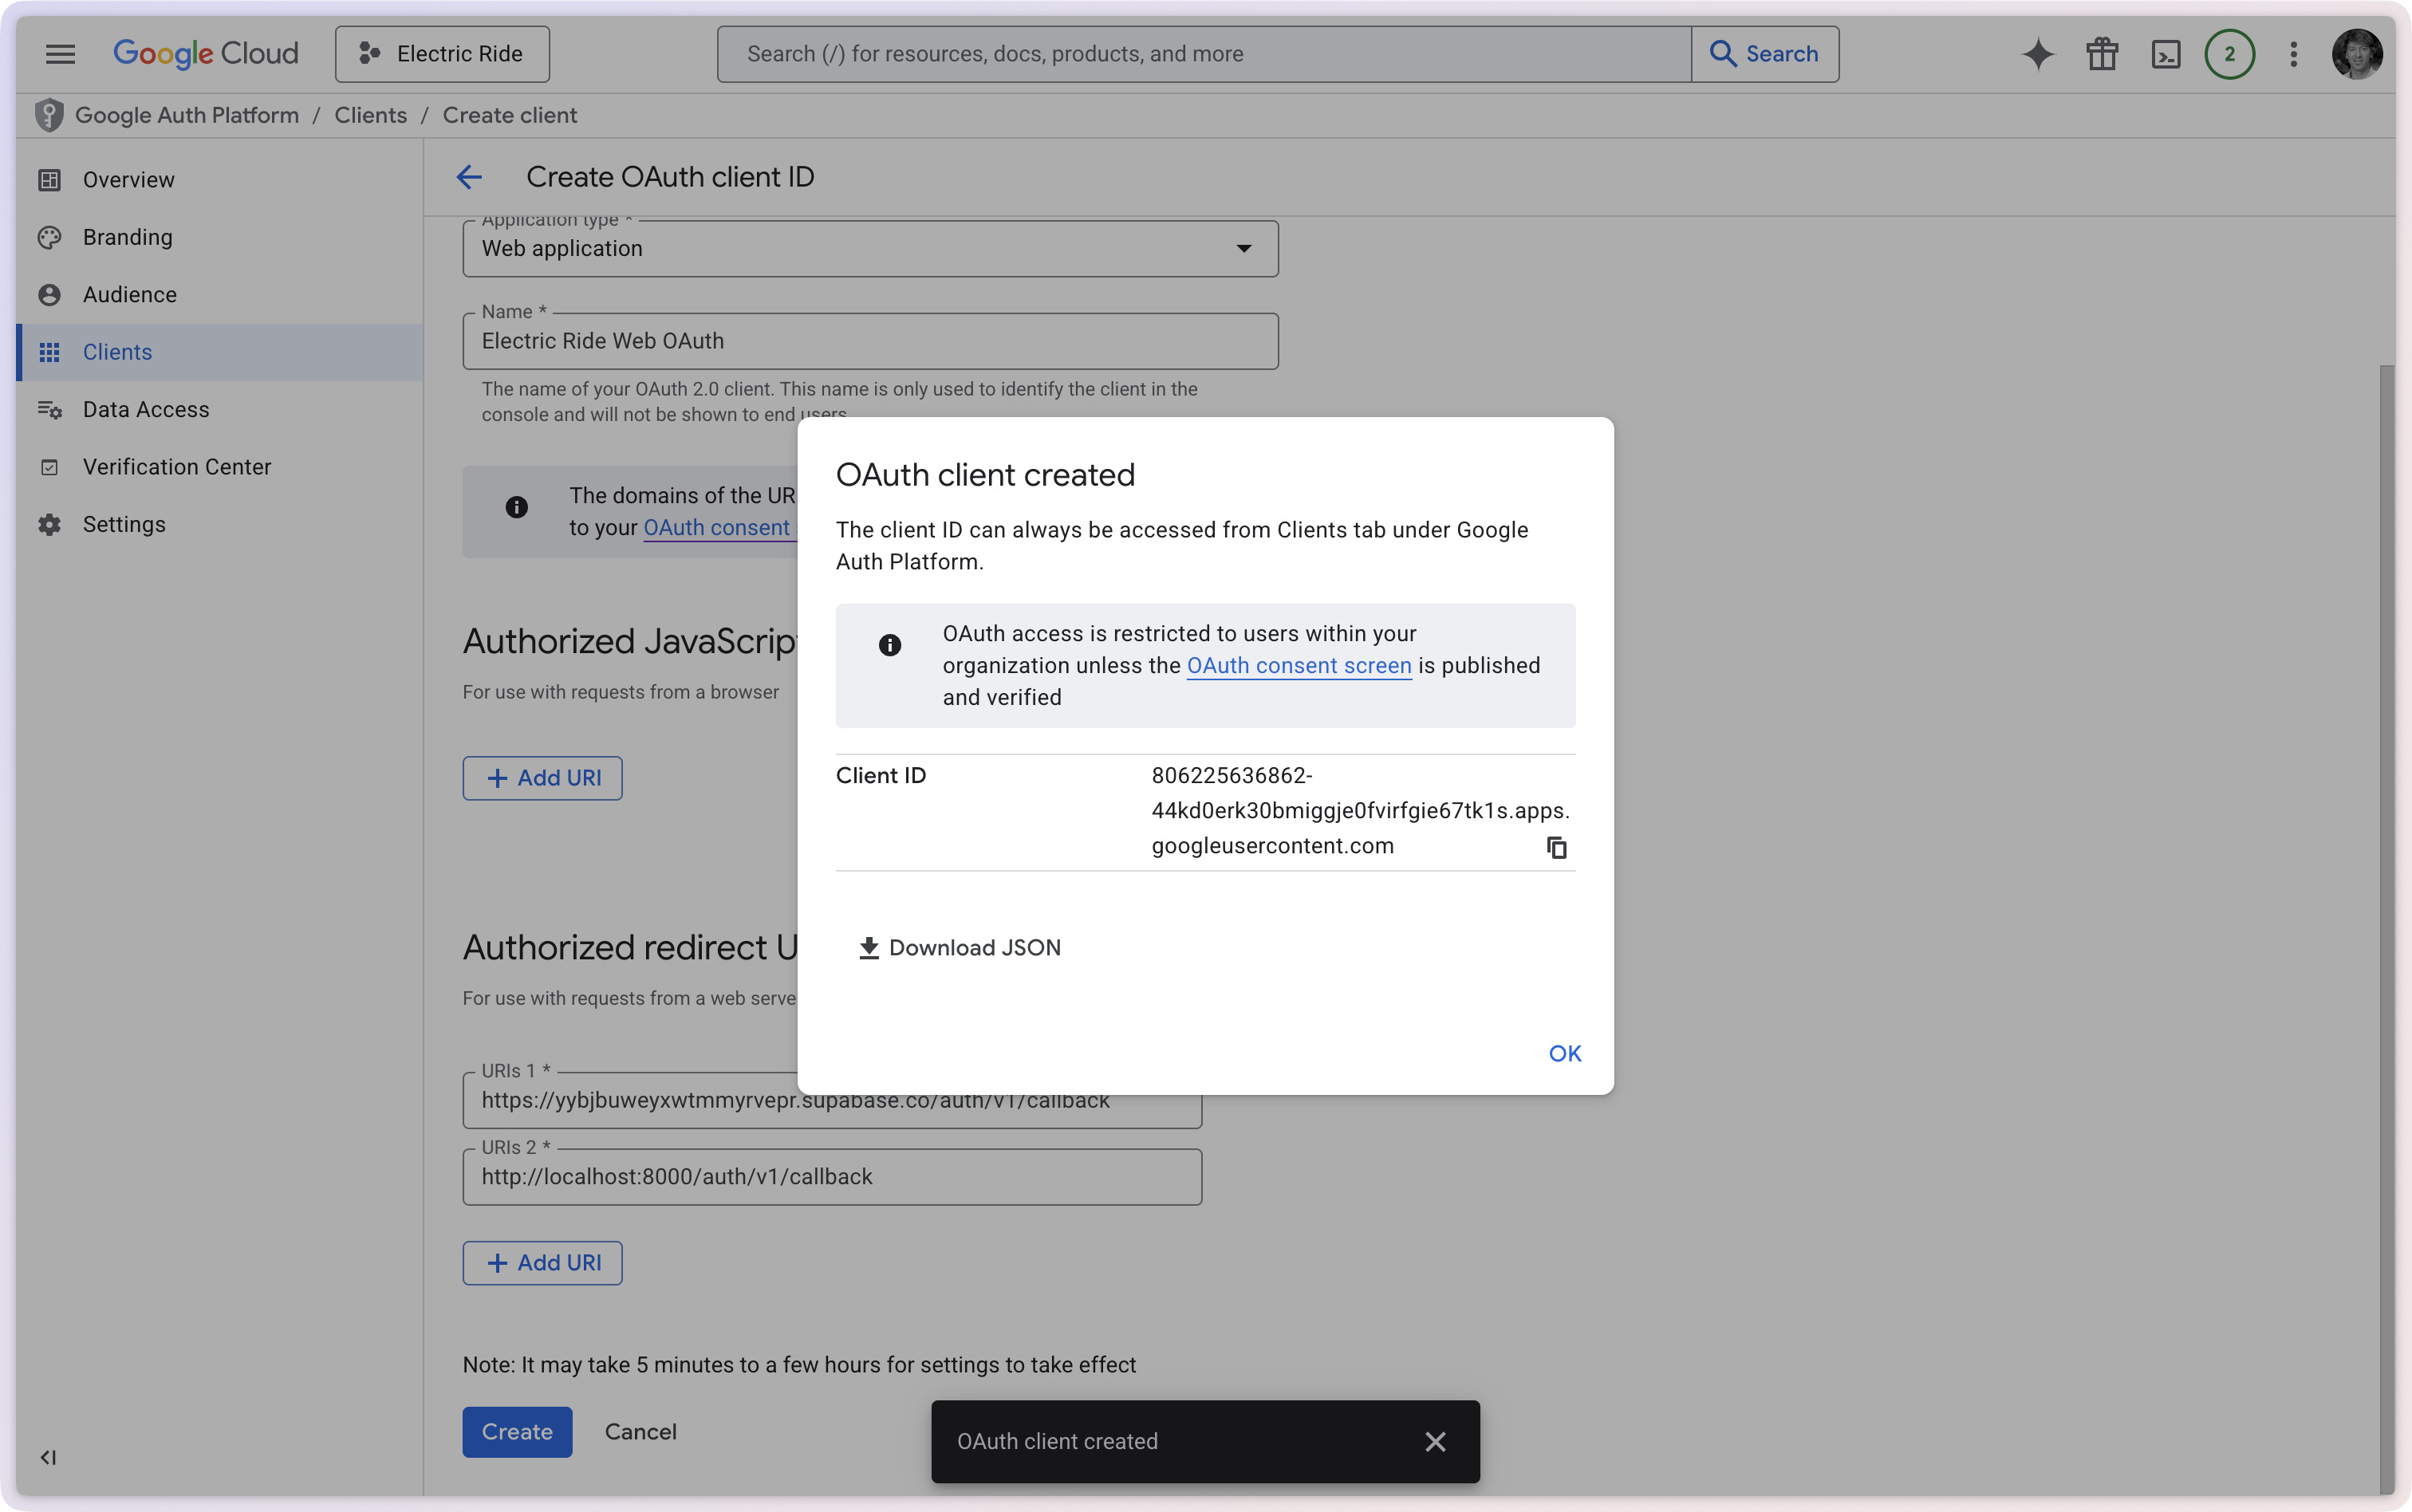
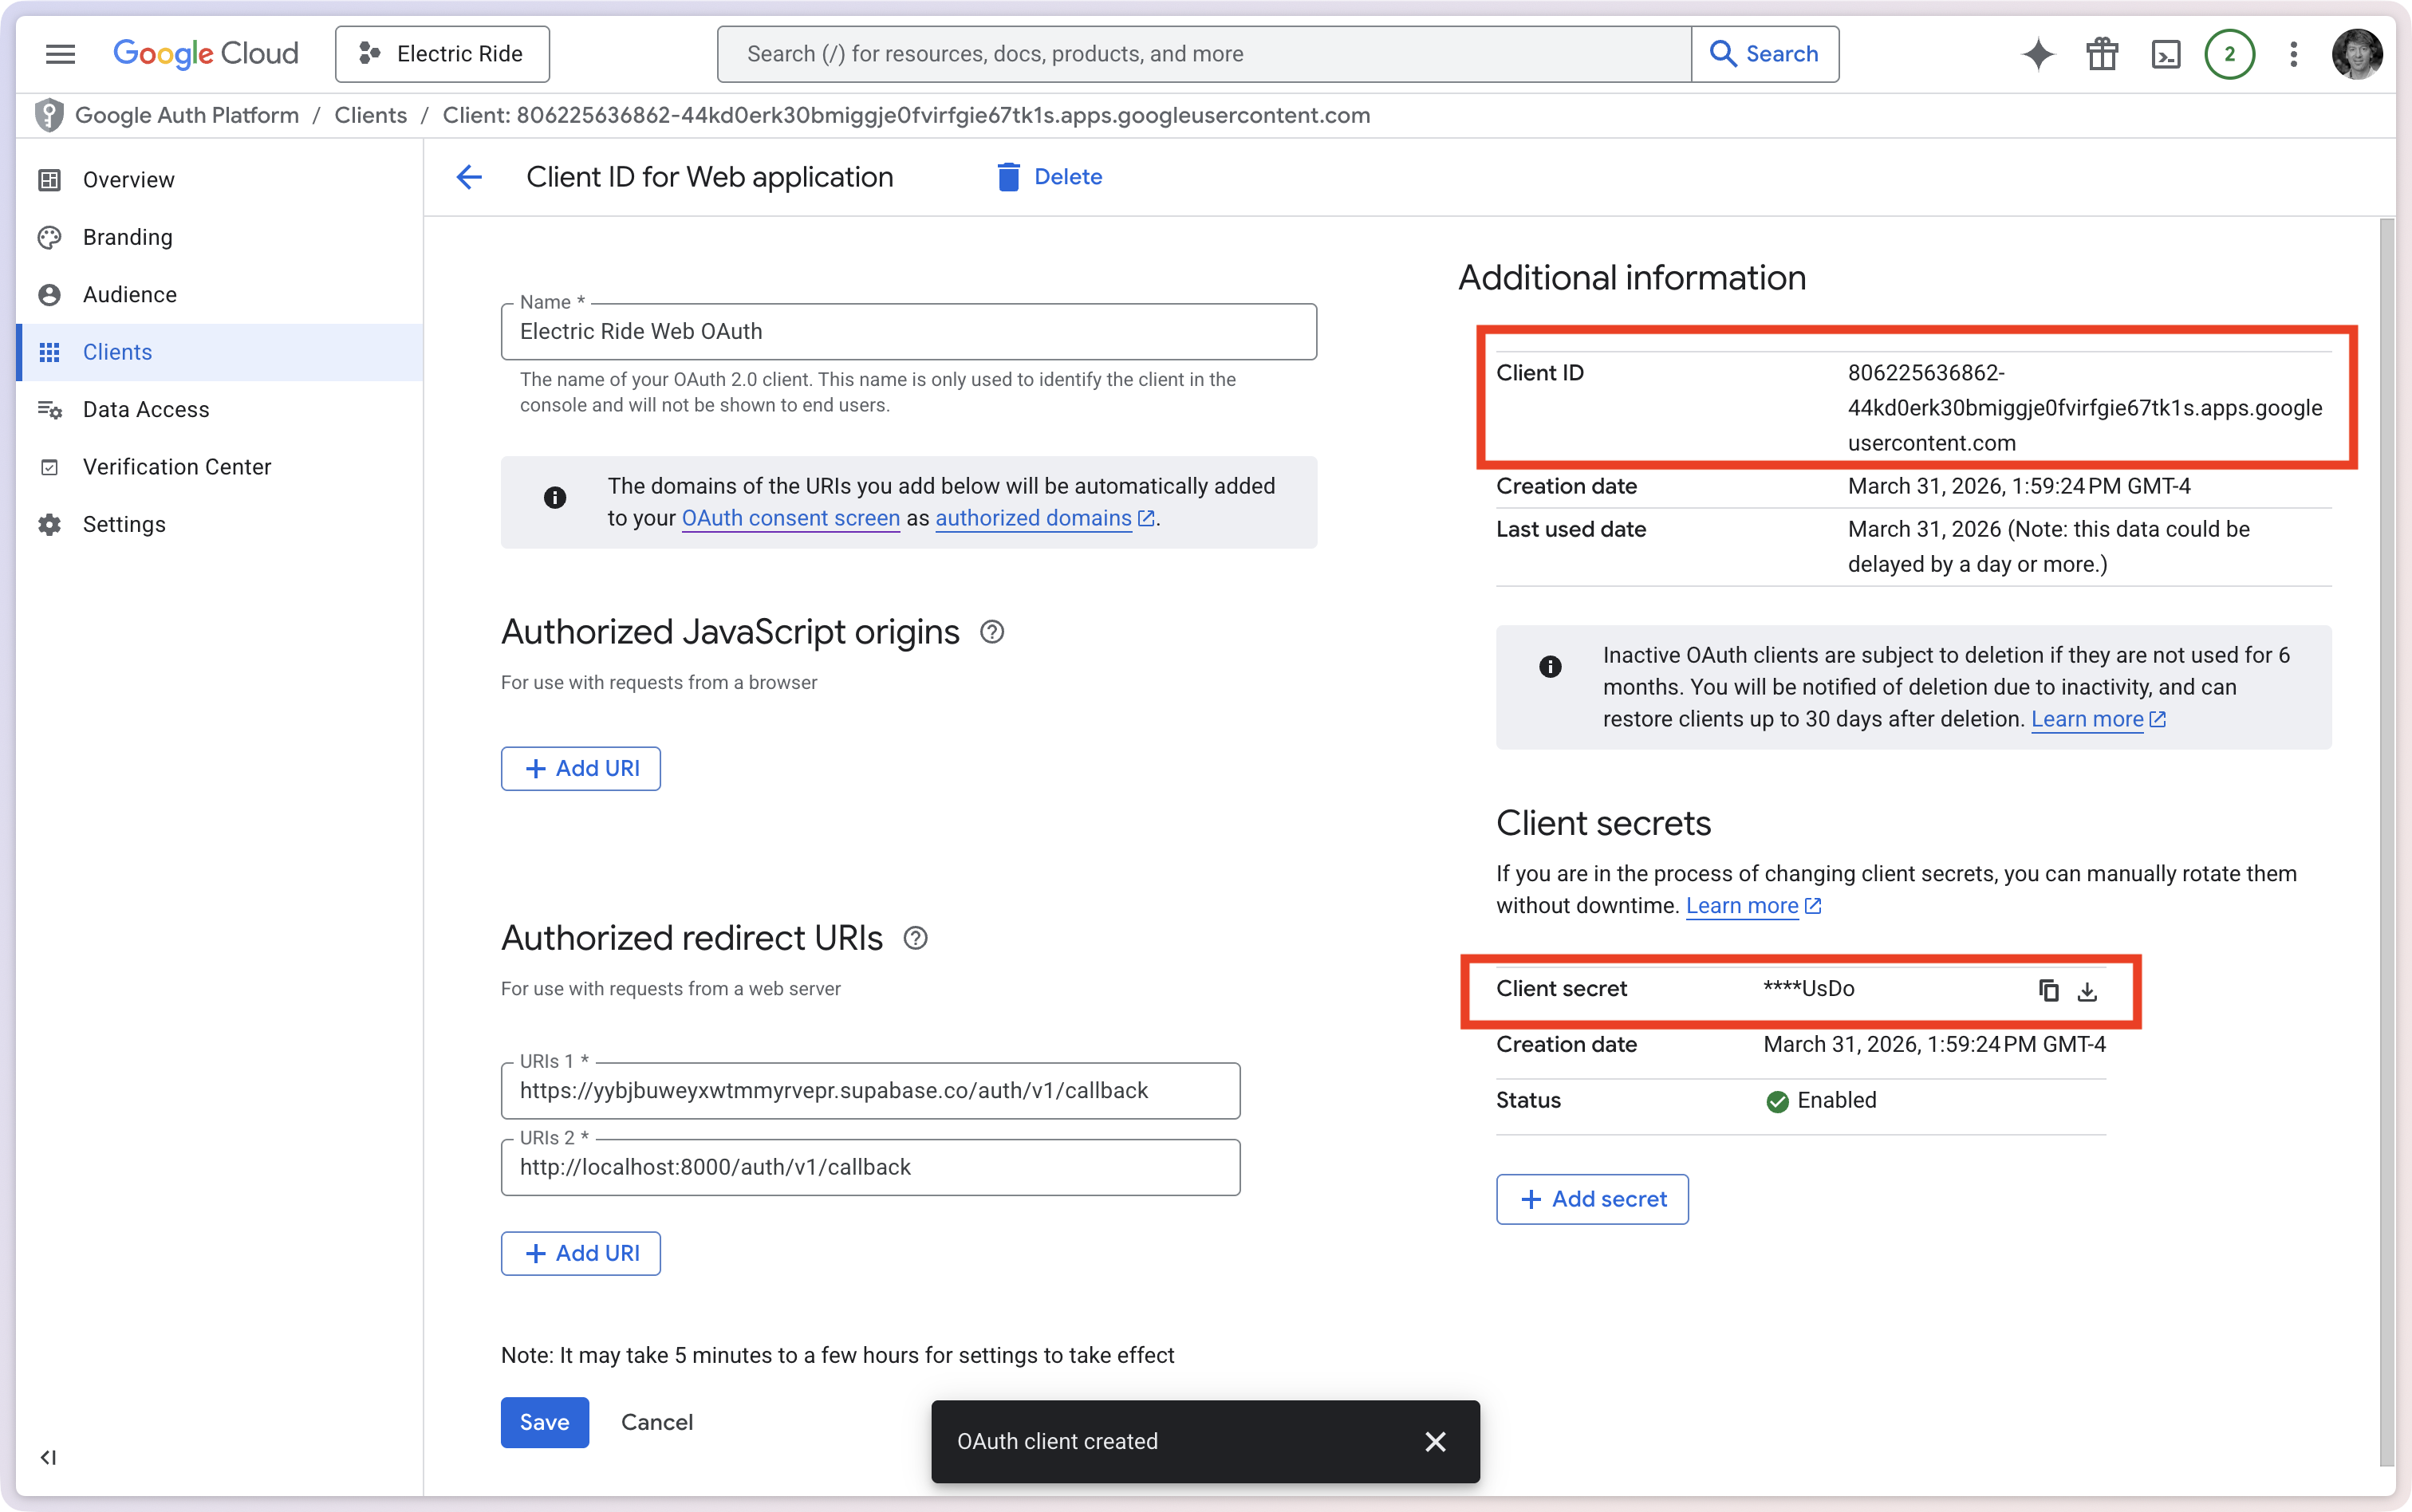
Google will now show you a dialog containing your Client ID.
A Client Secret will be provided within a JSON file that you should download and store in a safe place on your computer.
IMPORTANT
Copy both the Client ID and the Client Secret to a safe place on your computer. You will need both of them shortly.
Unlike some other OAuth setups, the web application approach requires the client secret as well as the client ID. Keep the secret somewhere private – do not paste it into any file that gets committed to GitHub.
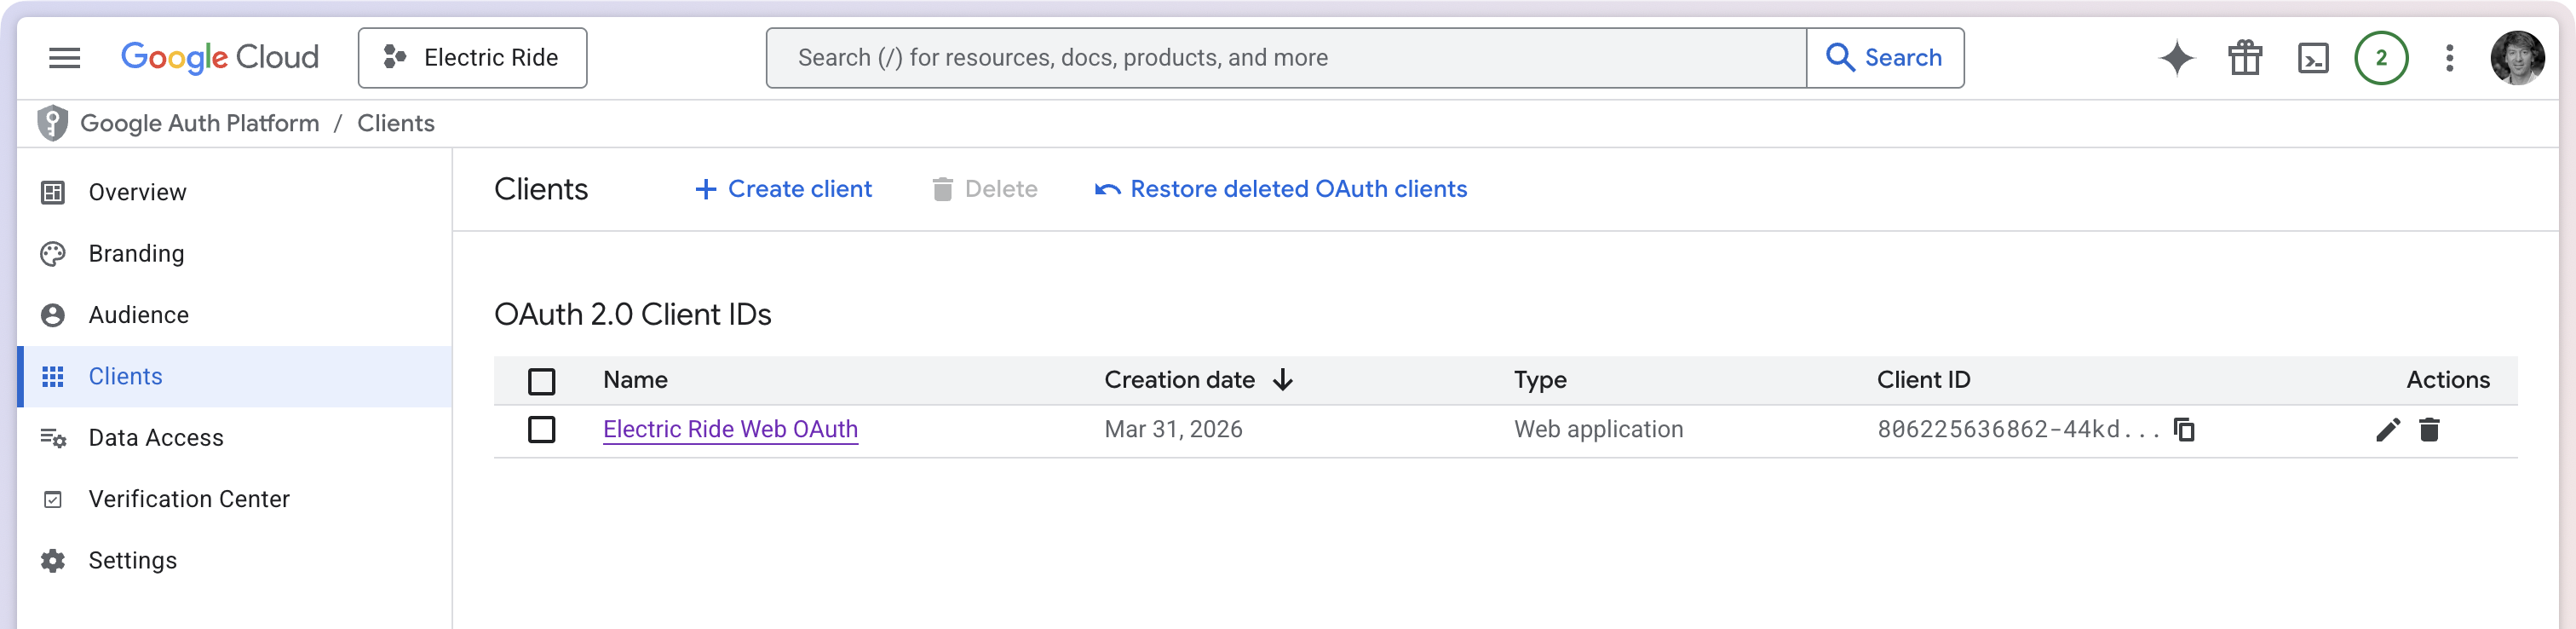
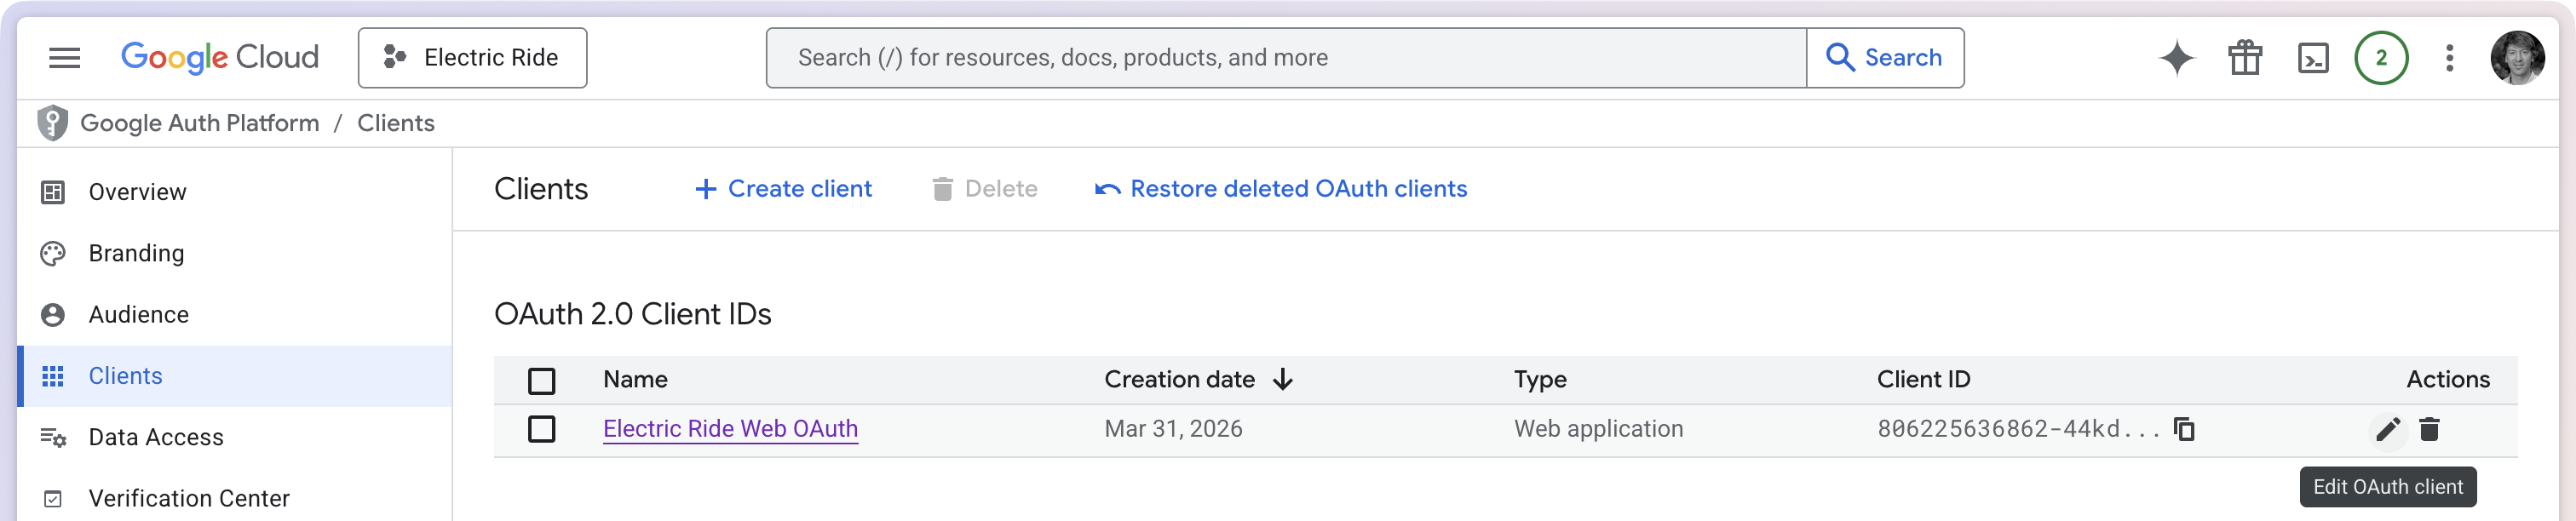
After creating your OAuth Client ID, the screen should look something like this:
TIP
If you do lose the JSON file, you can retrieve the Client ID and Client Secret by choosing the “pencil” icon – Edit OAuth Client:
The two values can be found in the locations shown here:
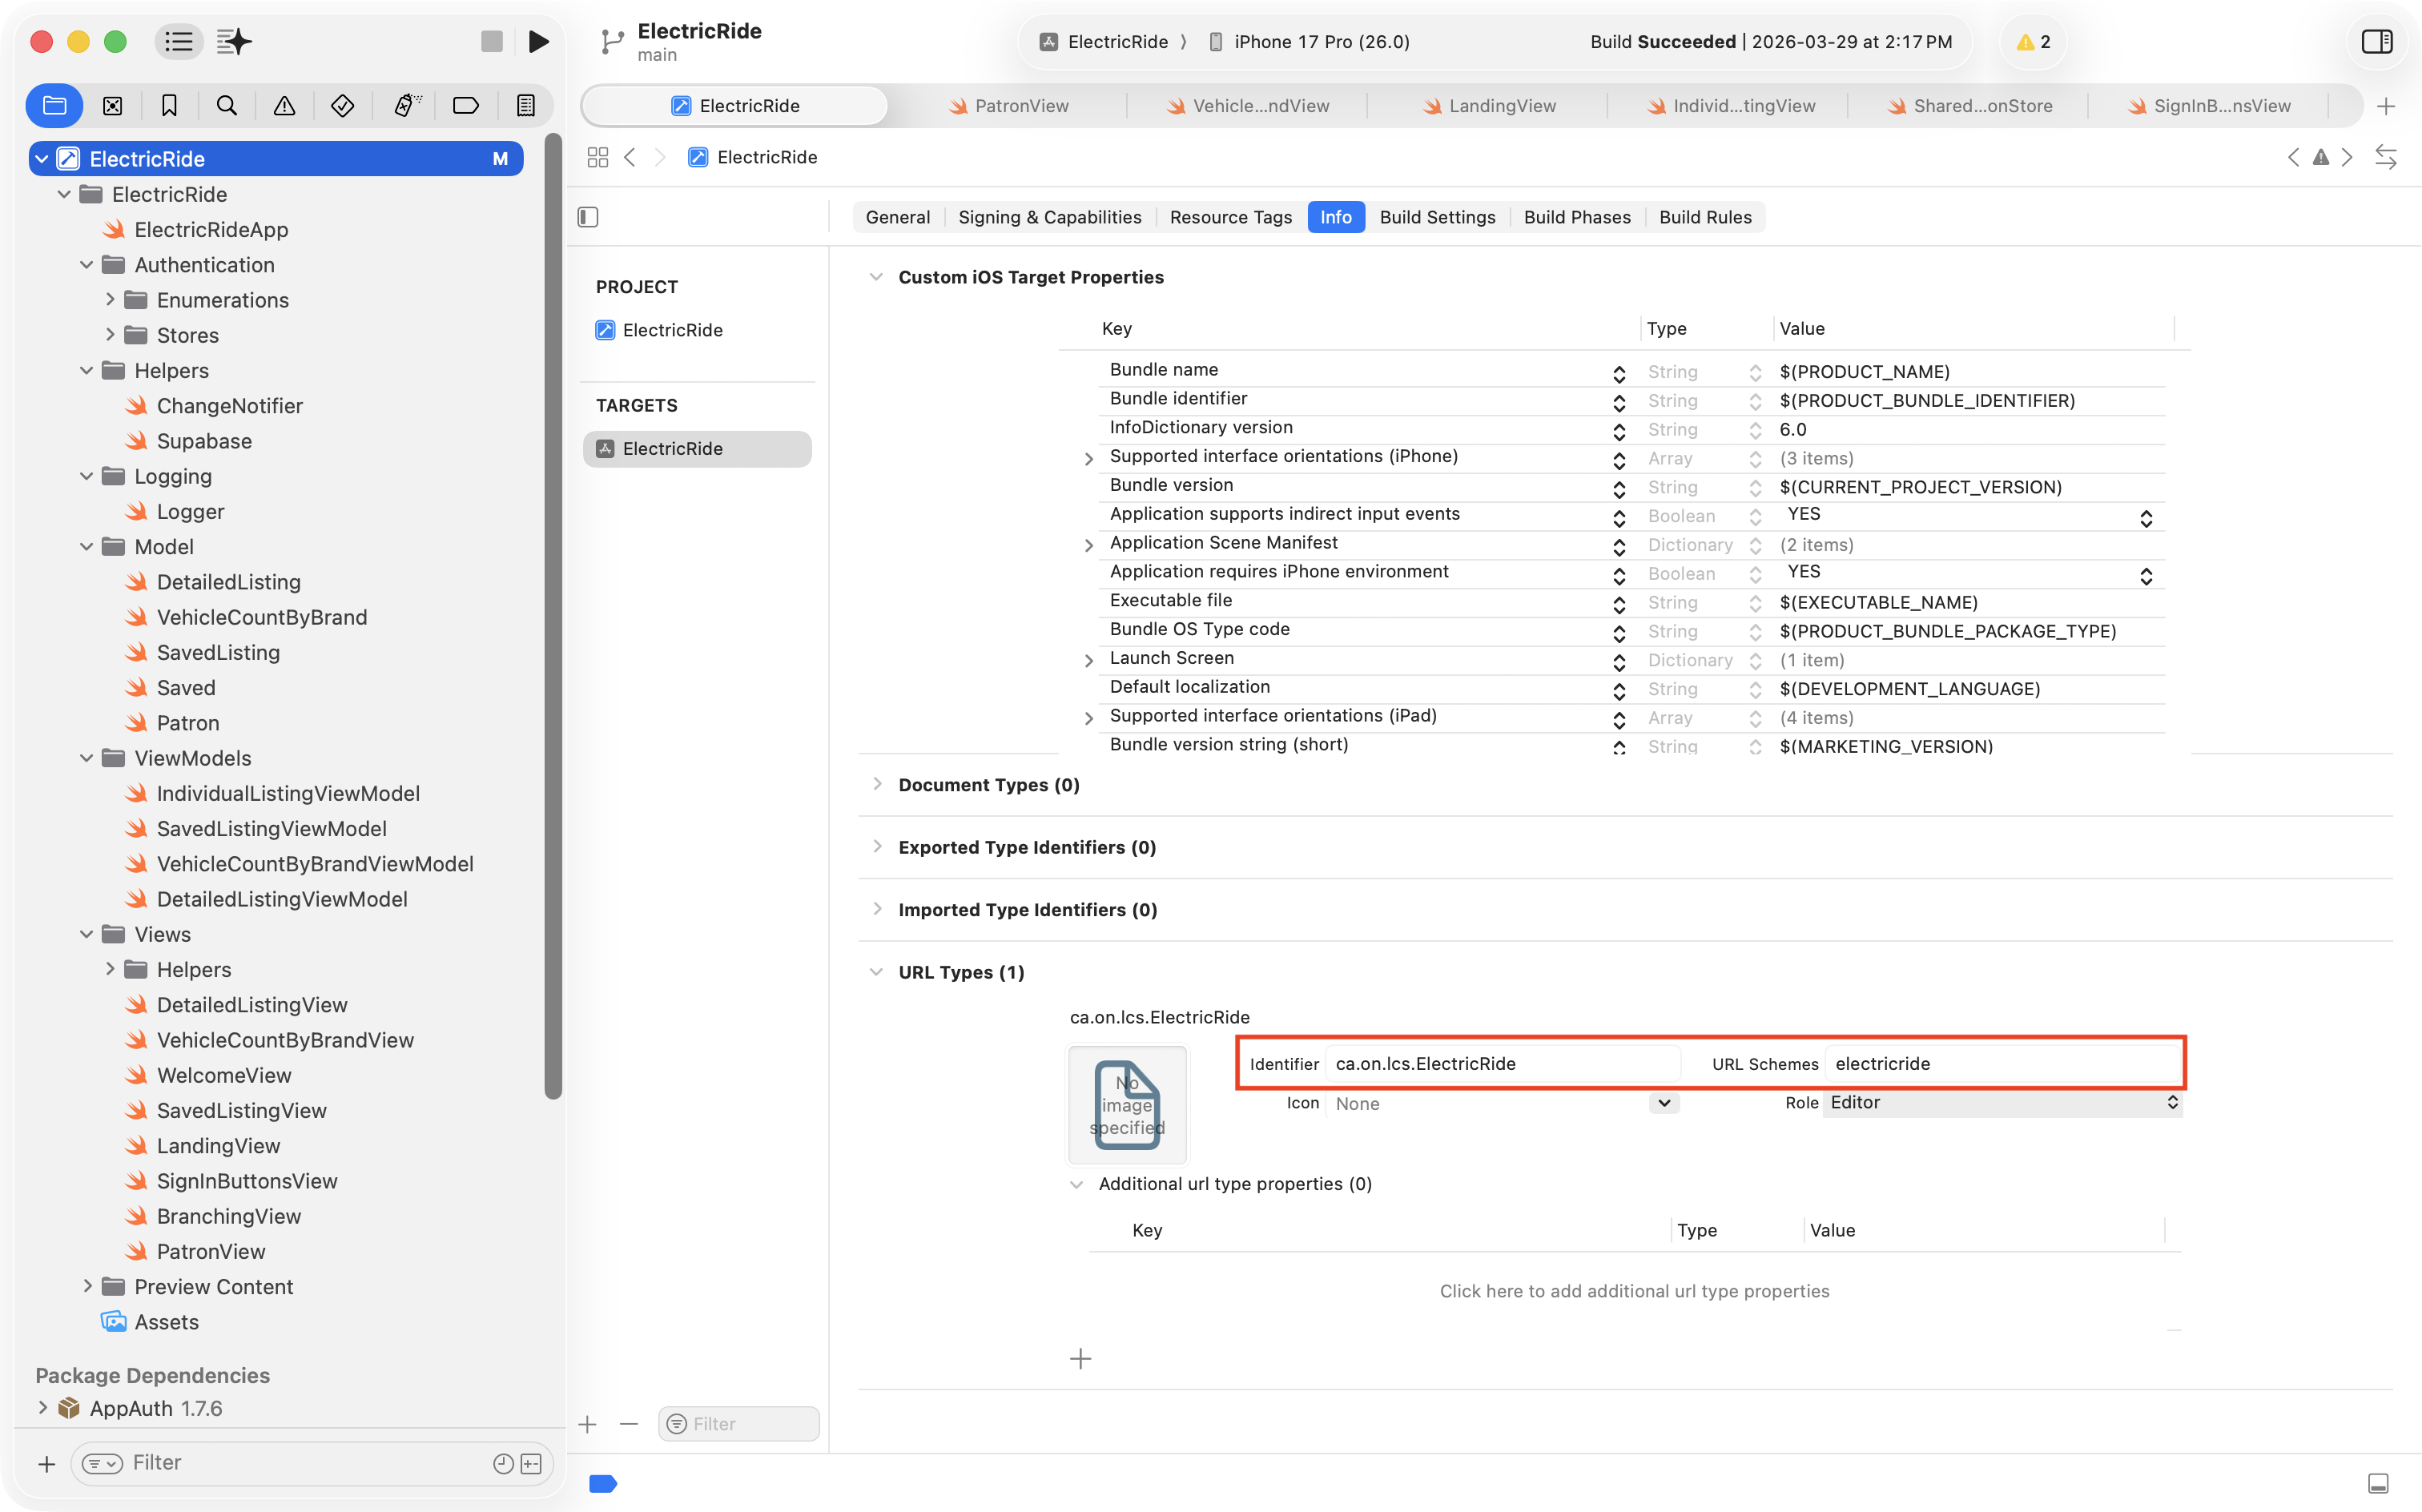
When Supabase finishes processing the sign-in, it needs a way to hand control back to your app. It does this by redirecting to a special address that only your app knows how to open – a custom URL scheme.
Think of it like a custom protocol, similar to how https:// opens a web browser or mailto: opens an email app. We are going to register a scheme that is unique to our app, such as electricride://, so that when Supabase redirects to that address, iOS knows to open our app.
In Xcode, select your project in the Project Navigator, then select your app Target, then open the Info tab. Scroll down to the URL Types section and click the + button to add a new entry:
Fill in the two fields as follows:
Field
Value
Identifier
Your app’s bundle ID (e.g. ca.on.lcs.ElectricRide)
URL Schemes
A short, lowercase name for your app with no spaces (e.g. electricride)
NOTE
The URL scheme you choose must be unique. If two apps on the same device share a scheme, iOS will open whichever one it finds first, which is not what we want. Using your app’s bundle ID as the identifier and a lowercase version of your app’s name as the scheme is a safe convention to follow.
Add Google sign-in to Supabase
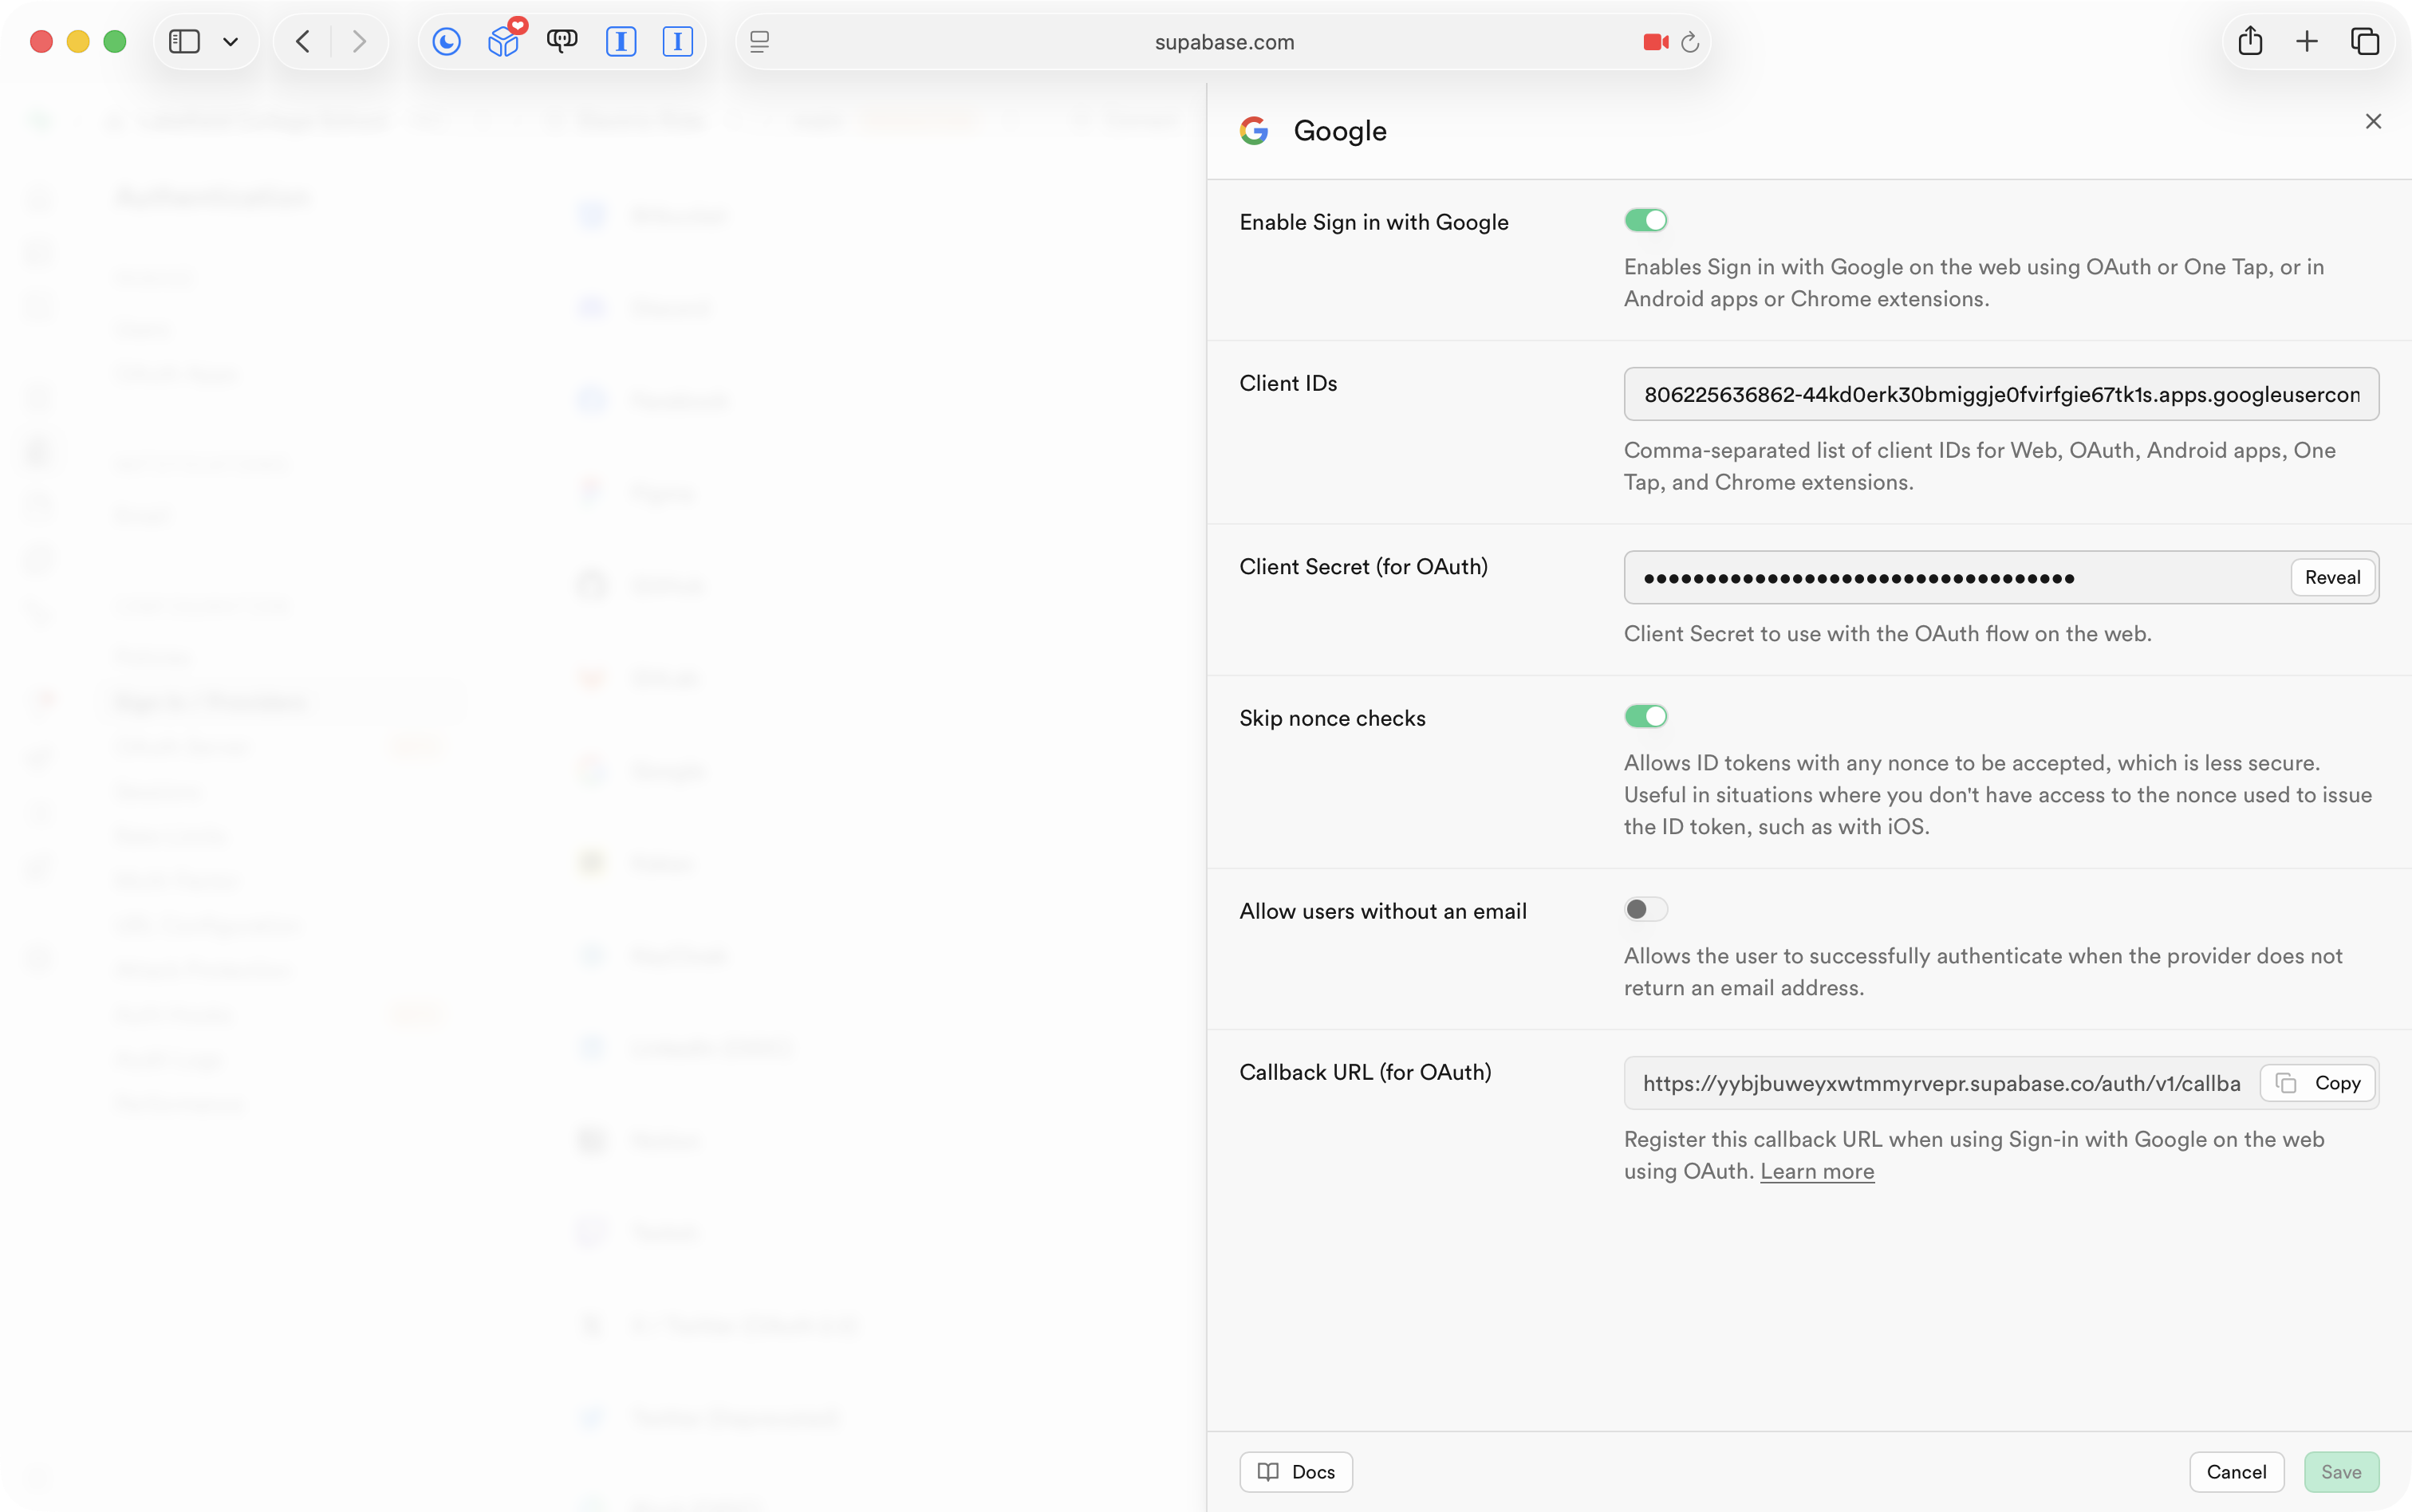
Next we need to tell Supabase that our app will be using Google sign-in, and provide the credentials Google just gave us.
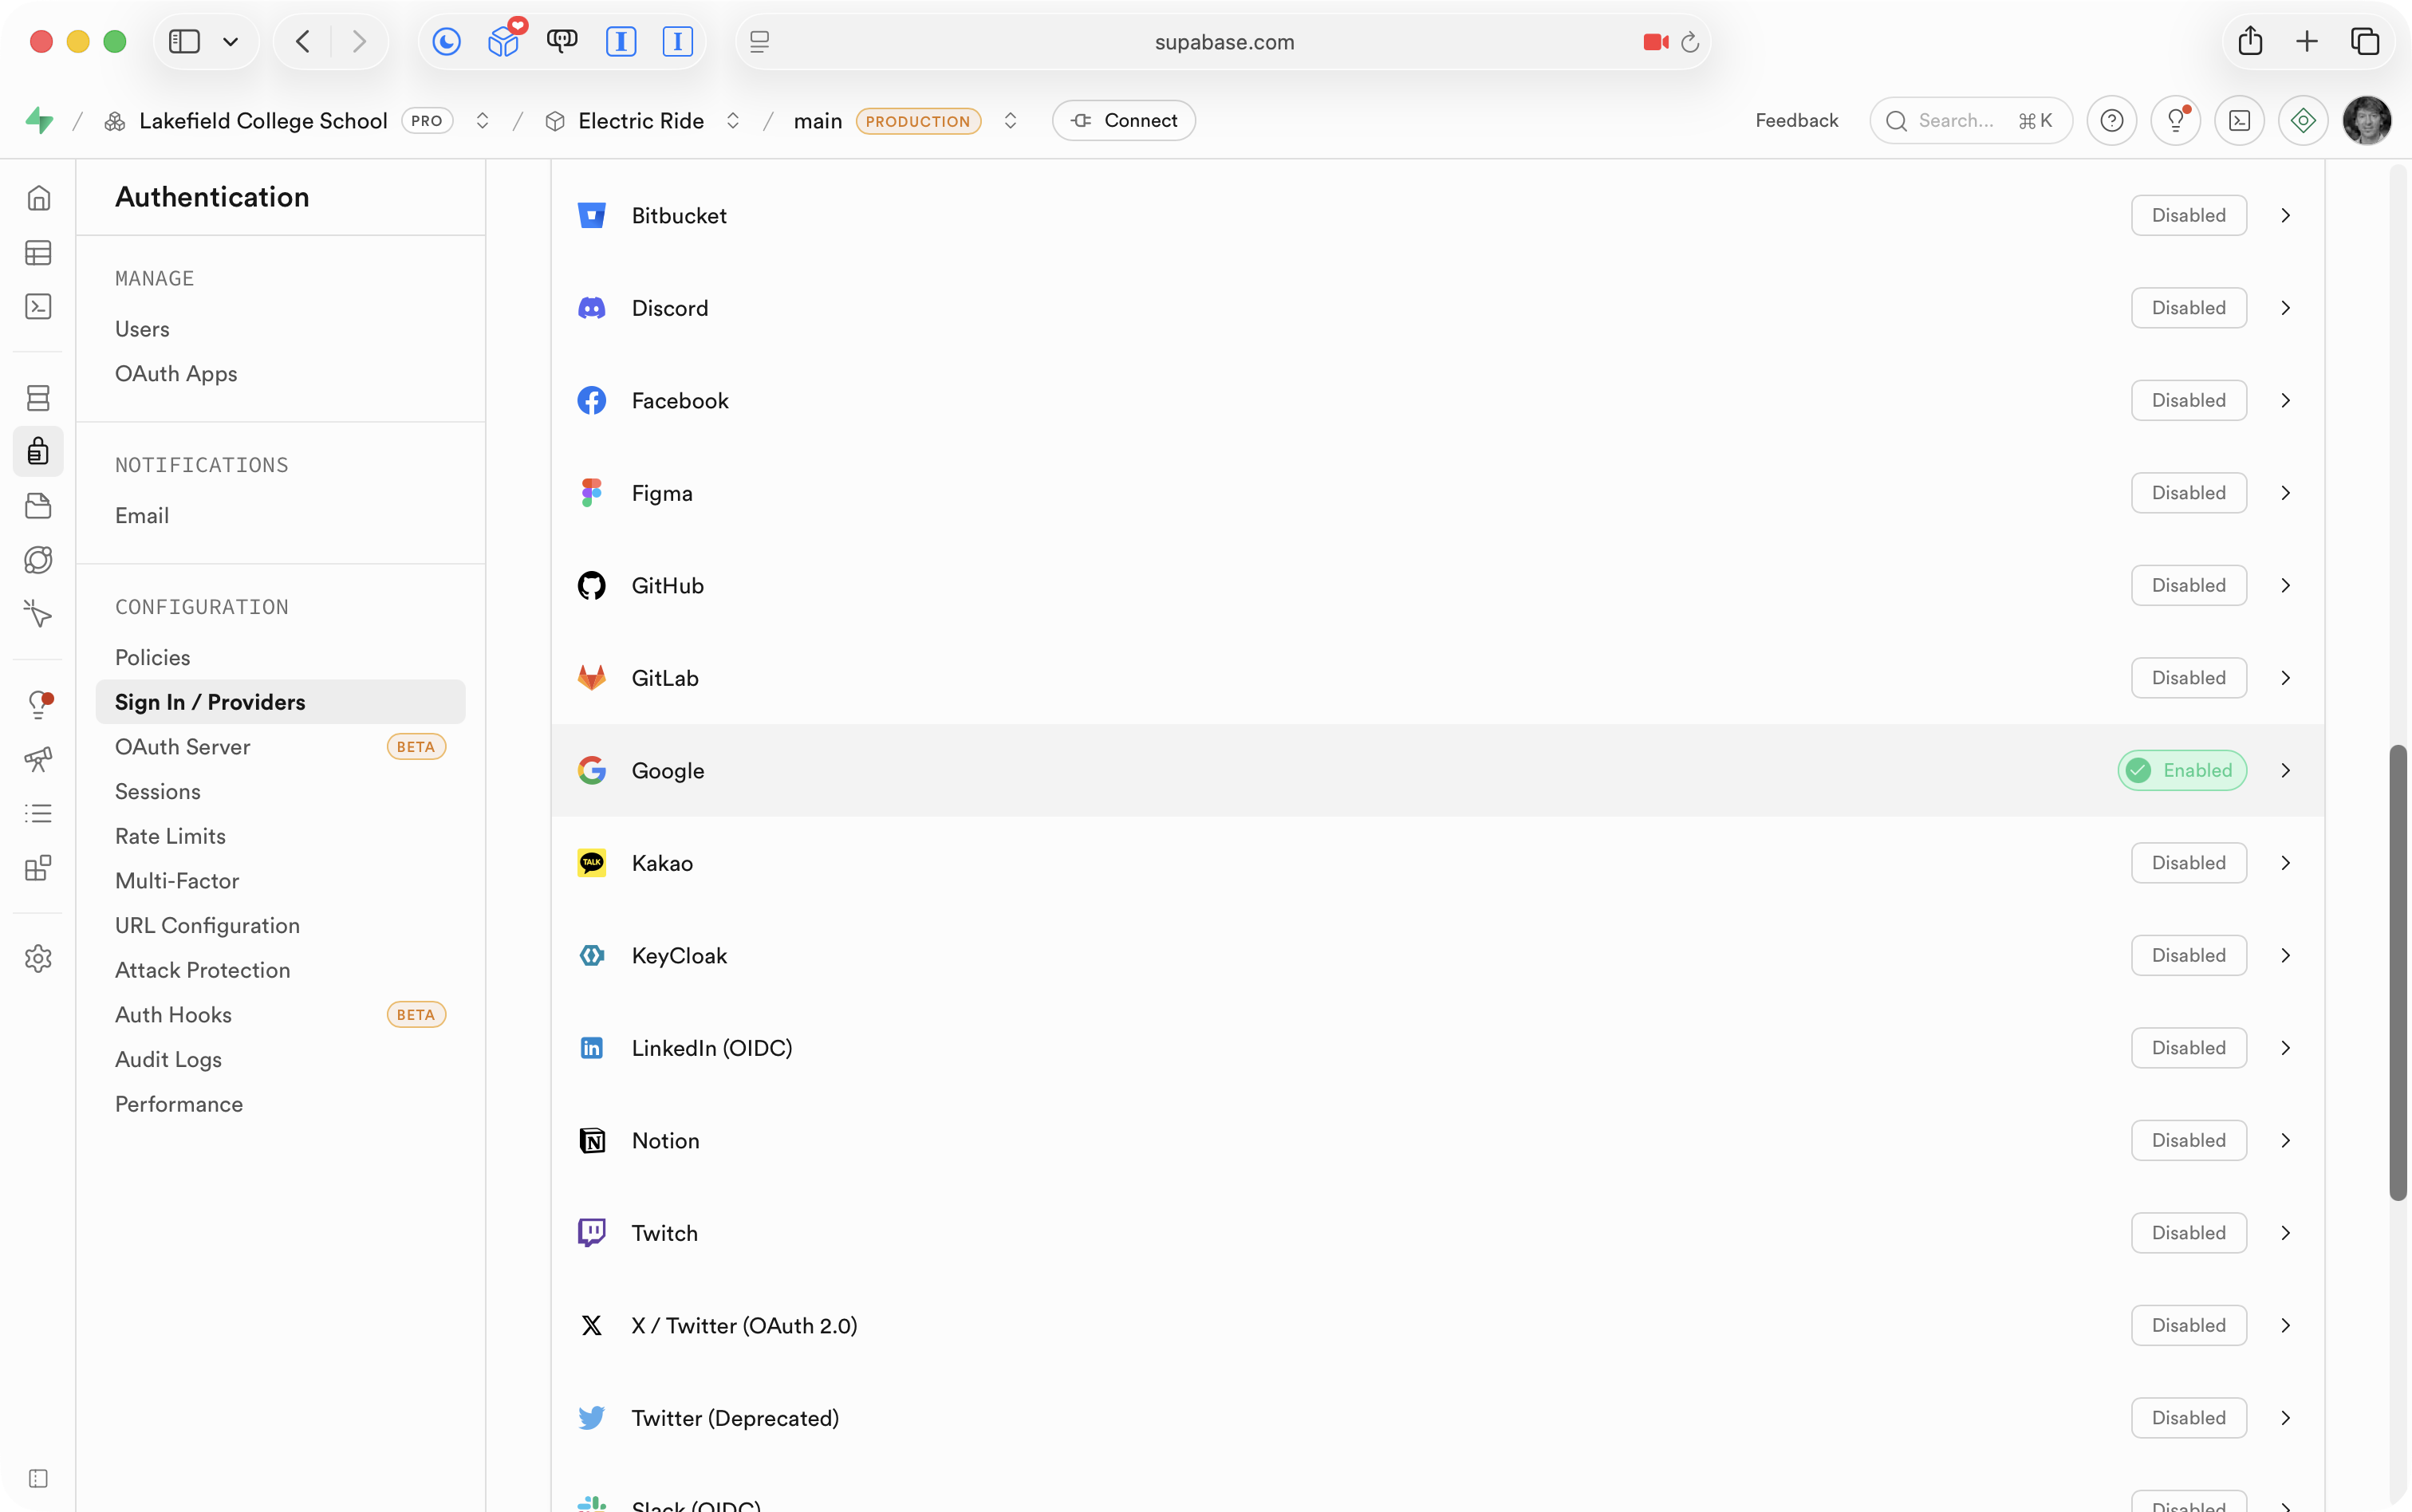
In your Supabase cloud dashboard, go to Authentication → Providers and find Google in the list. Enable it and then enter:
The Client ID (from Google’s OAuth client you just created)
The Client Secret (from the same dialog)
Press Save when you are done:
Add your app’s URL scheme as an allowed redirect URL
There are two mores thing to configure in Supabase.
After Supabase receives the sign-in response from Google, it will redirect to your app using the URL scheme you registered.
Supabase needs to know in advance that this redirect is expected and safe.
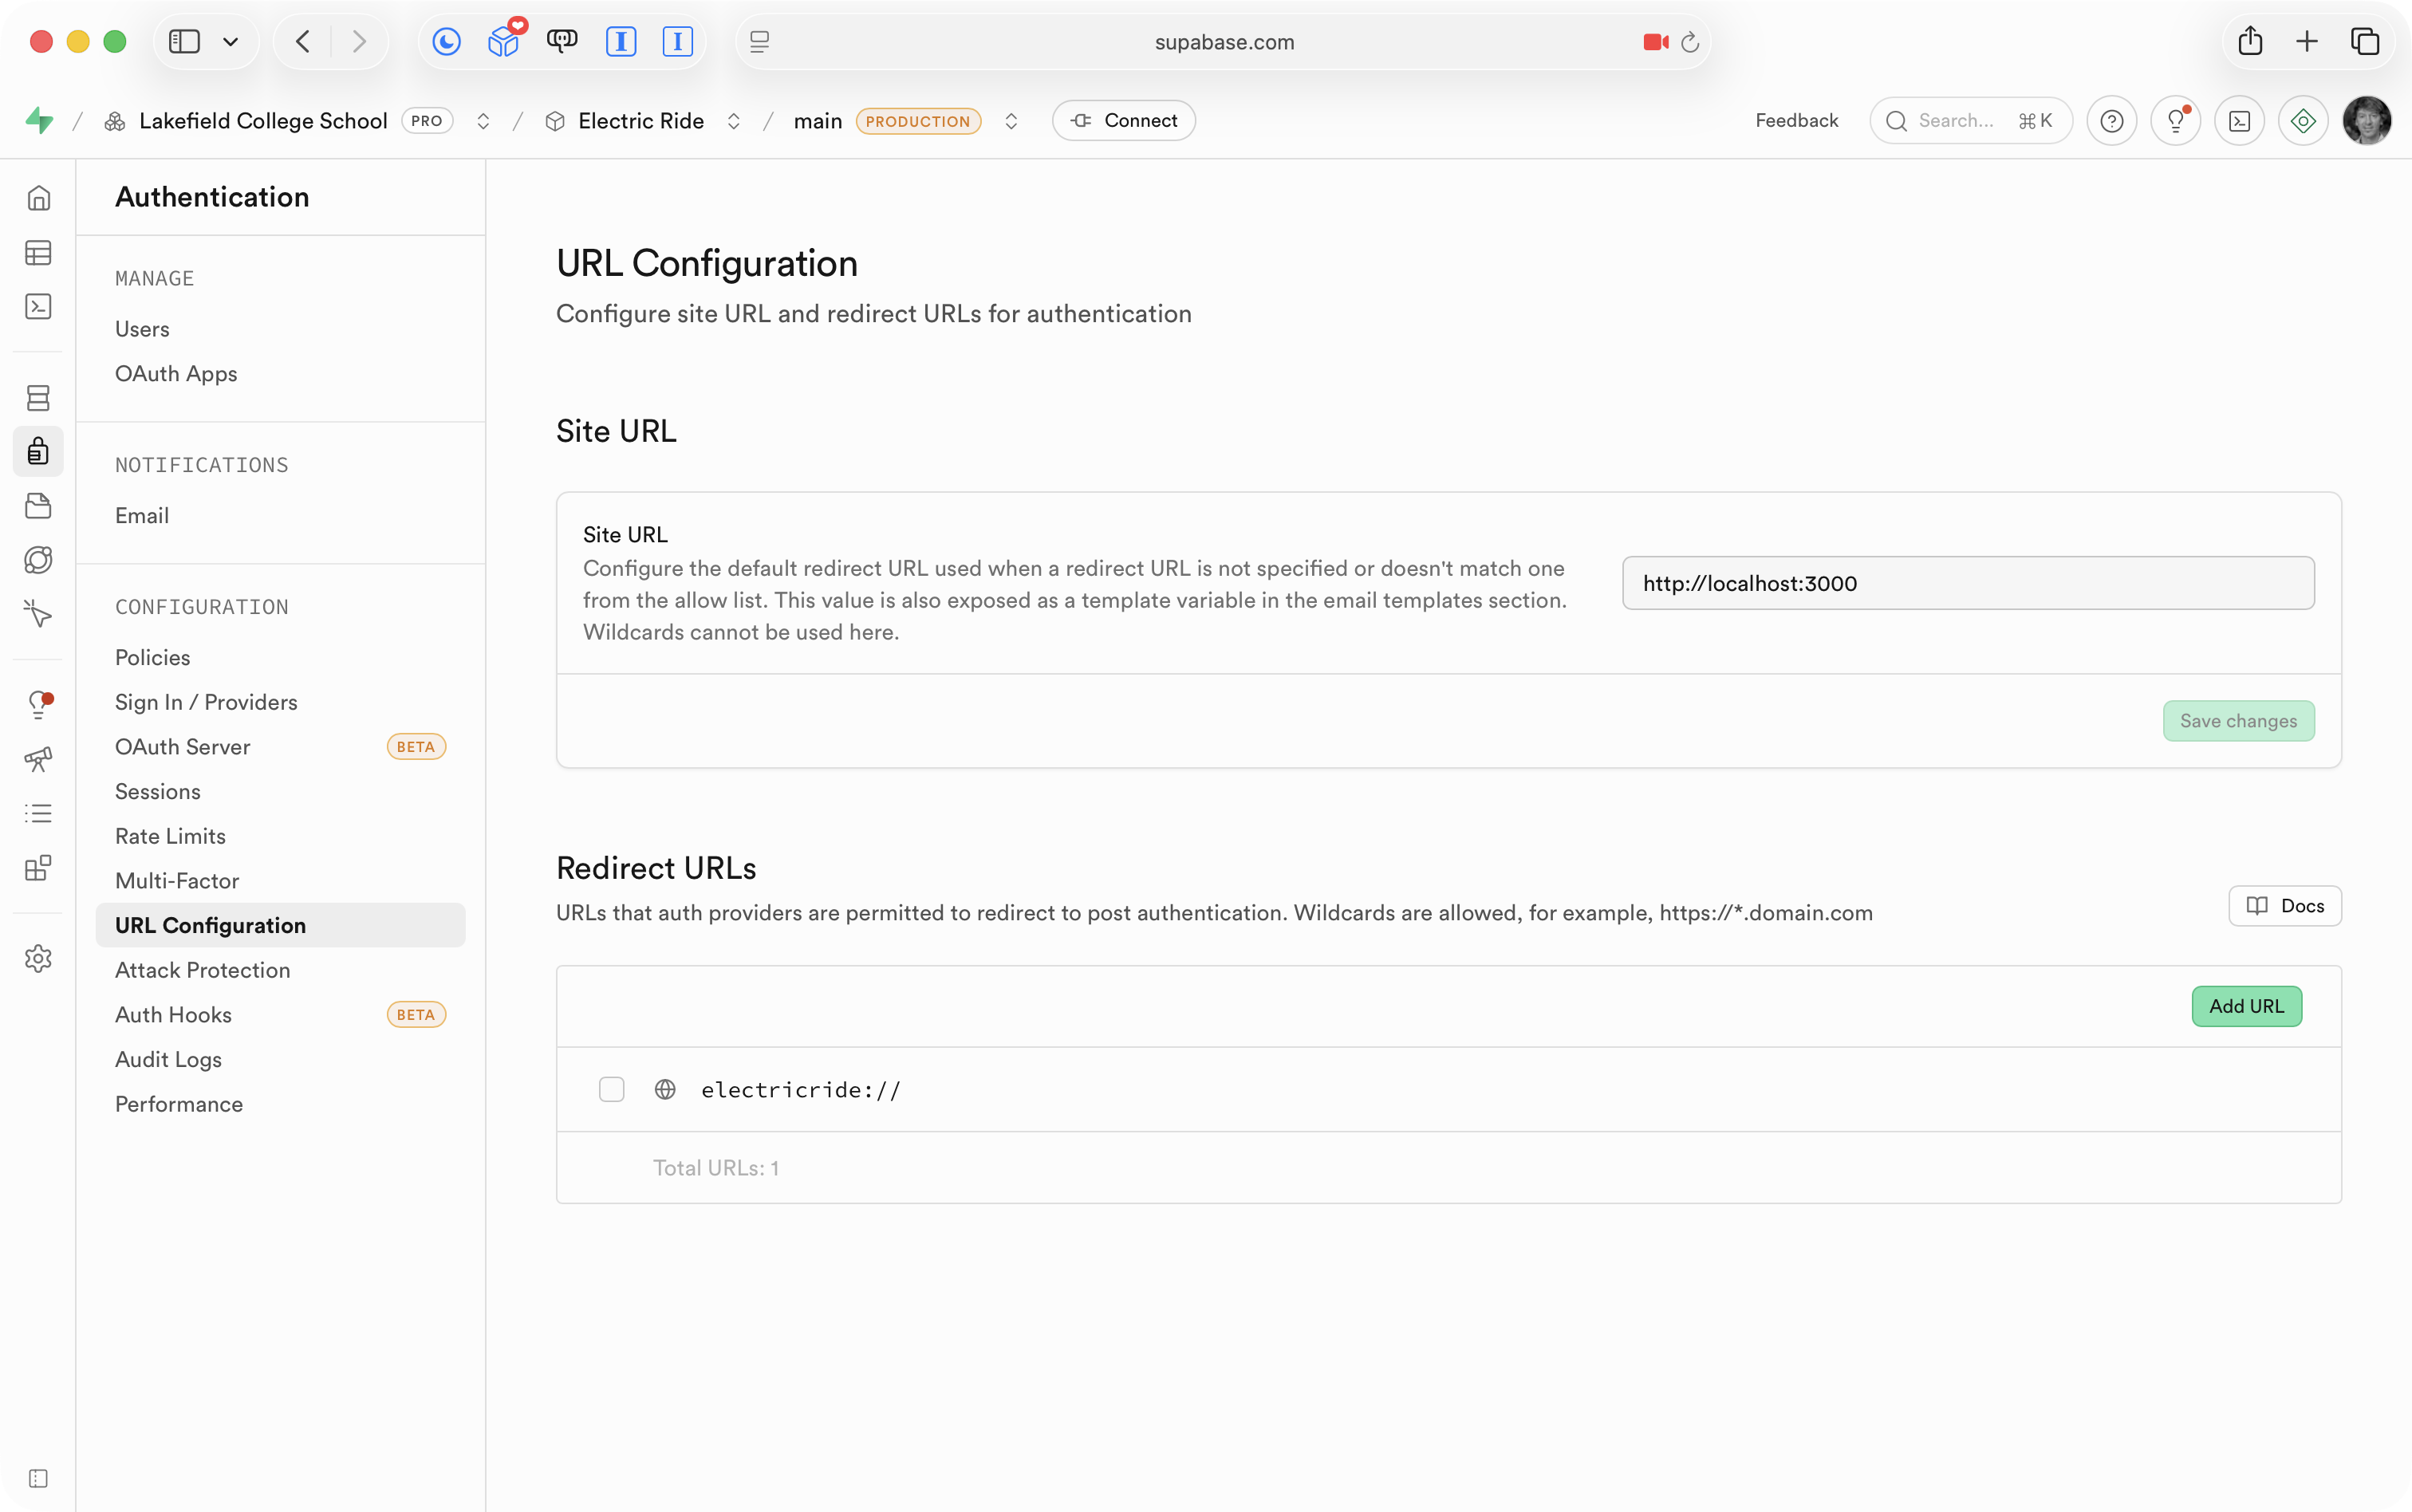
In the Supabase cloud dashboard, go to Authentication → URL Configuration.
Under Site URL, change the default value to:
electricride://
Then under Redirect URLs, press Add URL and enter:
electricride://**
Press Save.
NOTE
You should substitute electricride with whatever URL scheme you chose in the previous step.
Add code to use social sign-in
Finally, we need to update the code in our project to make sign-in happen using the approach we have set up above.
The changes are:
Remove the simulated sign-in code.
Add SignInButtonsView to start the sign-in process.
Handle adding a new patron to the database.
Adjust BranchingView to watch for changes in authentication status.
Remove simulated sign-in
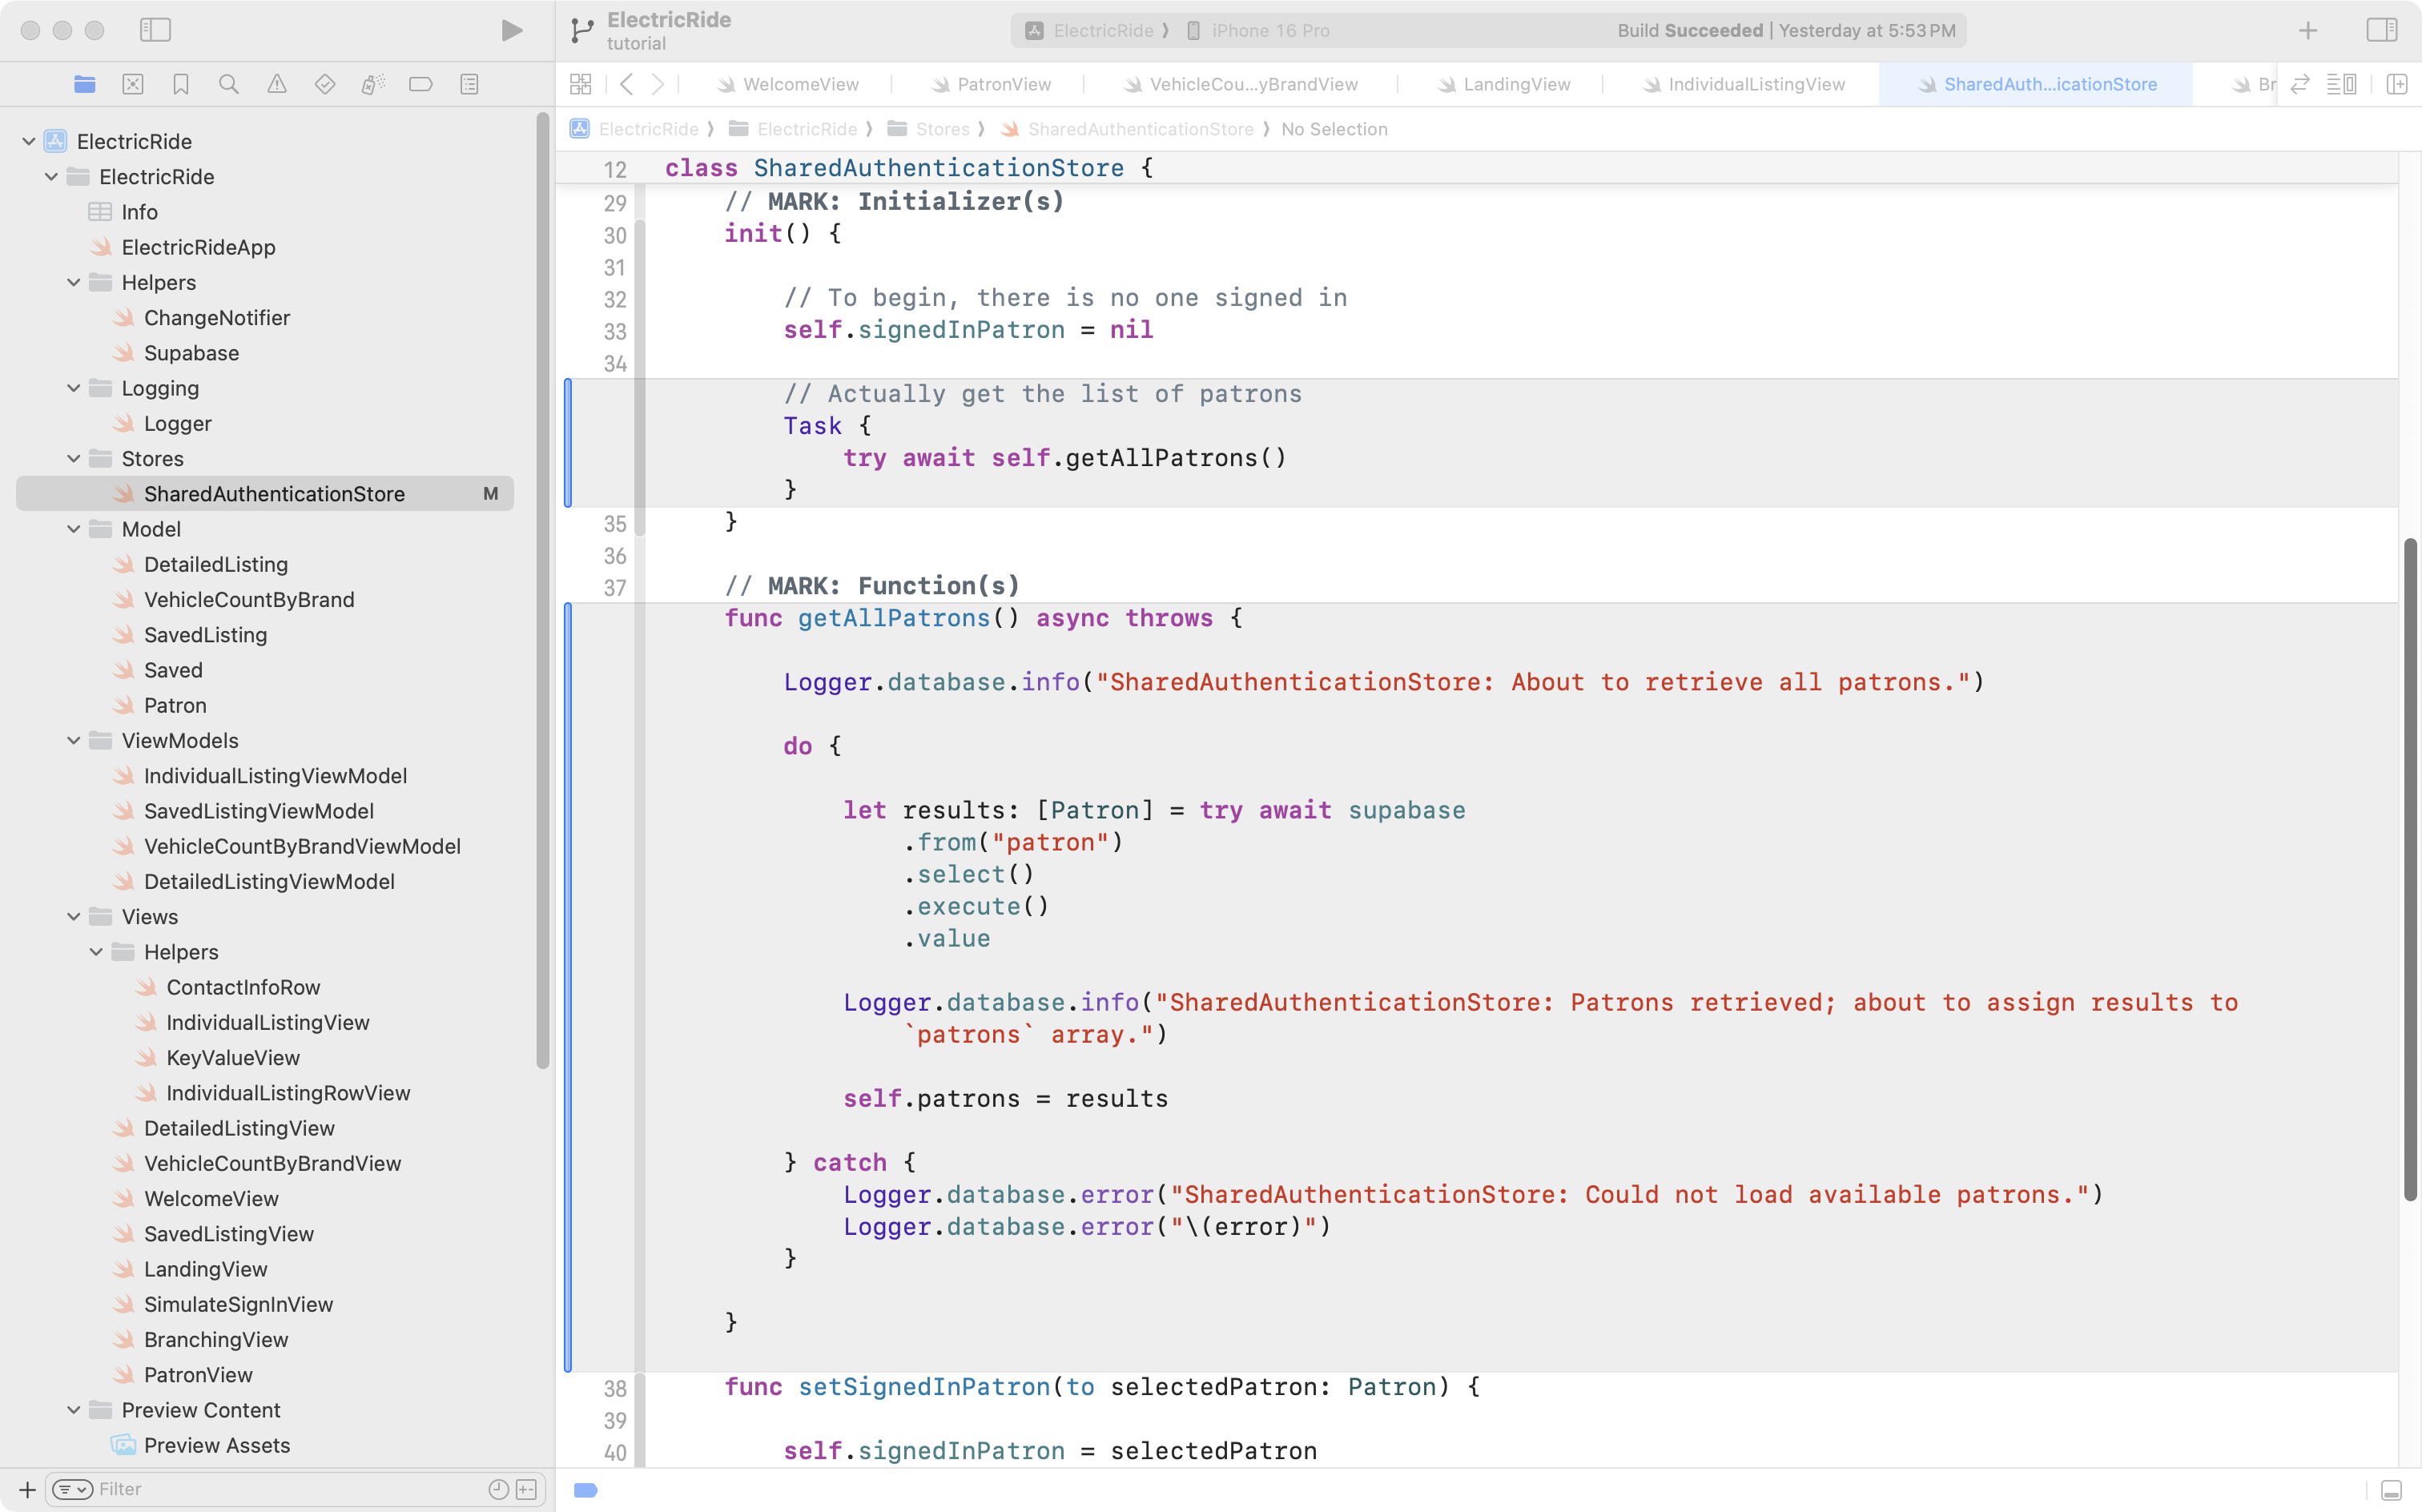
In SharedAuthenticationStore there is no longer any need to store a list of patrons, since we are not selecting a patron to simulate a sign-in for.
Mr. Gordon removed this section of code (the part in grey):
This also means the getAllPatrons function and the block of code in the initializer that invoked the function can be removed (removed code is in grey):
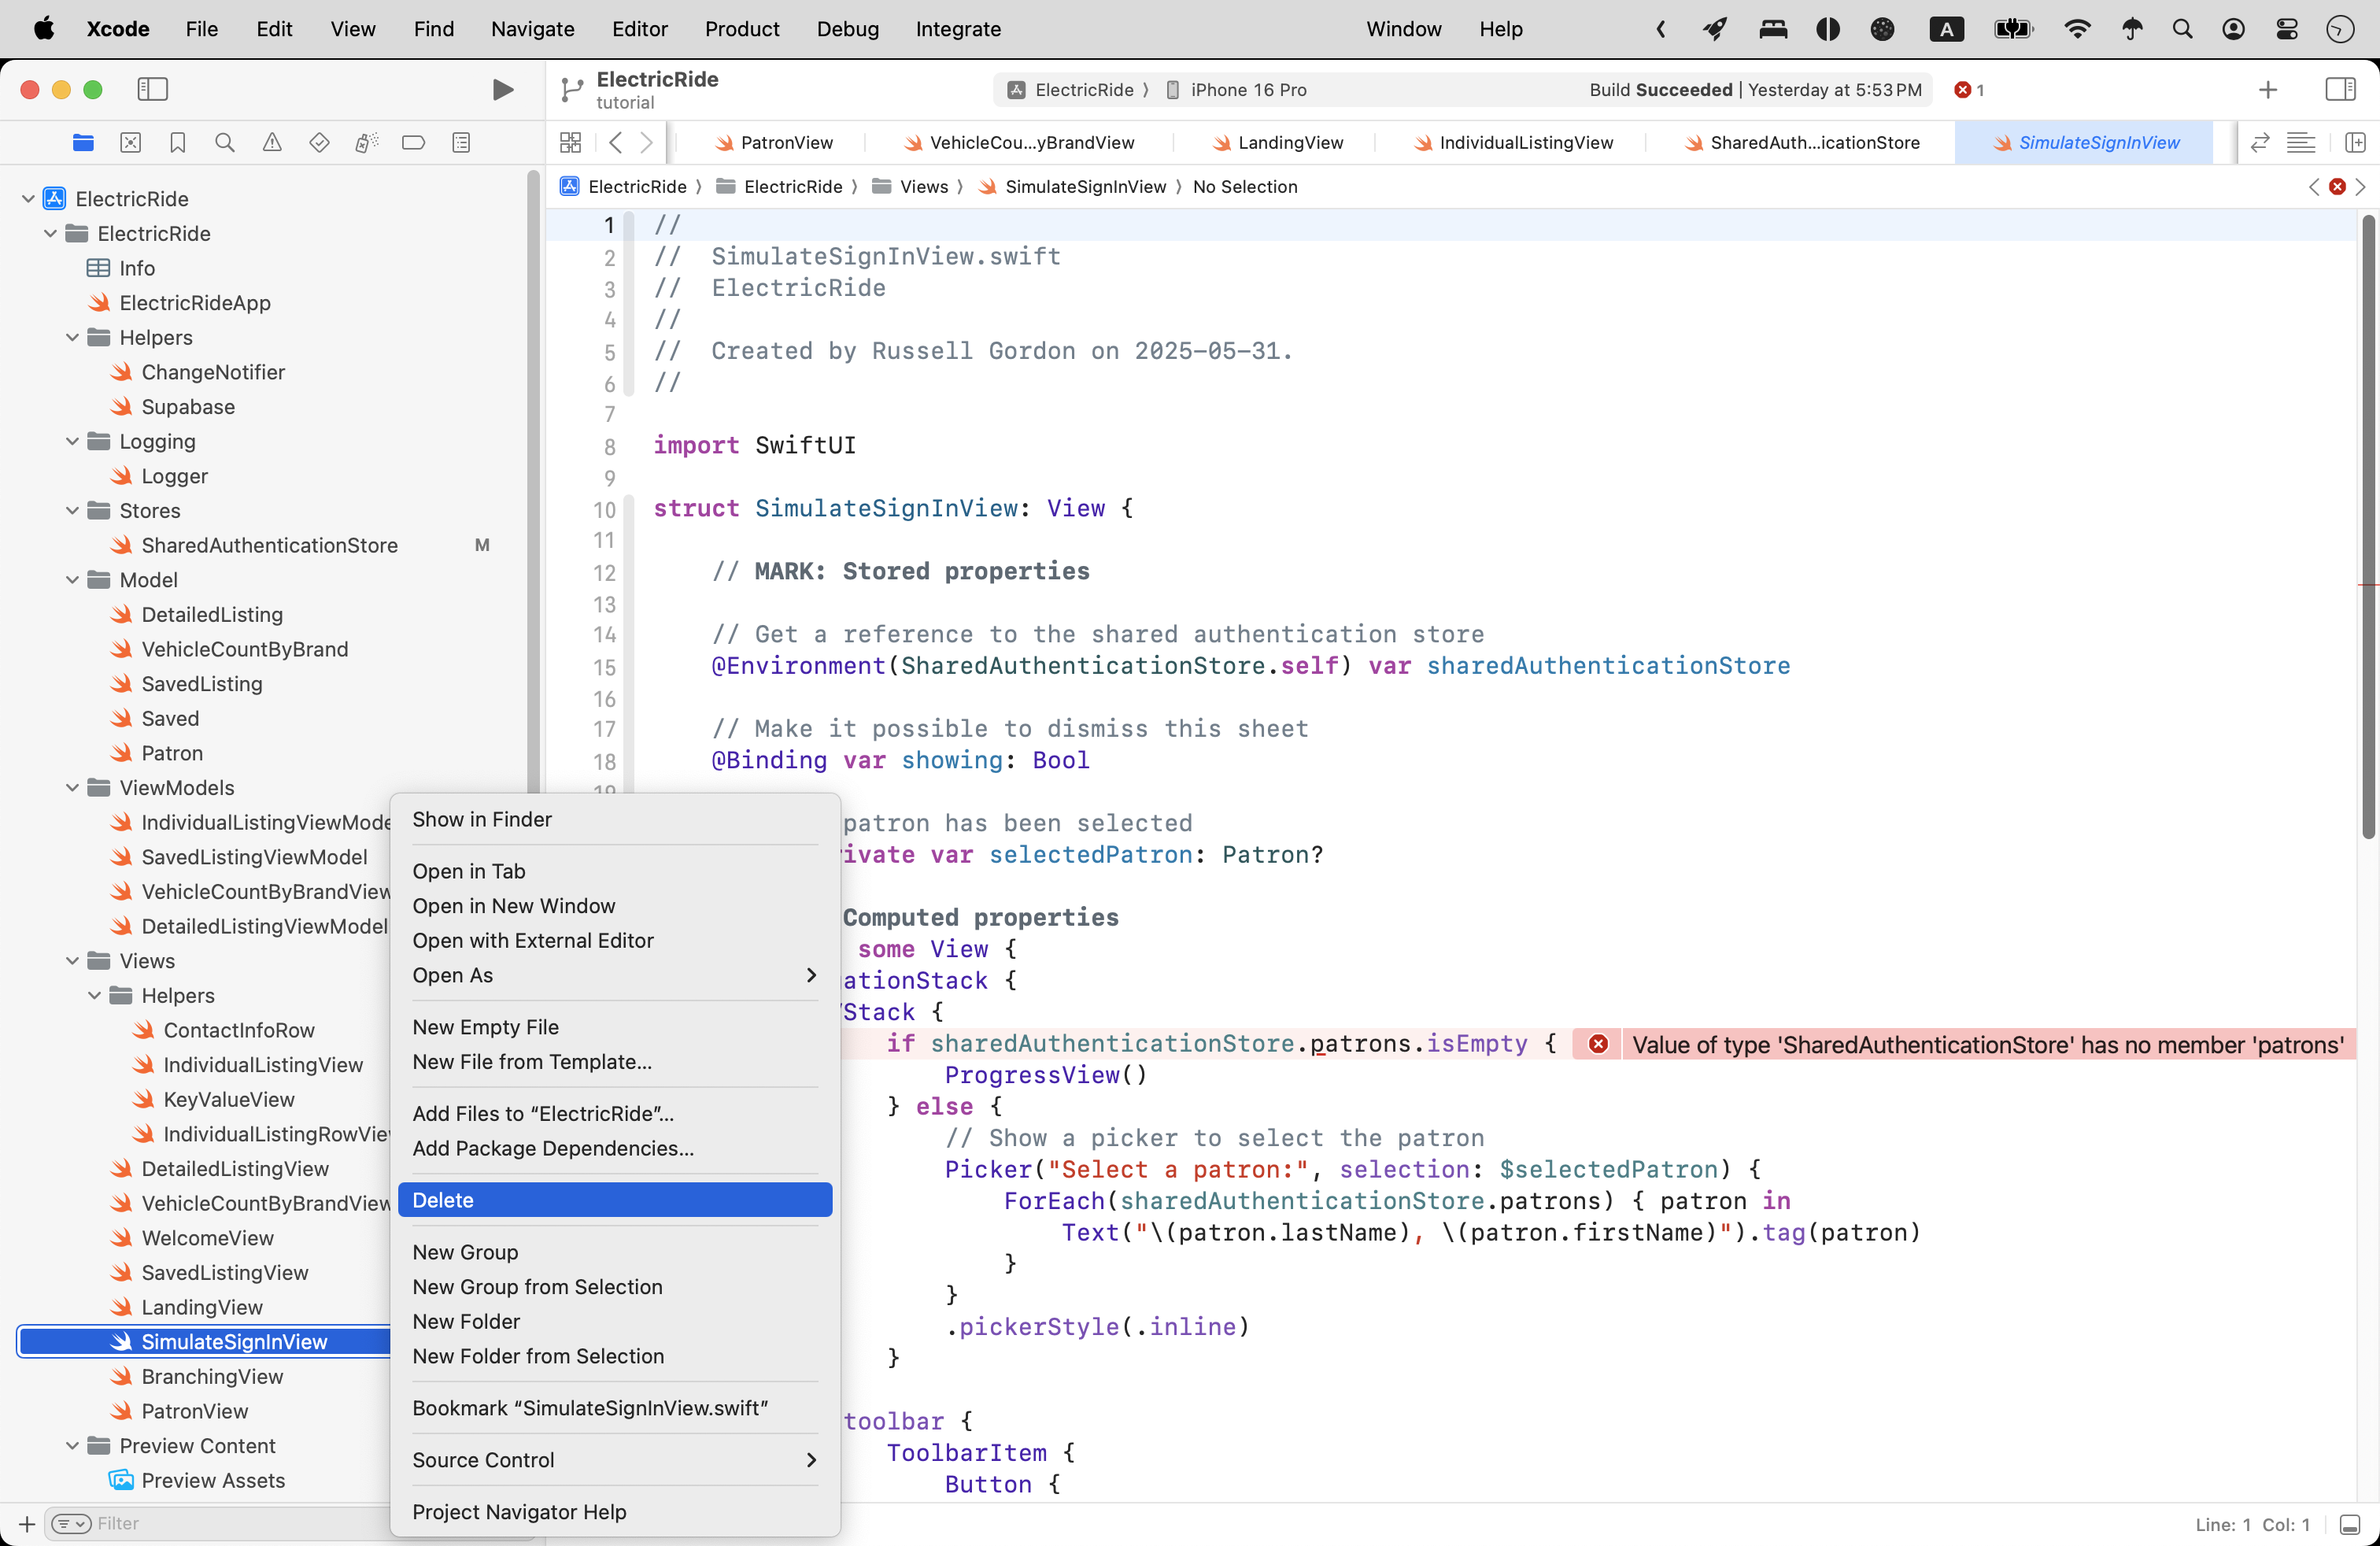
The SimulateSignInView file was deleted entirely:
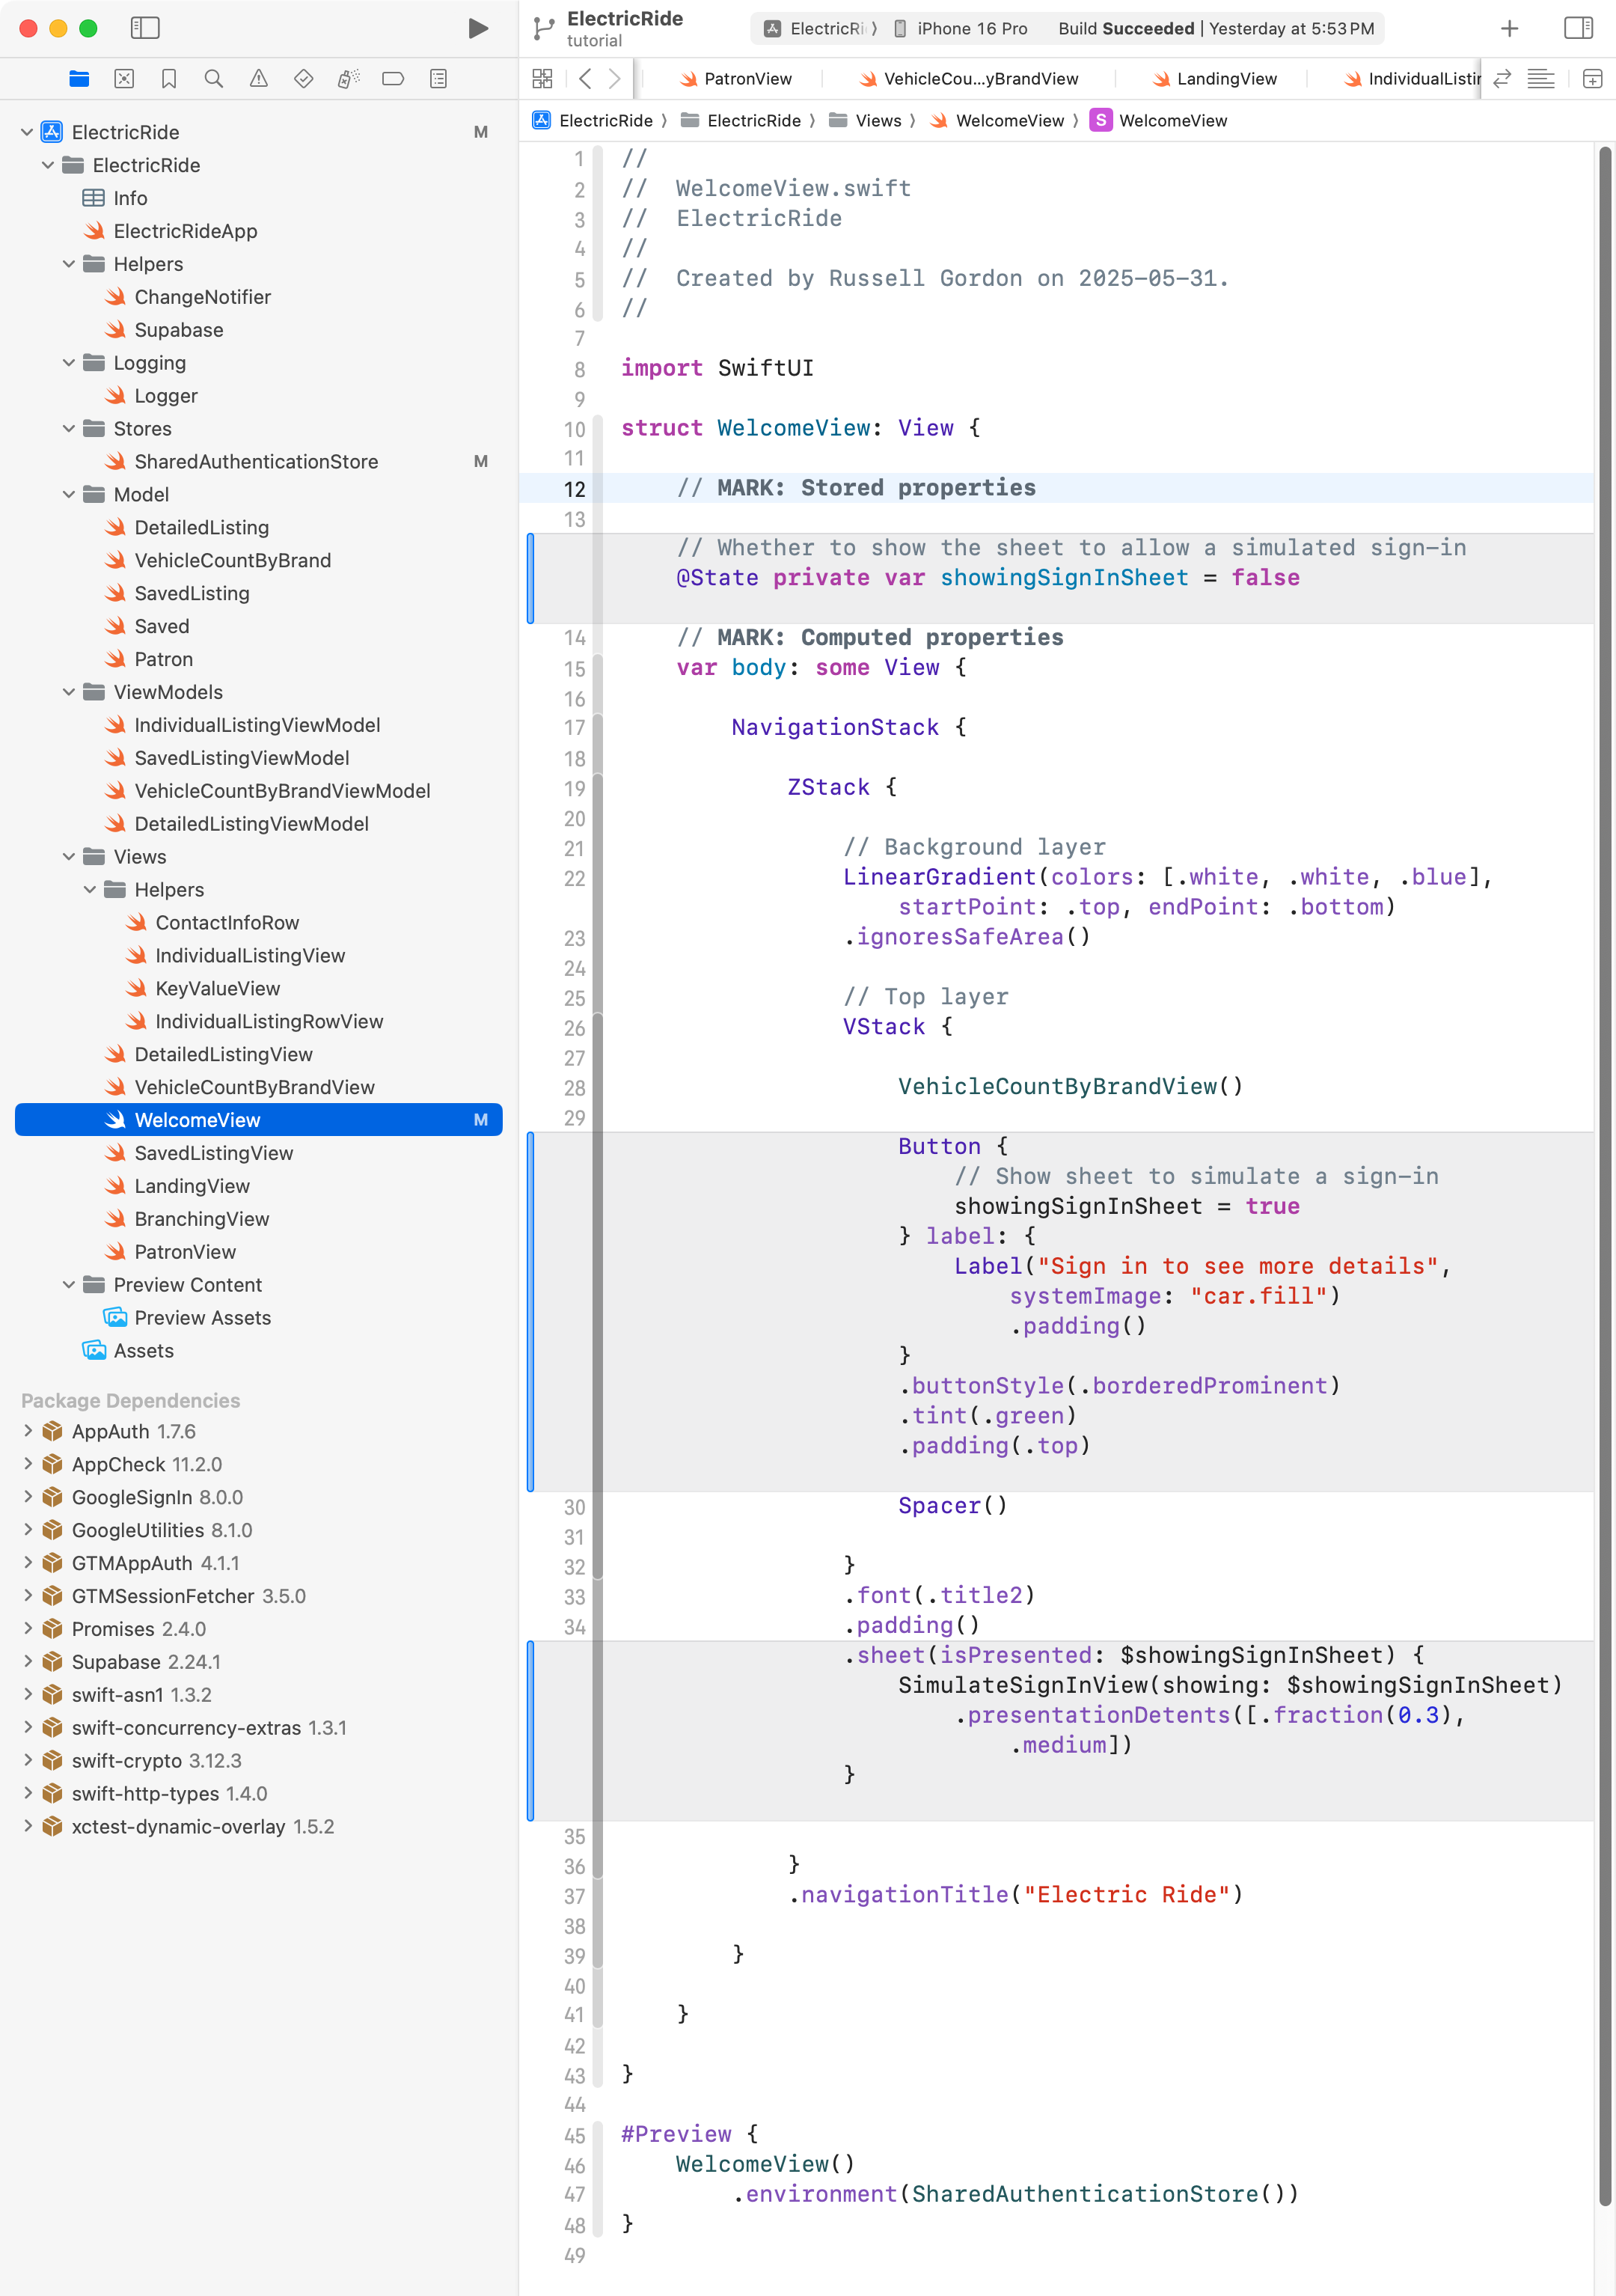
Then, on WelcomeView, Mr. Gordon removed the code that was used to show SimulateSignInView within a sheet (removed code shown in grey):
Running the app at this point works, but as expected, there is no way to sign in – simulated, or real:
Add social sign-in
Since a few new files related to signing-in users would be needed, Mr. Gordon created an Authentication group and moved the Stores group that holds SharedAuthenticationStore into it:
Next, there are three files that provide enumerations that let us keep track of what’s happening when someone signs in.
Remember, an enumeration is like a Bool – there are a set number of possible values – but we can define those possible values within the enumeration.
If you are following along here to add social sign-in to your own app, you can copy and paste these three blocks of code into your own project.
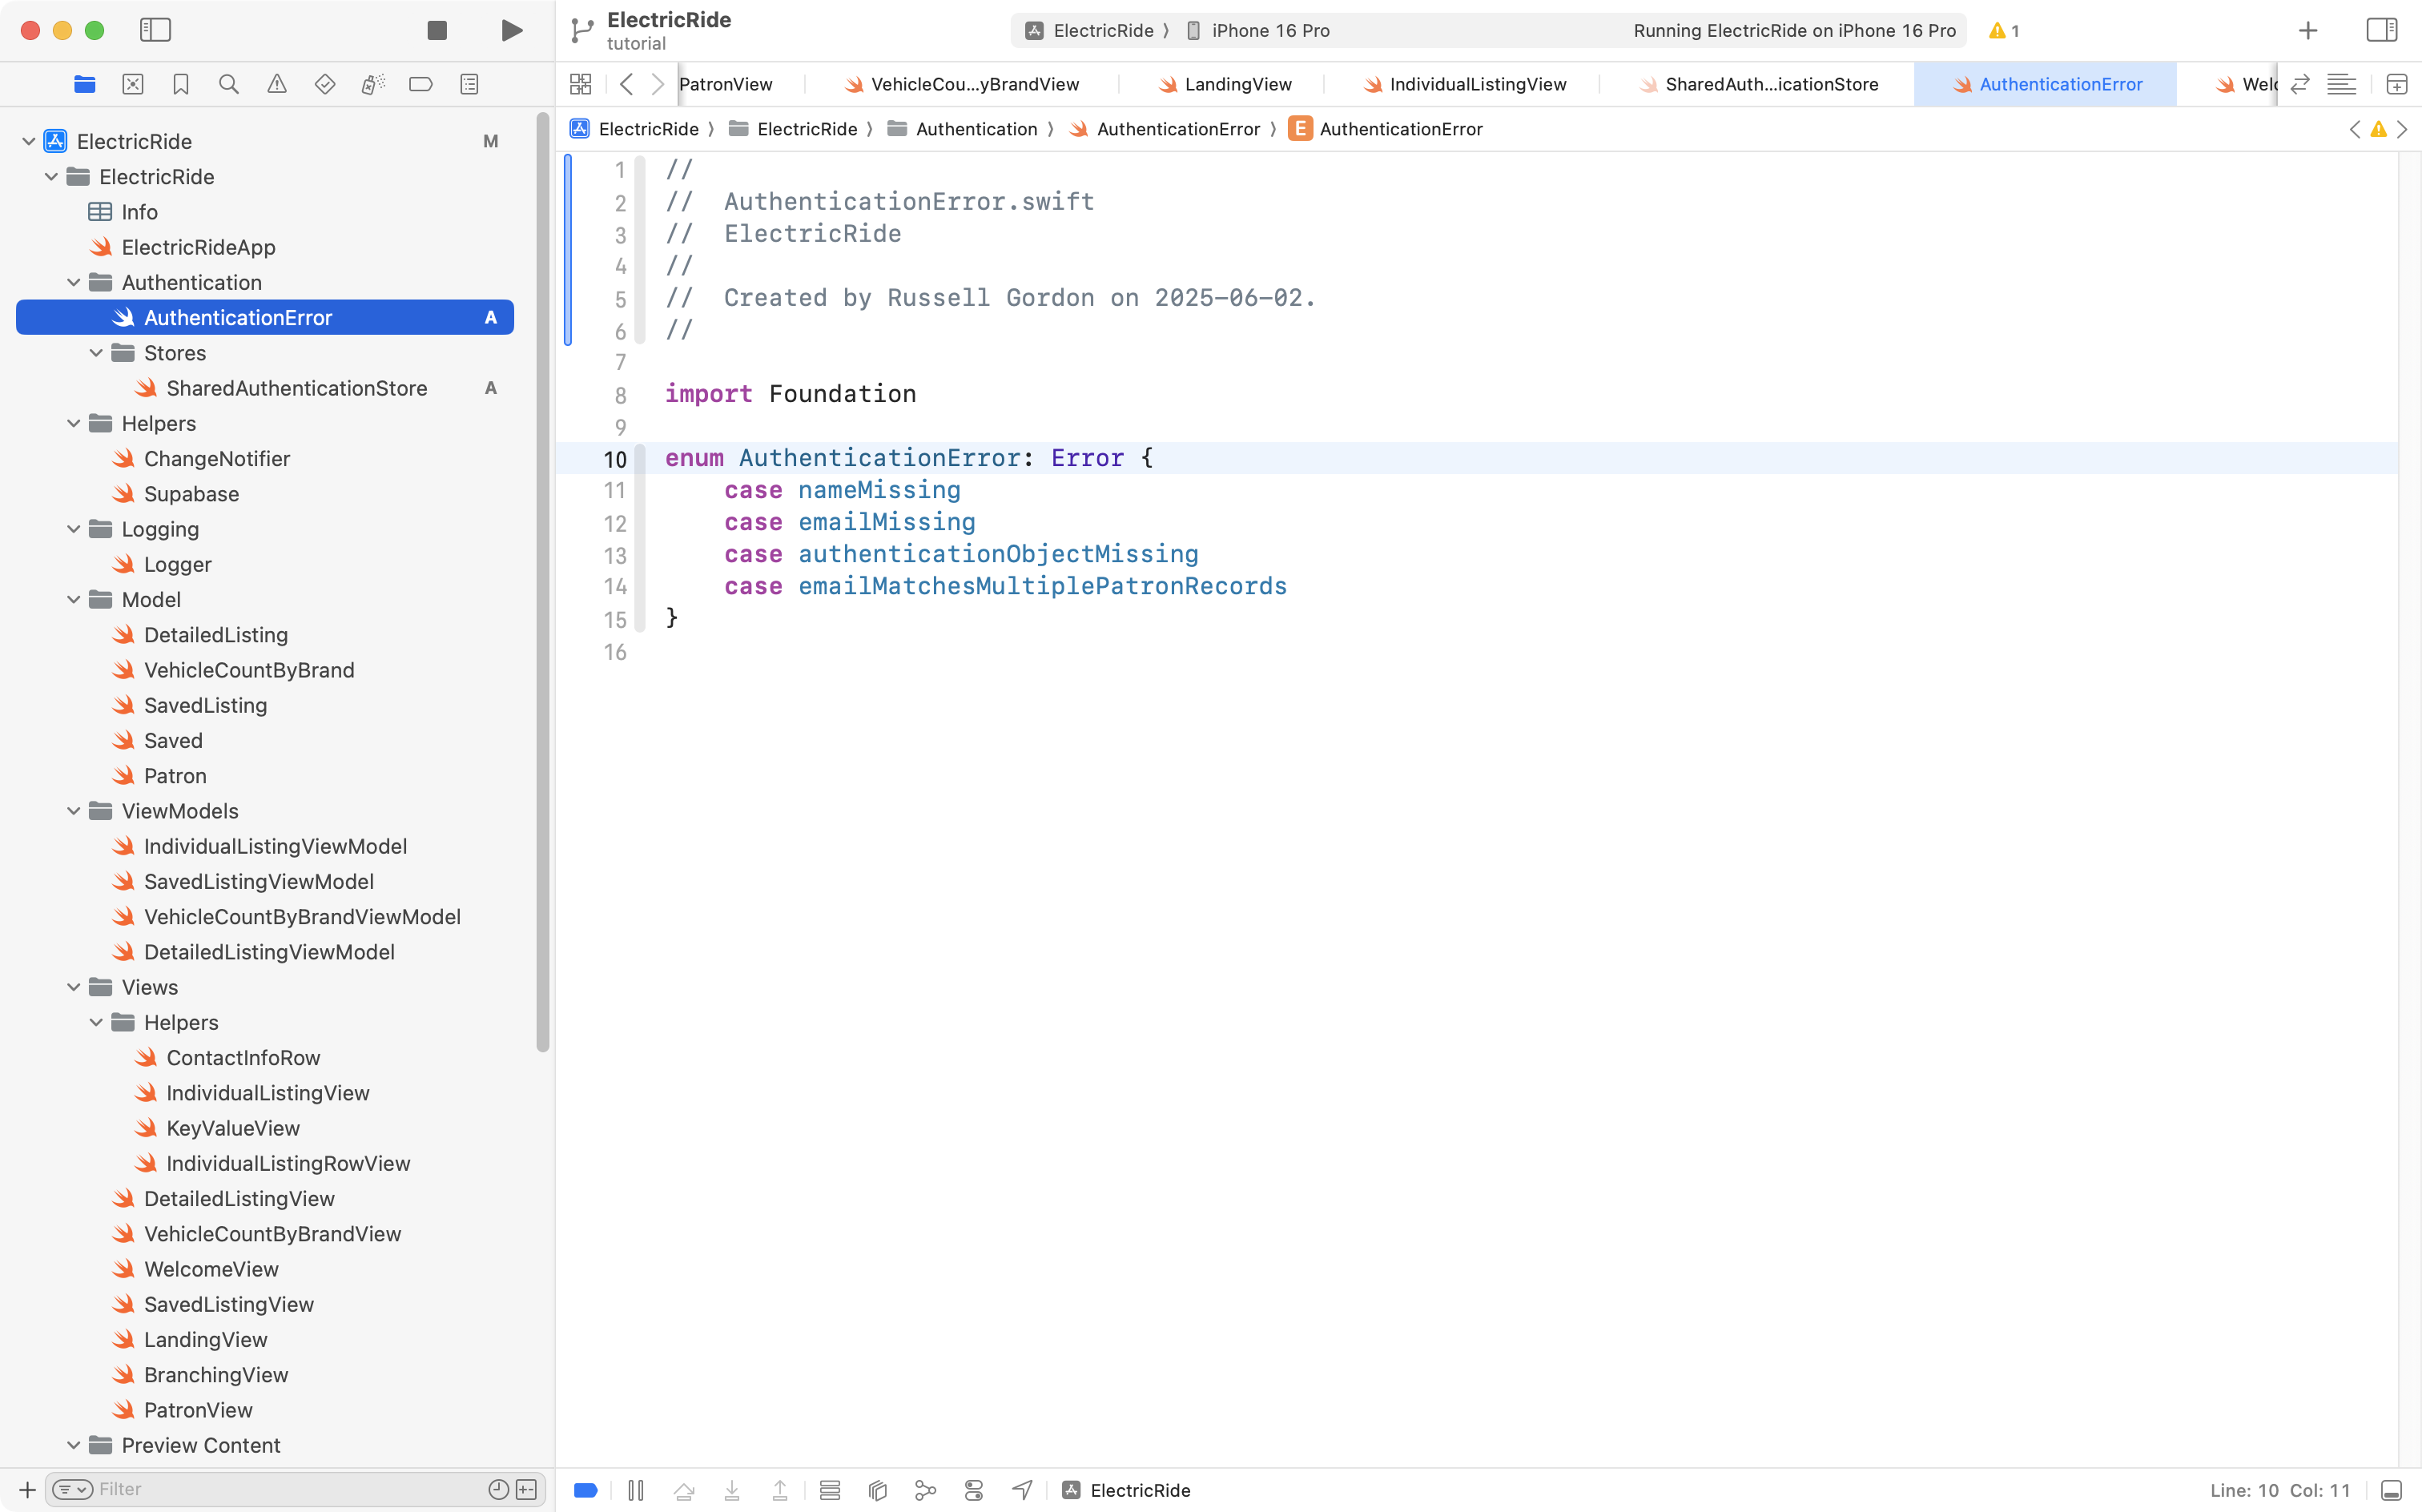
First, AuthenticationError:
import Foundationenum AuthenticationError: Error { case nameMissing case emailMissing case authenticationObjectMissing case emailMatchesMultiplePatronRecords}
… like this:
That enumeration lets us keep track of possible error states during sign-in.
Next, AuthenticationService:
import Foundationenum AuthenticationService: String { case apple = "Apple" case google = "Google" case undetermined = "Undetermined"}
… like this:
That enumeration lets us keep track of what third-party service a user signed in with (planning for future functionality).
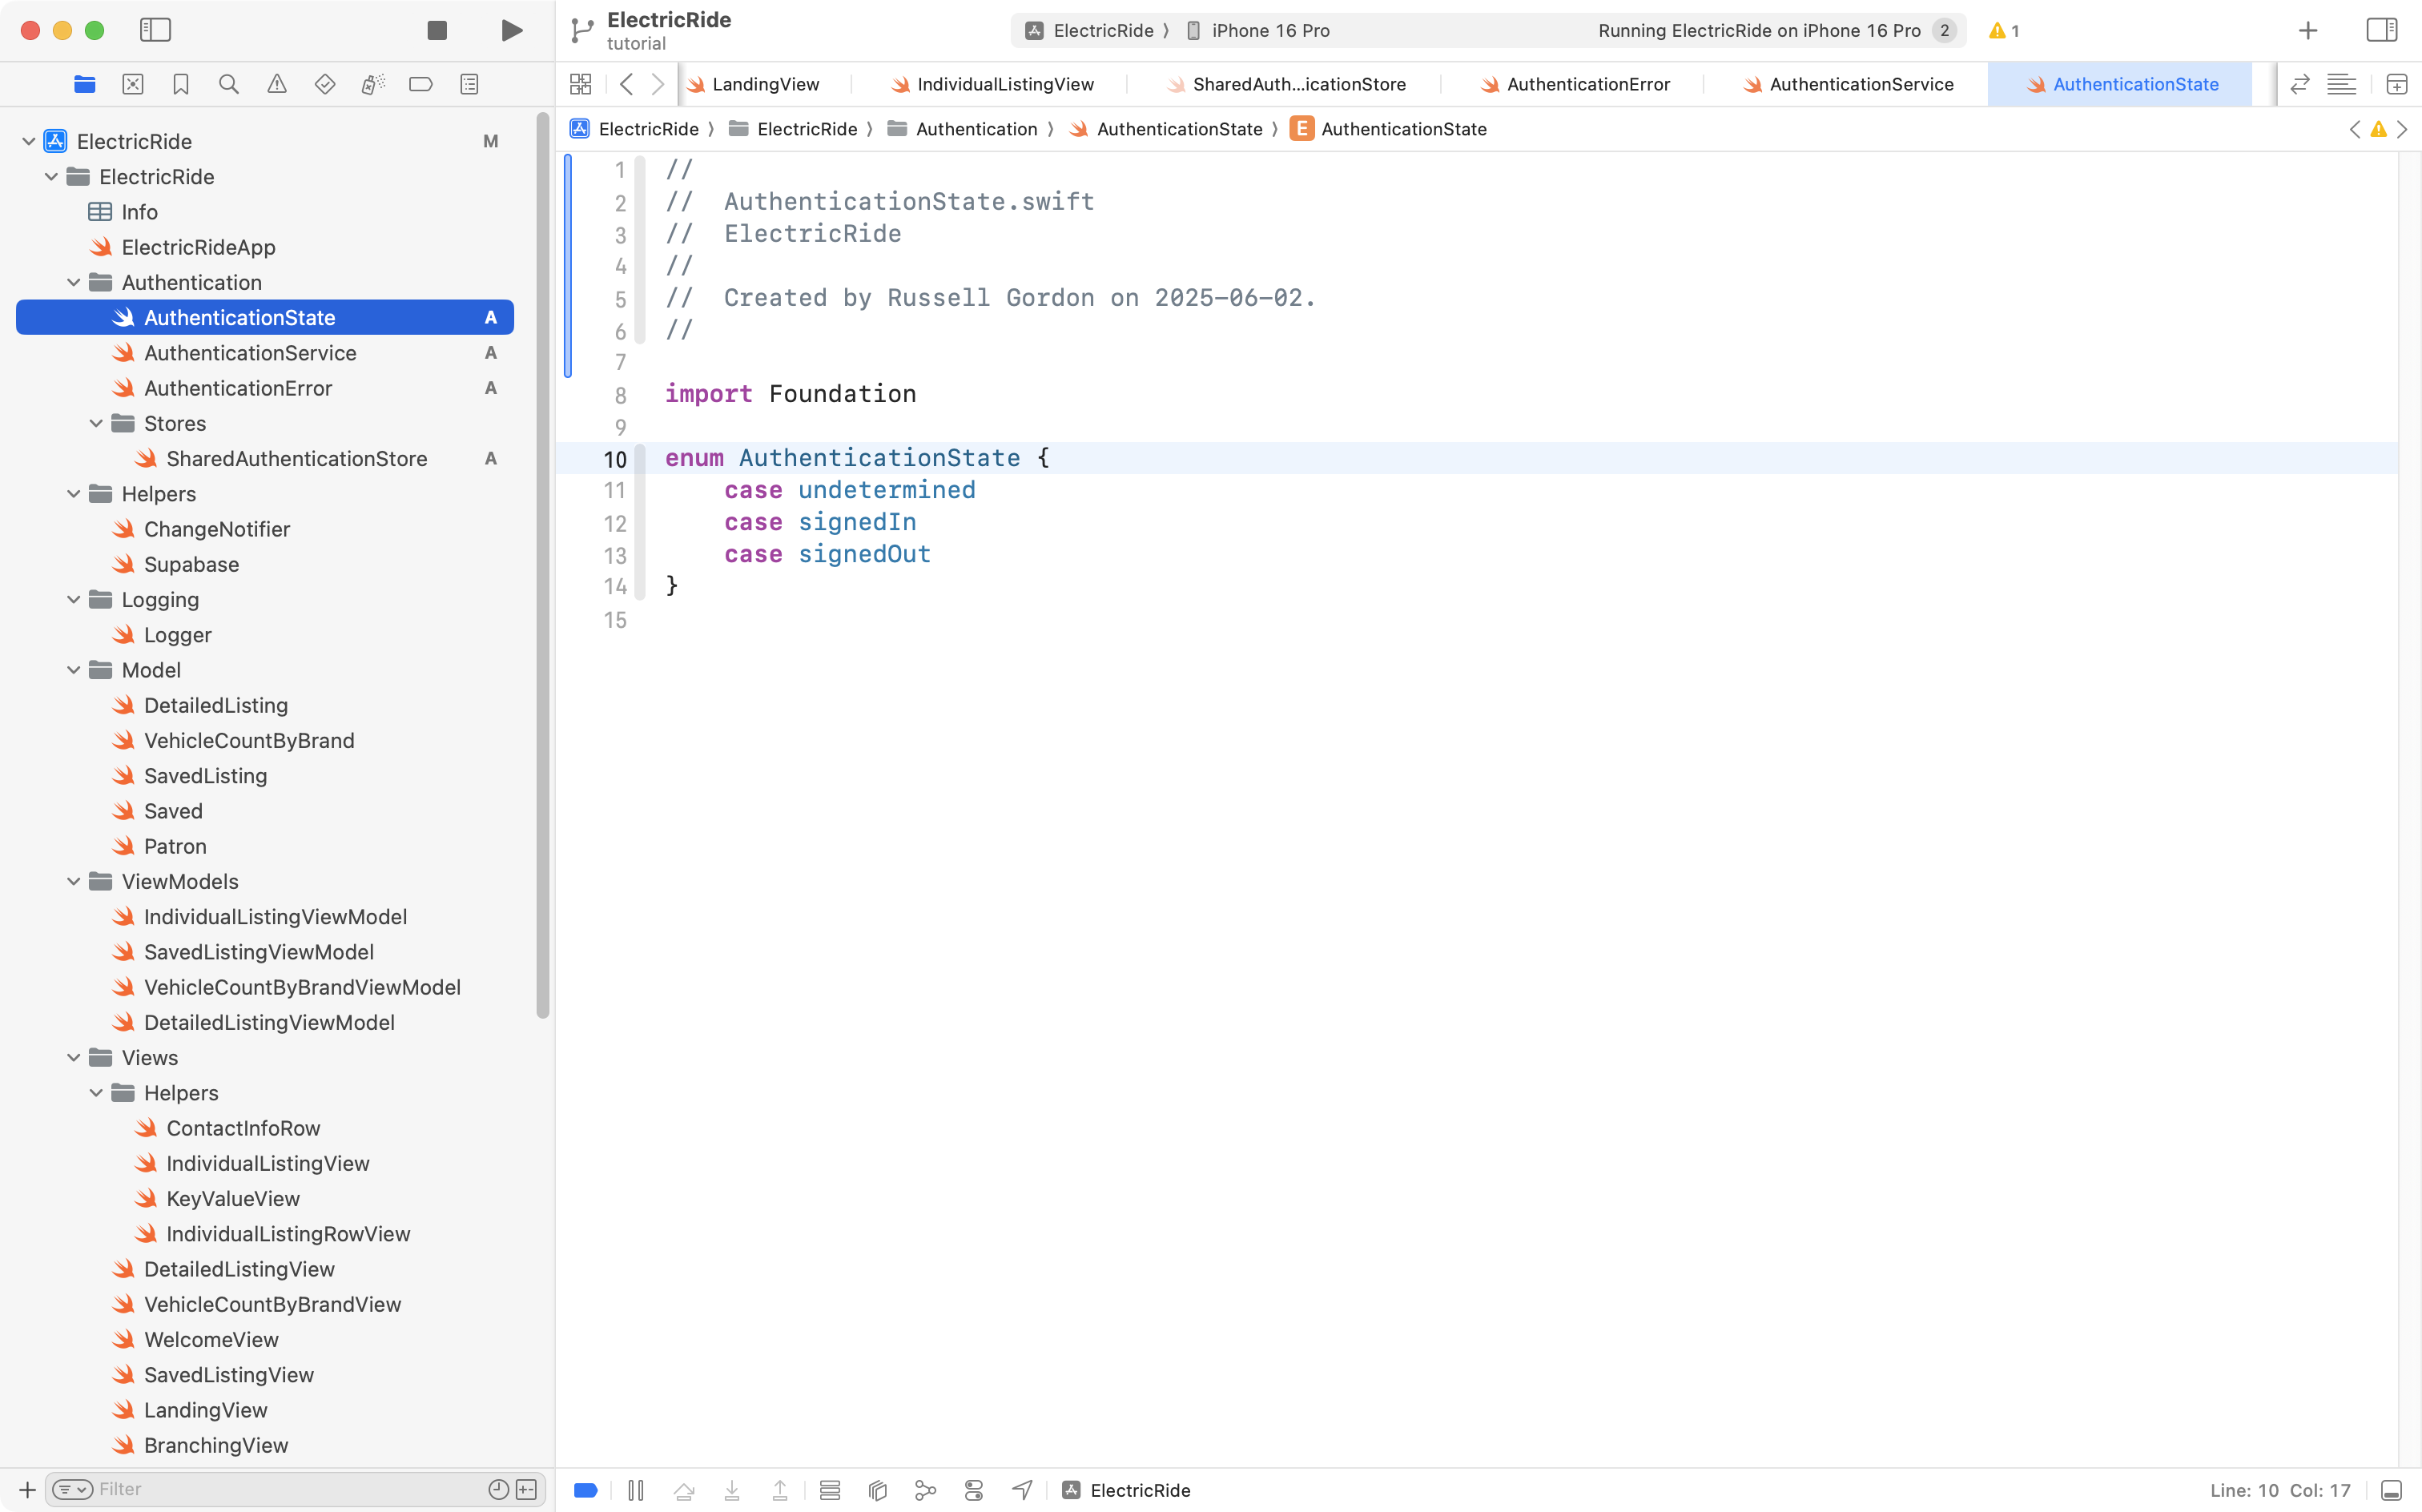
Finally, AuthenticationState:
import Foundationenum AuthenticationState { case undetermined case signedIn case signedOut}
… like this:
That enumeration, as its name suggests, tracks whether the user is signed in or not, or is in some other indeterminate state.
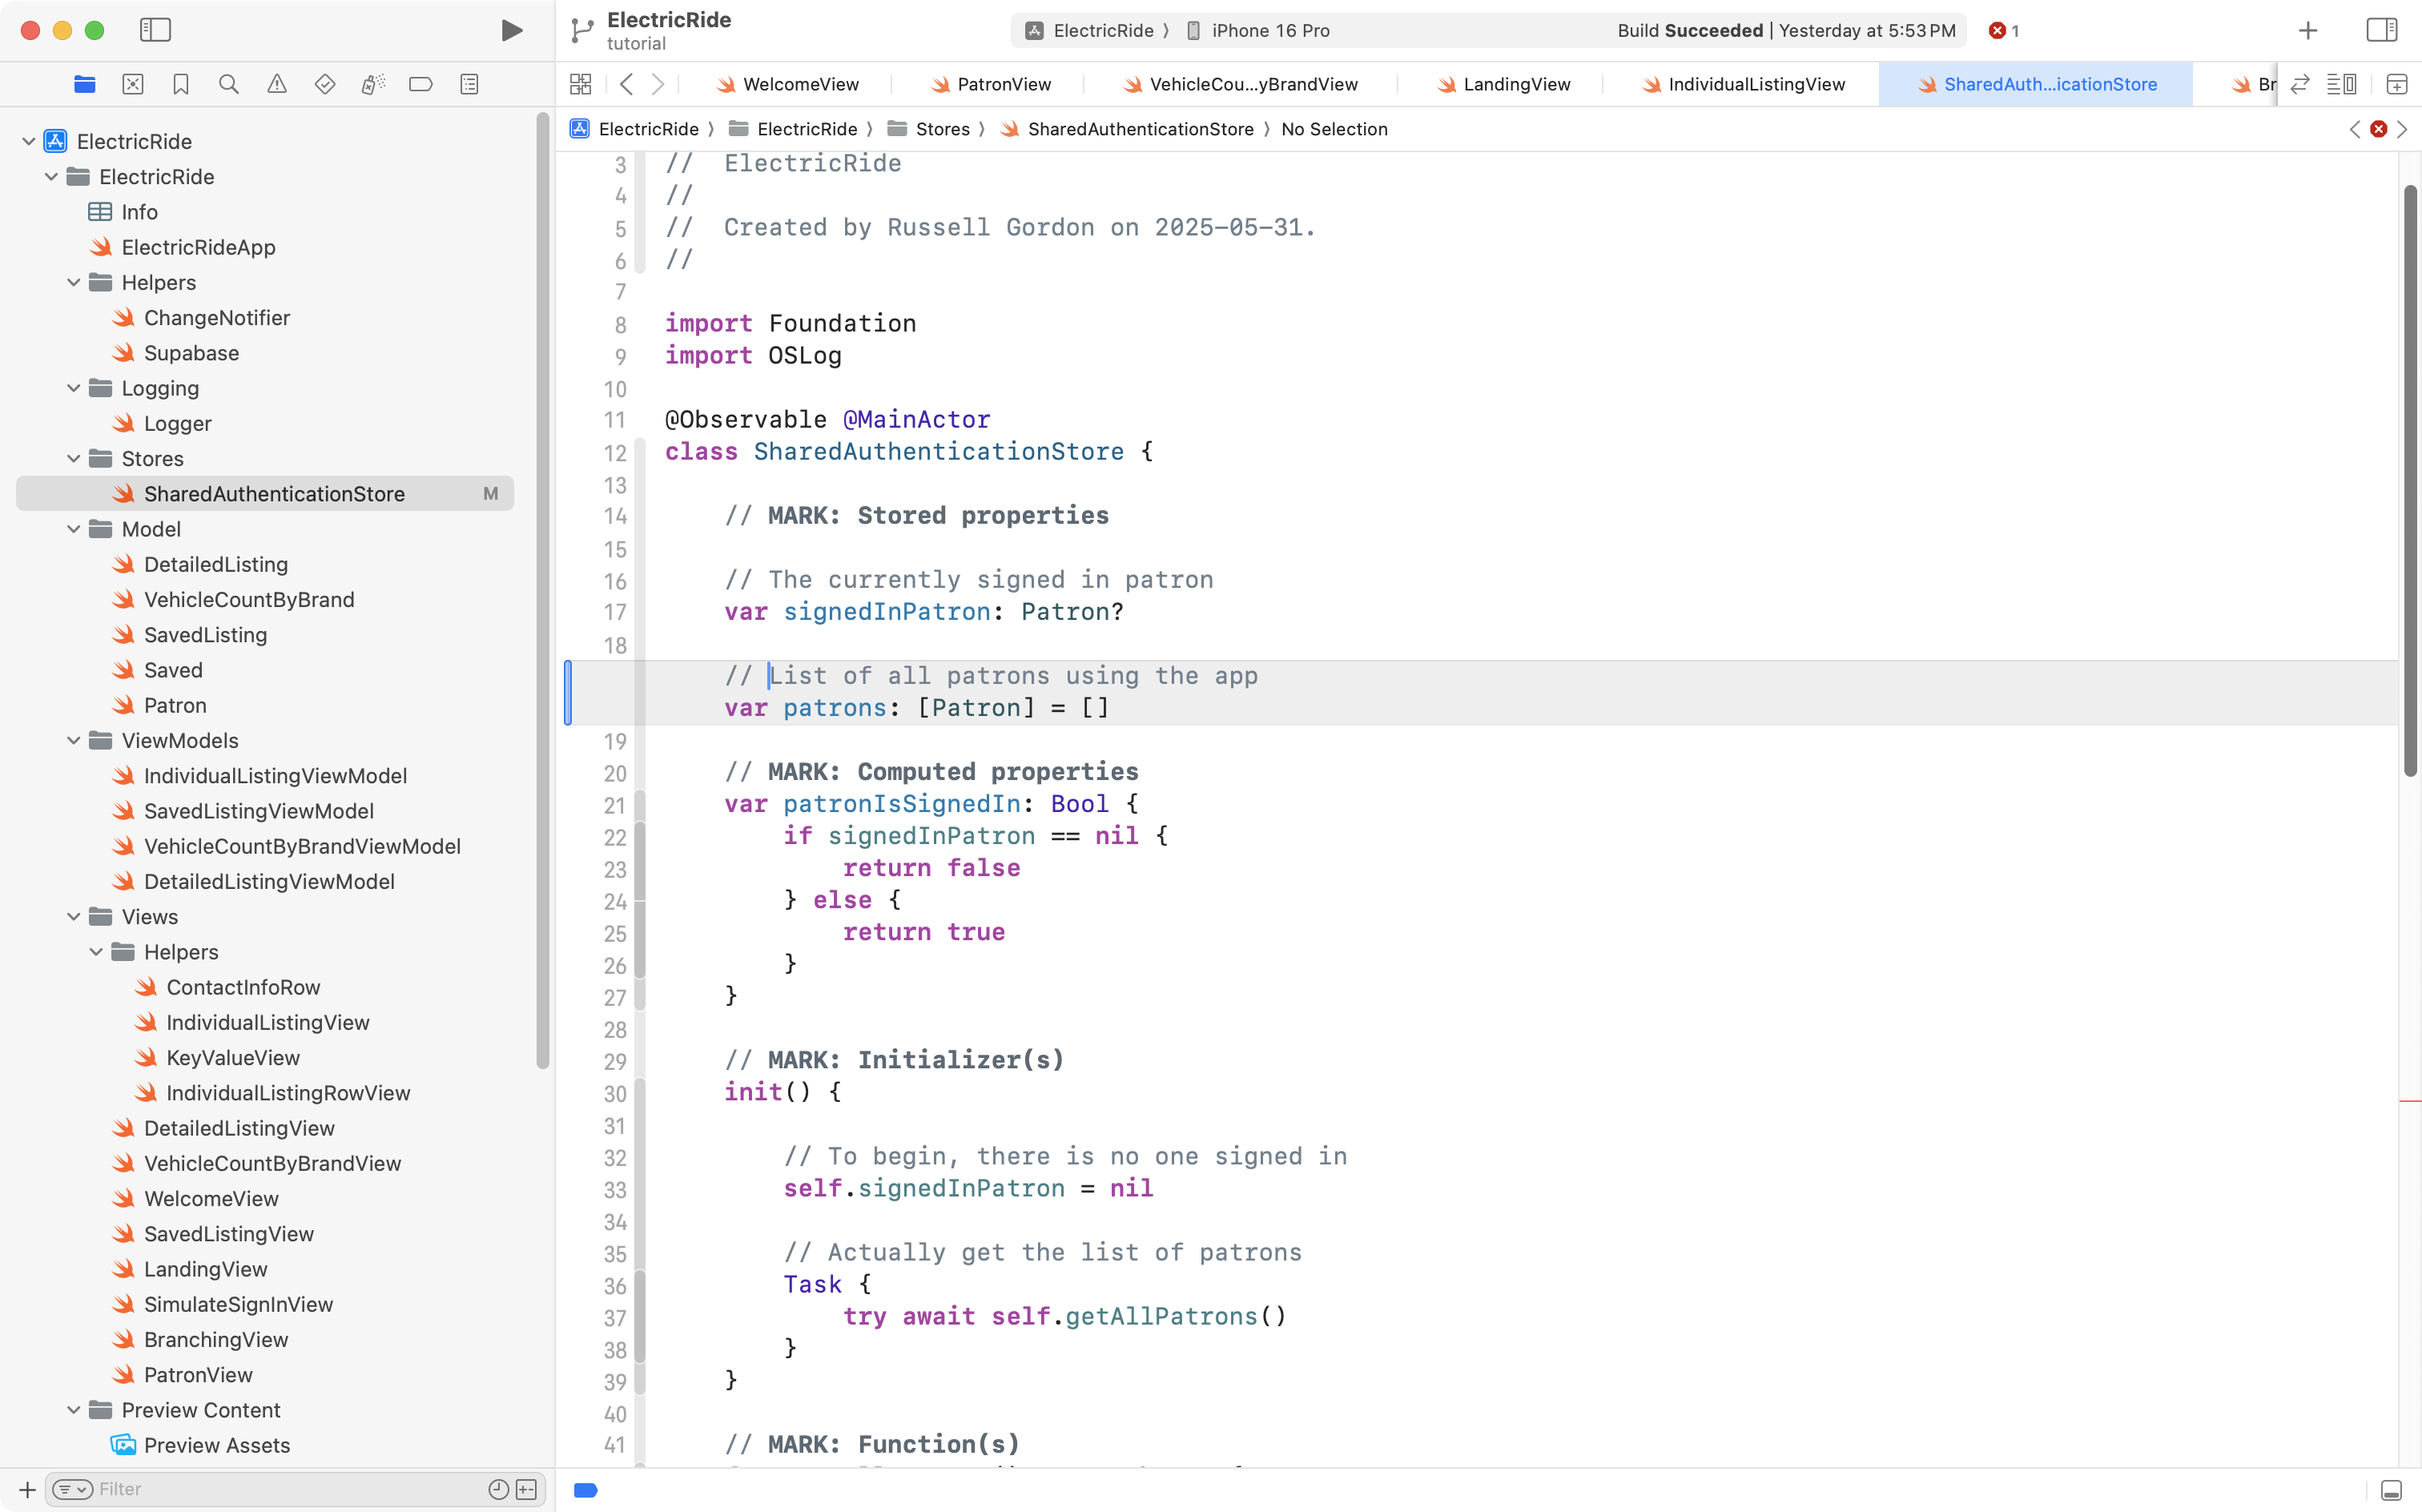
Now a series of additions are needed to SharedAuthenticationStore. These changes will:
Add stored properties to:
keep track of which service the user signed in with (loggedInWithService)
hold an error message that may need to be presented if there is a problem during sign in (authenticationException)
track the status of a user’s sign in, so we know when they have moved from being “signed out” to being “signed in” (authenticationStatus)
Add functions to:
get and set the user’s name and email address (setNameAndEmail)
check whether the user signing in represents a new patron or an existing one (checkWhetherPatronExists)
monitor the authentication state, watching the supabase.auth.authStateChanges stream, and handling those scenarios (monitorAuthenticationState)
allow a user to be signed out (signOut)
Adjust the initializer so that it invokes monitorAuthenticationState.
There’s a lot of code there, and if you are following along to adjust your own copy of SharedAuthenticationStore it is going to be easier to just copy and paste all of this code below into your own copy of the file:
import Foundationimport OSLogimport Supabase@Observable @MainActorclass SharedAuthenticationStore { // MARK: Stored properties // The currently signed in patron var signedInPatron: Patron? // Which service was used to sign in? var loggedInWithService: AuthenticationService = .undetermined // For holding any messages to show later regarding problems signing in var authenticationException: String = "" // What is the status of the user's sign in process? var authenticationStatus: AuthenticationState = .undetermined // MARK: Computed properties var patronIsSignedIn: Bool { if signedInPatron == nil { return false } else { return true } } // MARK: Initializer(s) init() { // To begin, there is no one signed in self.signedInPatron = nil // Monitor for changes in authentication status Task { await self.monitorAuthenticationState() } } // MARK: Function(s) func setSignedInPatron(to selectedPatron: Patron) { self.signedInPatron = selectedPatron } func setNameAndEmail() async throws { Logger.authentication.info("SharedAuthenticationStore: About to set name and email from authentication object.") // Holds the metadata object we are given after a social sign-in occurs var retrievedResult: [String: AnyJSON]? do { // Get the metadata object for the logged in user retrievedResult = try await supabase.auth.session.user.userMetadata } catch { Logger.authentication.error("SharedAuthenticationStore: Could not get the metadata object for the signed in user.") Logger.authentication.error("SharedAuthenticationStore: \(String(describing: error))") } // Ensure that the metadata object could be retrieved guard let result = retrievedResult else { Logger.authentication.error("SharedAuthenticationStore: Metadata object for logged in user could not be unwrapped.") throw AuthenticationError.authenticationObjectMissing } // Pull the name and email from the metadata object Logger.authentication.info("SharedAuthenticationStore: Metadata object contains...\n\n\(result)") let email = String(describing: result["email"] ?? "") let name = String(describing: result["name"] ?? "") // Ensure that the email is not an empty string guard email.isEmpty == false else { Logger.authentication.error("SharedAuthenticationStore: Email address was missing from metadata object.") throw AuthenticationError.emailMissing } // Ensure that the name is not an empty string guard name.isEmpty == false else { Logger.authentication.error("SharedAuthenticationStore: Name was missing from metadata object.") throw AuthenticationError.nameMissing } // Is this person someone who has used the app before? Logger.authentication.info("SharedAuthenticationStore: About to check whether user has signed in to this app before...") try await checkWhetherPatronExists(basedUpon: email, givenName: name) } private func checkWhetherPatronExists(basedUpon givenEmailAddress: String, givenName: String) async throws { // Look up patron(s) who have this email address let results: [Patron] = try await supabase .from("patron") .select() .eq("email_address", value: givenEmailAddress) .limit(1) .execute() .value // Should be either 0 or 1 elements in array... // When there is one row returned, we found that the email of the // logged in user matches one of the emails in the "patron" table // in the database, which means this user has signed in to the app // before... if results.count == 1 { Logger.authentication.info("SharedAuthenticationStore: Email address already in database, this is an existing user of the app.") // Set the active patron record self.signedInPatron = results[0] } else if results.count == 0 { Logger.authentication.info("SharedAuthenticationStore: Email address not yet in database, this is a new user of the app.") // Create a new Patron instance // // NOTE: Google social sign-in doesn't provide first and last names separately. // To work around this we just place the user's entire name in the firstName field. let newPatron = Patron( id: nil, firstName: givenName, lastName: "", emailAddress: givenEmailAddress, phoneNumber: "" ) // Add user to the patron table, then immediately retrieve the new patron let confirmedNewPatron: Patron = try await supabase .from("patron") .insert(newPatron) // Now get back the newly created row (this will have an id assigned) .select() .single() .execute() .value // Set the active patron self.signedInPatron = confirmedNewPatron } else { Logger.authentication.error("SharedAuthenticationStore: Email address of user signing in matches multiple patron records.") throw AuthenticationError.emailMatchesMultiplePatronRecords } } private func monitorAuthenticationState() async { // Monitor authentication state Logger.authentication.info("SharedAuthenticationStore: About to begin watching for authentication state changes.") // Essentially a loop that activates whenever authentication state change is detected for await state in supabase.auth.authStateChanges { Logger.authentication.info("SharedAuthenticationStore: Supabase authentication state change, it is now: \(String(describing: state.event)).") switch state.event { case .initialSession: Logger.authentication.info("SharedAuthenticationStore: Auth state event is INITIAL_SESSION") case .signedIn: Logger.authentication.info("SharedAuthenticationStore: Auth state event is SIGNED_IN") case .signedOut: Logger.authentication.info("SharedAuthenticationStore: Auth state event is SIGNED_OUT") case .tokenRefreshed: Logger.authentication.info("SharedAuthenticationStore: Auth state event is TOKEN_REFRESHED") case .userUpdated: Logger.authentication.info("SharedAuthenticationStore: Auth state event is USER_UPDATED") case .passwordRecovery: Logger.authentication.info("SharedAuthenticationStore: Auth state event is PASSWORD_RECOVERY") case .mfaChallengeVerified: Logger.authentication.info("SharedAuthenticationStore: Auth state event is MFA_CHALLENGE_VERIFIED") case .userDeleted: Logger.authentication.info("SharedAuthenticationStore: Auth state event is USER_DELETED") } // If the user has been signed in, signed out, or if this is their // initial session with Supabase, the code block below will run if [.initialSession, .signedIn, .signedOut].contains(state.event) { // isAuthenticated set to true when the user has a session // Otherwise, it is set to false Logger.authentication.info("SharedAuthenticationStore: About to check whether an authenticated session exists.") if state.session == nil { Logger.authentication.info("SharedAuthenticationStore: There is no existing authenticated session to restore; setting authentication status to 'signed out'.") self.authenticationStatus = .signedOut } else { Logger.authentication.info("SharedAuthenticationStore: An authenticated session exists; setting authentication status to 'signed in'.") self.authenticationStatus = .signedIn } if self.authenticationStatus == .signedIn { // Obtain the name and email address for this user do { // Reset authentication information message self.authenticationException = "" // Try to get authentication information (name and email address of this user) try await self.setNameAndEmail() } catch AuthenticationError.emailMissing, AuthenticationError.nameMissing { Logger.authentication.error("SharedAuthenticationStore: Name or email address is missing, so we are signing out this user.") do { // IMPORTANT: Only logout from the current session, not ALL sessions the user has with our application. // SEE: https://supabase.com/docs/guides/auth/signout?queryGroups=language&language=swift try await supabase.auth.signOut(scope: .local) Logger.authentication.info("SharedAuthenticationStore: Could not obtain name or email address after session restoration occurred.\n\nPlease take a screenshot of this occurrence and contact the application owner.") self.authenticationException = "SharedAuthenticationStore: Could not obtain name or email address after session restoration occurred.\n\nPlease take a screenshot of this occurrence and contact the application owner." } catch { Logger.authentication.error("SharedAuthenticationStore: Name or email was missing; also could not sign out from authenticated session.") } } catch { Logger.authentication.error("SharedAuthenticationStore: \(String(describing: error)).") } } } } } func signOut() { Task { do { Logger.authentication.info("SharedAuthenticationStore: About to sign out patron with id \(self.signedInPatron?.id ?? 0) and email address \(self.signedInPatron?.emailAddress ?? "").") // IMPORTANT: Only logout from the current session, not ALL sessions the user has with our application. // SEE: https://supabase.com/docs/guides/auth/signout?queryGroups=language&language=swift try await supabase.auth.signOut(scope: .local) self.authenticationStatus = .signedOut self.loggedInWithService = .undetermined Logger.authentication.info("SharedAuthenticationStore: Patron with id \(self.signedInPatron?.id ?? 0) and email address \(self.signedInPatron?.emailAddress ?? "") has been signed out.") } catch { Logger.authentication.error("SharedAuthenticationStore: Error signing out user, details: \(String(describing: error))") } } }}
TIP
If you are following along to make similar changes to your own app, don’t worry if errors start to appear. You are in the middle of making significant edits. Take stock of where you are at once you are finished adding and adjusting the code in your app by following along here.
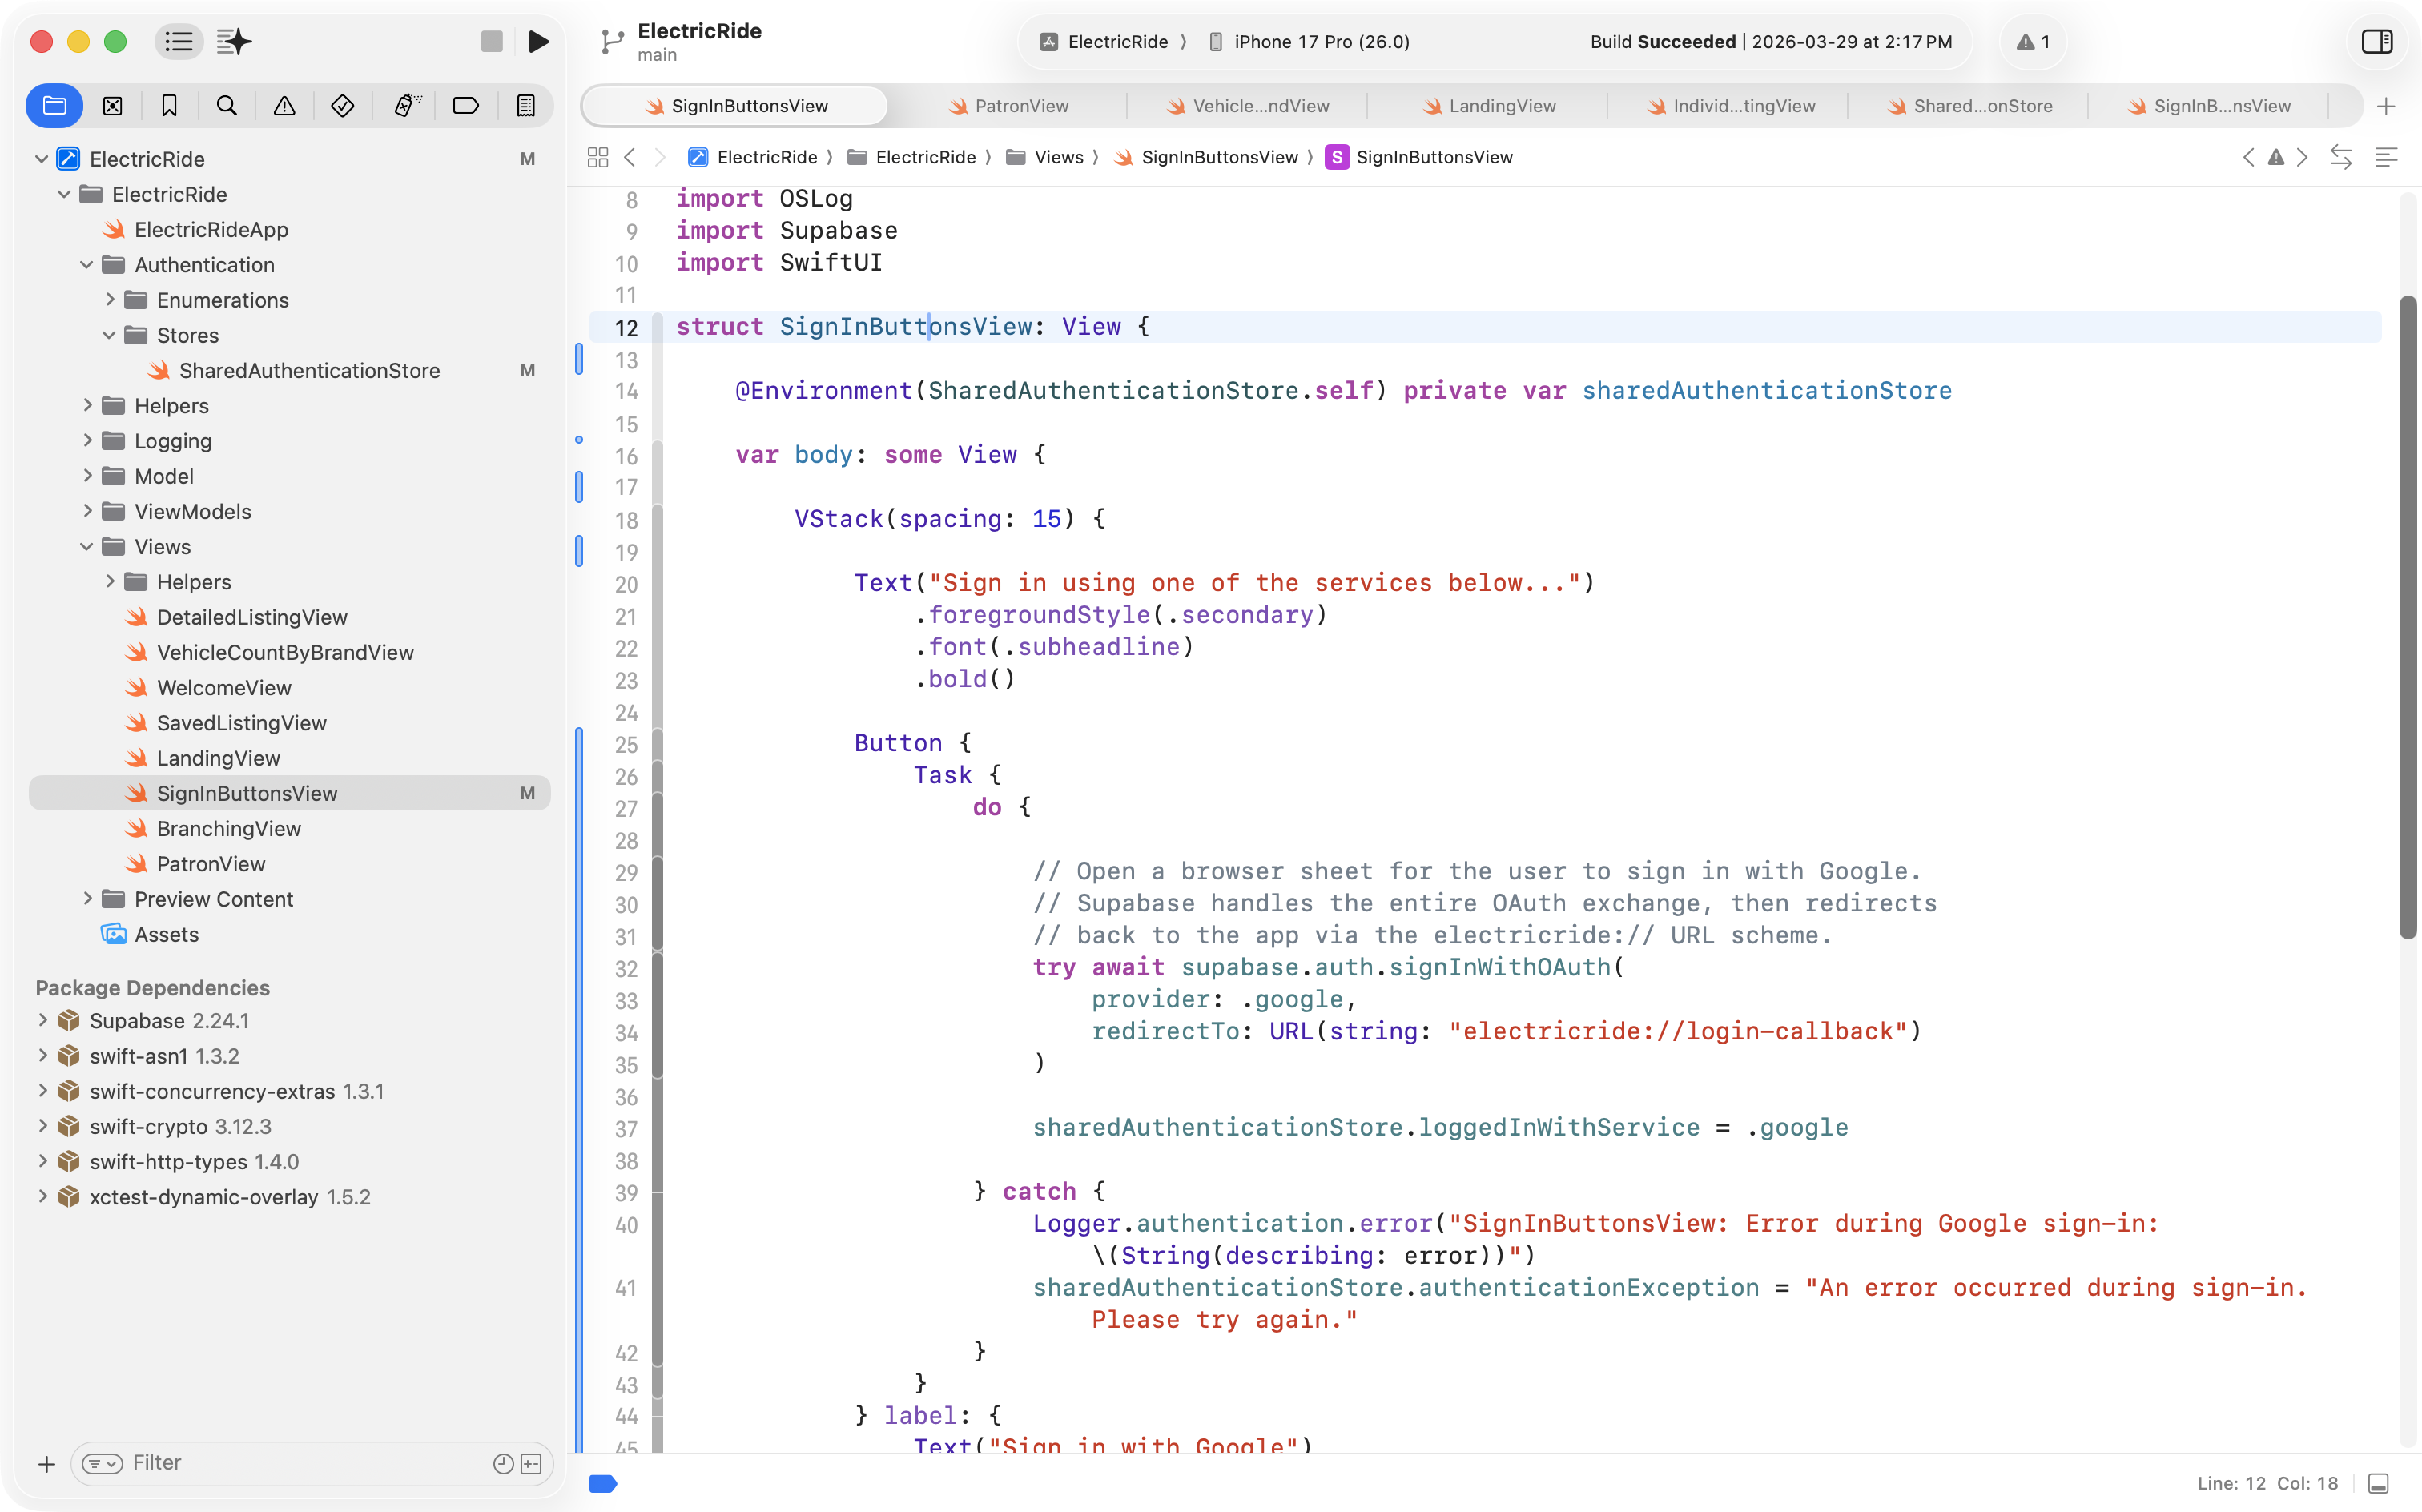
Next we need a view to present the Sign in with Google button.
With the Supabase-native approach to using Sign in with Google, a single call to supabase.auth.signInWithOAuth does everything we need.
Supabase will open a browser sheet, the user signs in, and then monitorAuthenticationState (which is already running in the background) detects the completed sign-in and handles the rest.
Copy and paste this code:
import OSLogimport Supabaseimport SwiftUIstruct SignInButtonsView: View { @Environment(SharedAuthenticationStore.self) private var sharedAuthenticationStore @Environment(\.openURL) var openURL var body: some View { VStack(spacing: 15) { Text("Sign in using one of the services below...") .foregroundStyle(.secondary) .font(.subheadline) .bold() Button { Task { do { let redirectTo = URL(string: "electricride://login-callback") if supabaseURL.scheme == "https" { // Production: ASWebAuthenticationSession works fine with https // and gives a smoother in-app browser sheet experience. try await supabase.auth.signInWithOAuth( provider: .google, redirectTo: redirectTo ) } else { // Local development: ASWebAuthenticationSession does not support // http:// URLs in the iOS Simulator, so open Safari instead. let url = try supabase.auth.getOAuthSignInURL( provider: .google, redirectTo: redirectTo ) openURL(url) } sharedAuthenticationStore.loggedInWithService = .google } catch { Logger.authentication.error("SignInButtonsView: Error during Google sign-in: \(String(describing: error))") sharedAuthenticationStore.authenticationException = "An error occurred during sign-in. Please try again." } } } label: { Text("Sign in with Google") .frame(width: 280) } .buttonStyle(.borderedProminent) .frame(width: 300) .padding() Spacer() } .onAppear { Logger.viewCycle.info("SignInButtonsView: View has appeared.") } }}
… into a new file named SignInButtonsView, like this:
NOTE
The URL electricride://login-callback in the code above must match the URL scheme you registered in Xcode earlier. If you used a different scheme for your own app – for example, boneappetit – then this line should read:
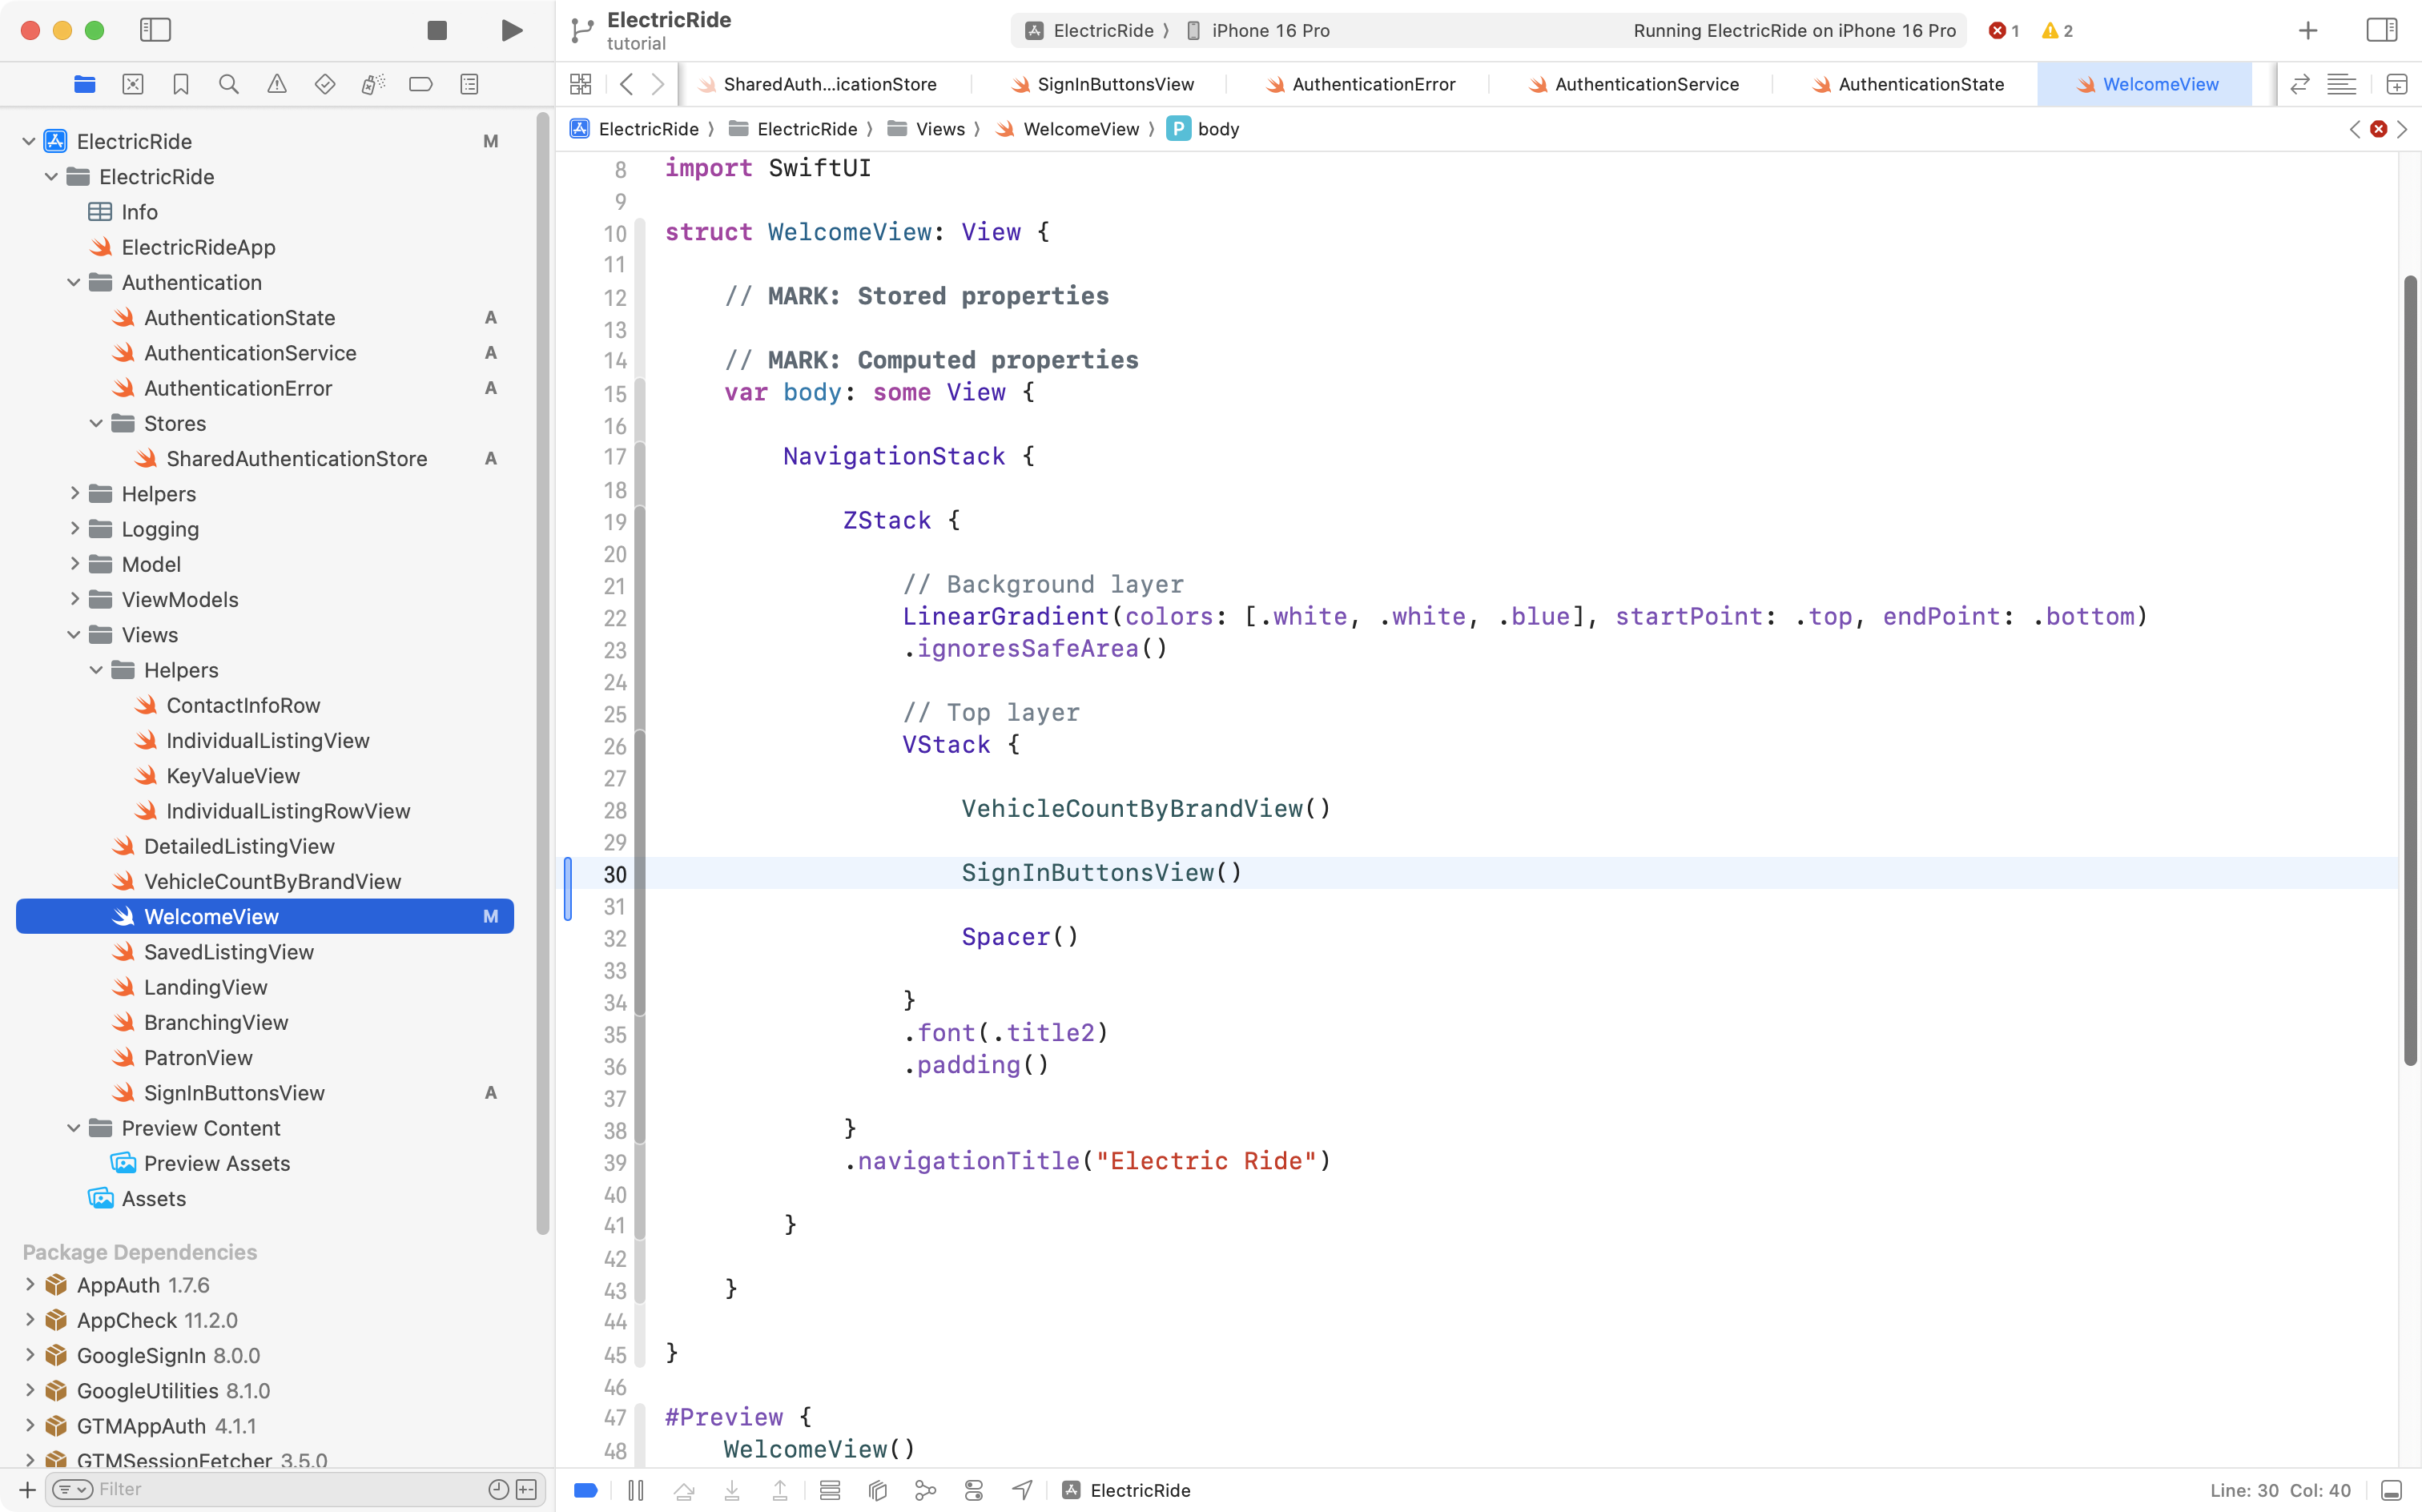
WelcomeView is the view in Mr. Gordon’s app that shows when a user is not signed in:
As you might guess, our next step is to make SignInButtonsView appear on this screen. So, please add that code to WelcomeView, like this:
Handle adding a new patron
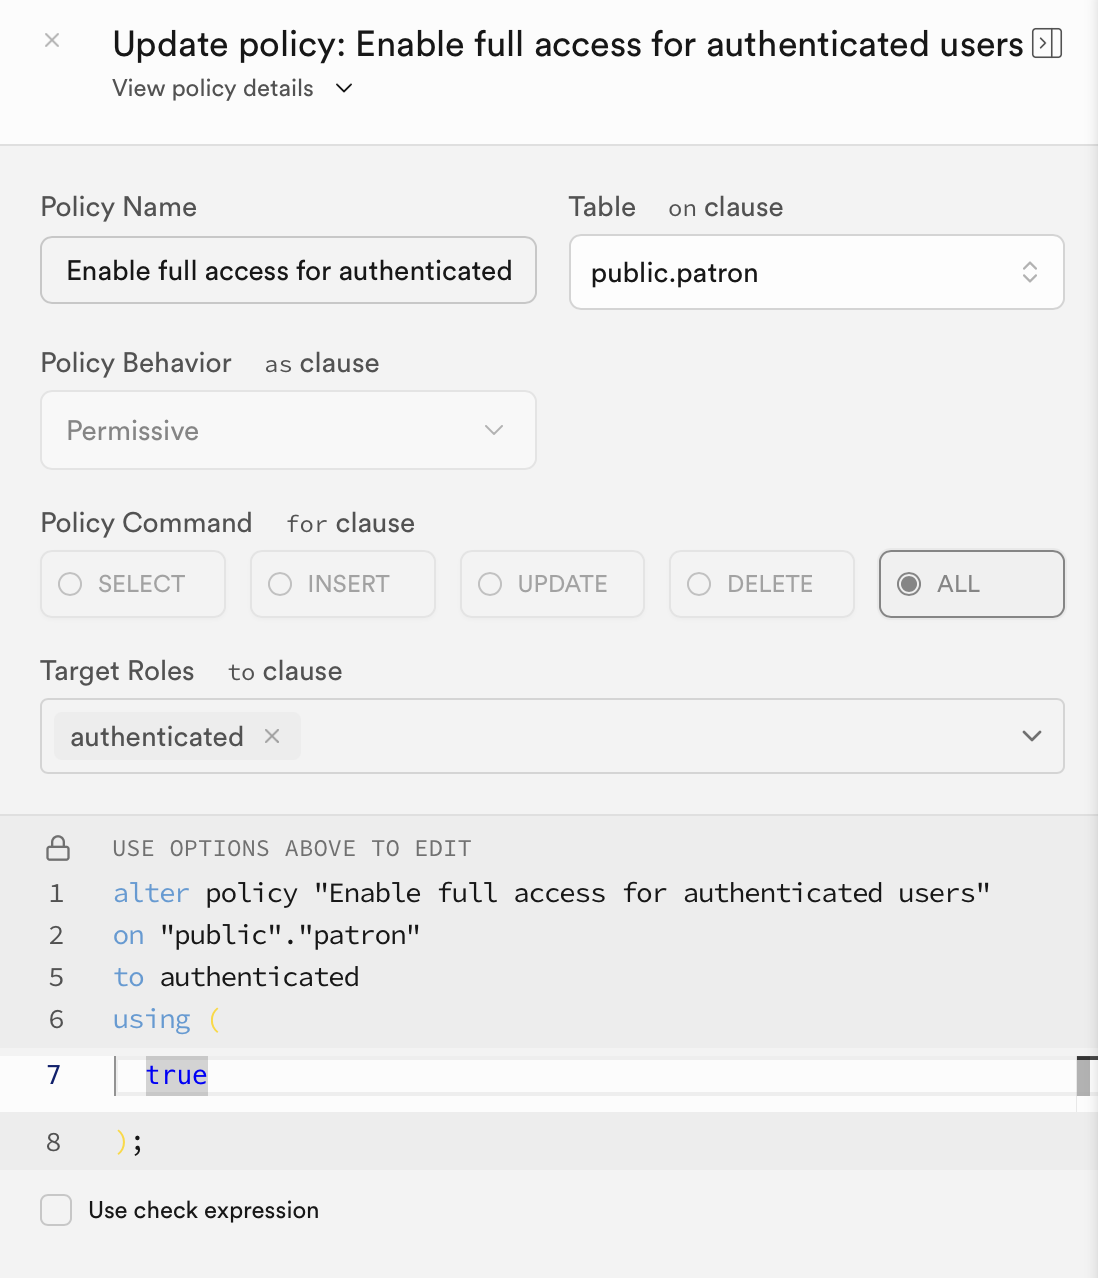
Since we will potentially be adding a new patron to the database, Mr. Gordon adjusted the row-level security policy on the patron table to allow an authenticated user to not just read rows, but create (insert) rows in that table:
Adding patrons (rather than simply reading a list of existing patrons from the database) means a change is needed to the Patron data type.
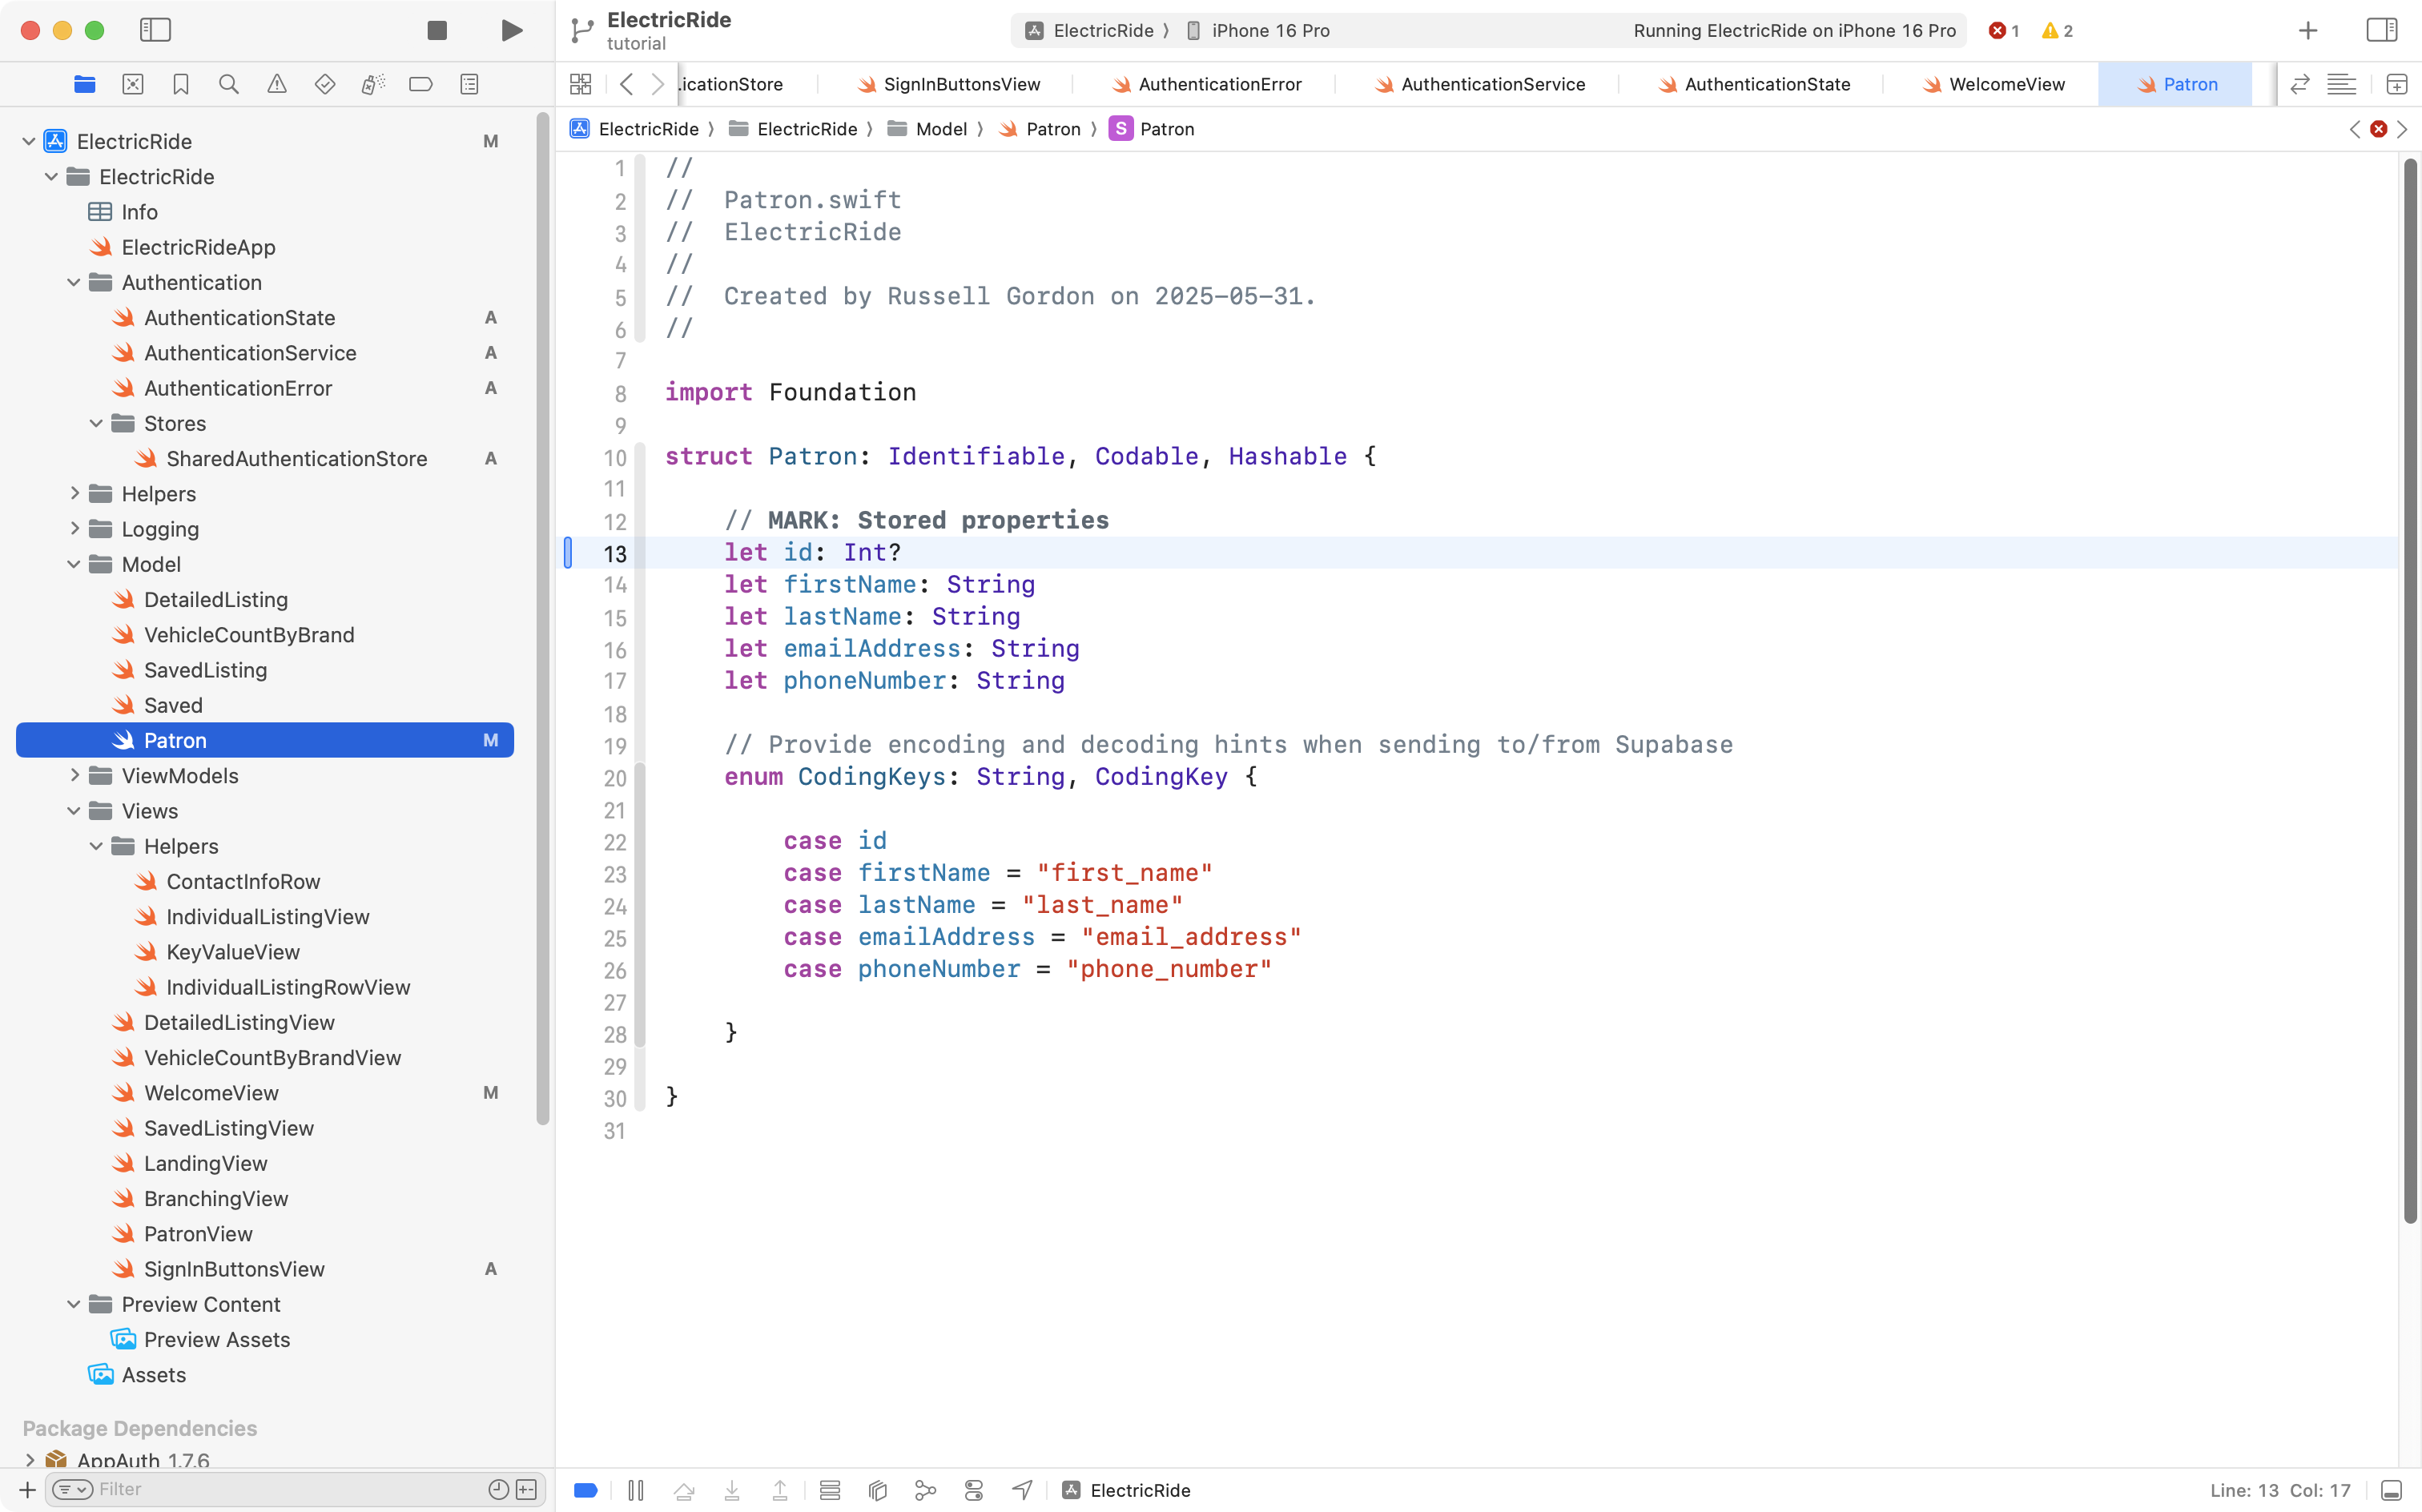
When a new patron is added, at first, we won’t know what id that patron will be assigned in the database. So, we need to make that property optional, like this:
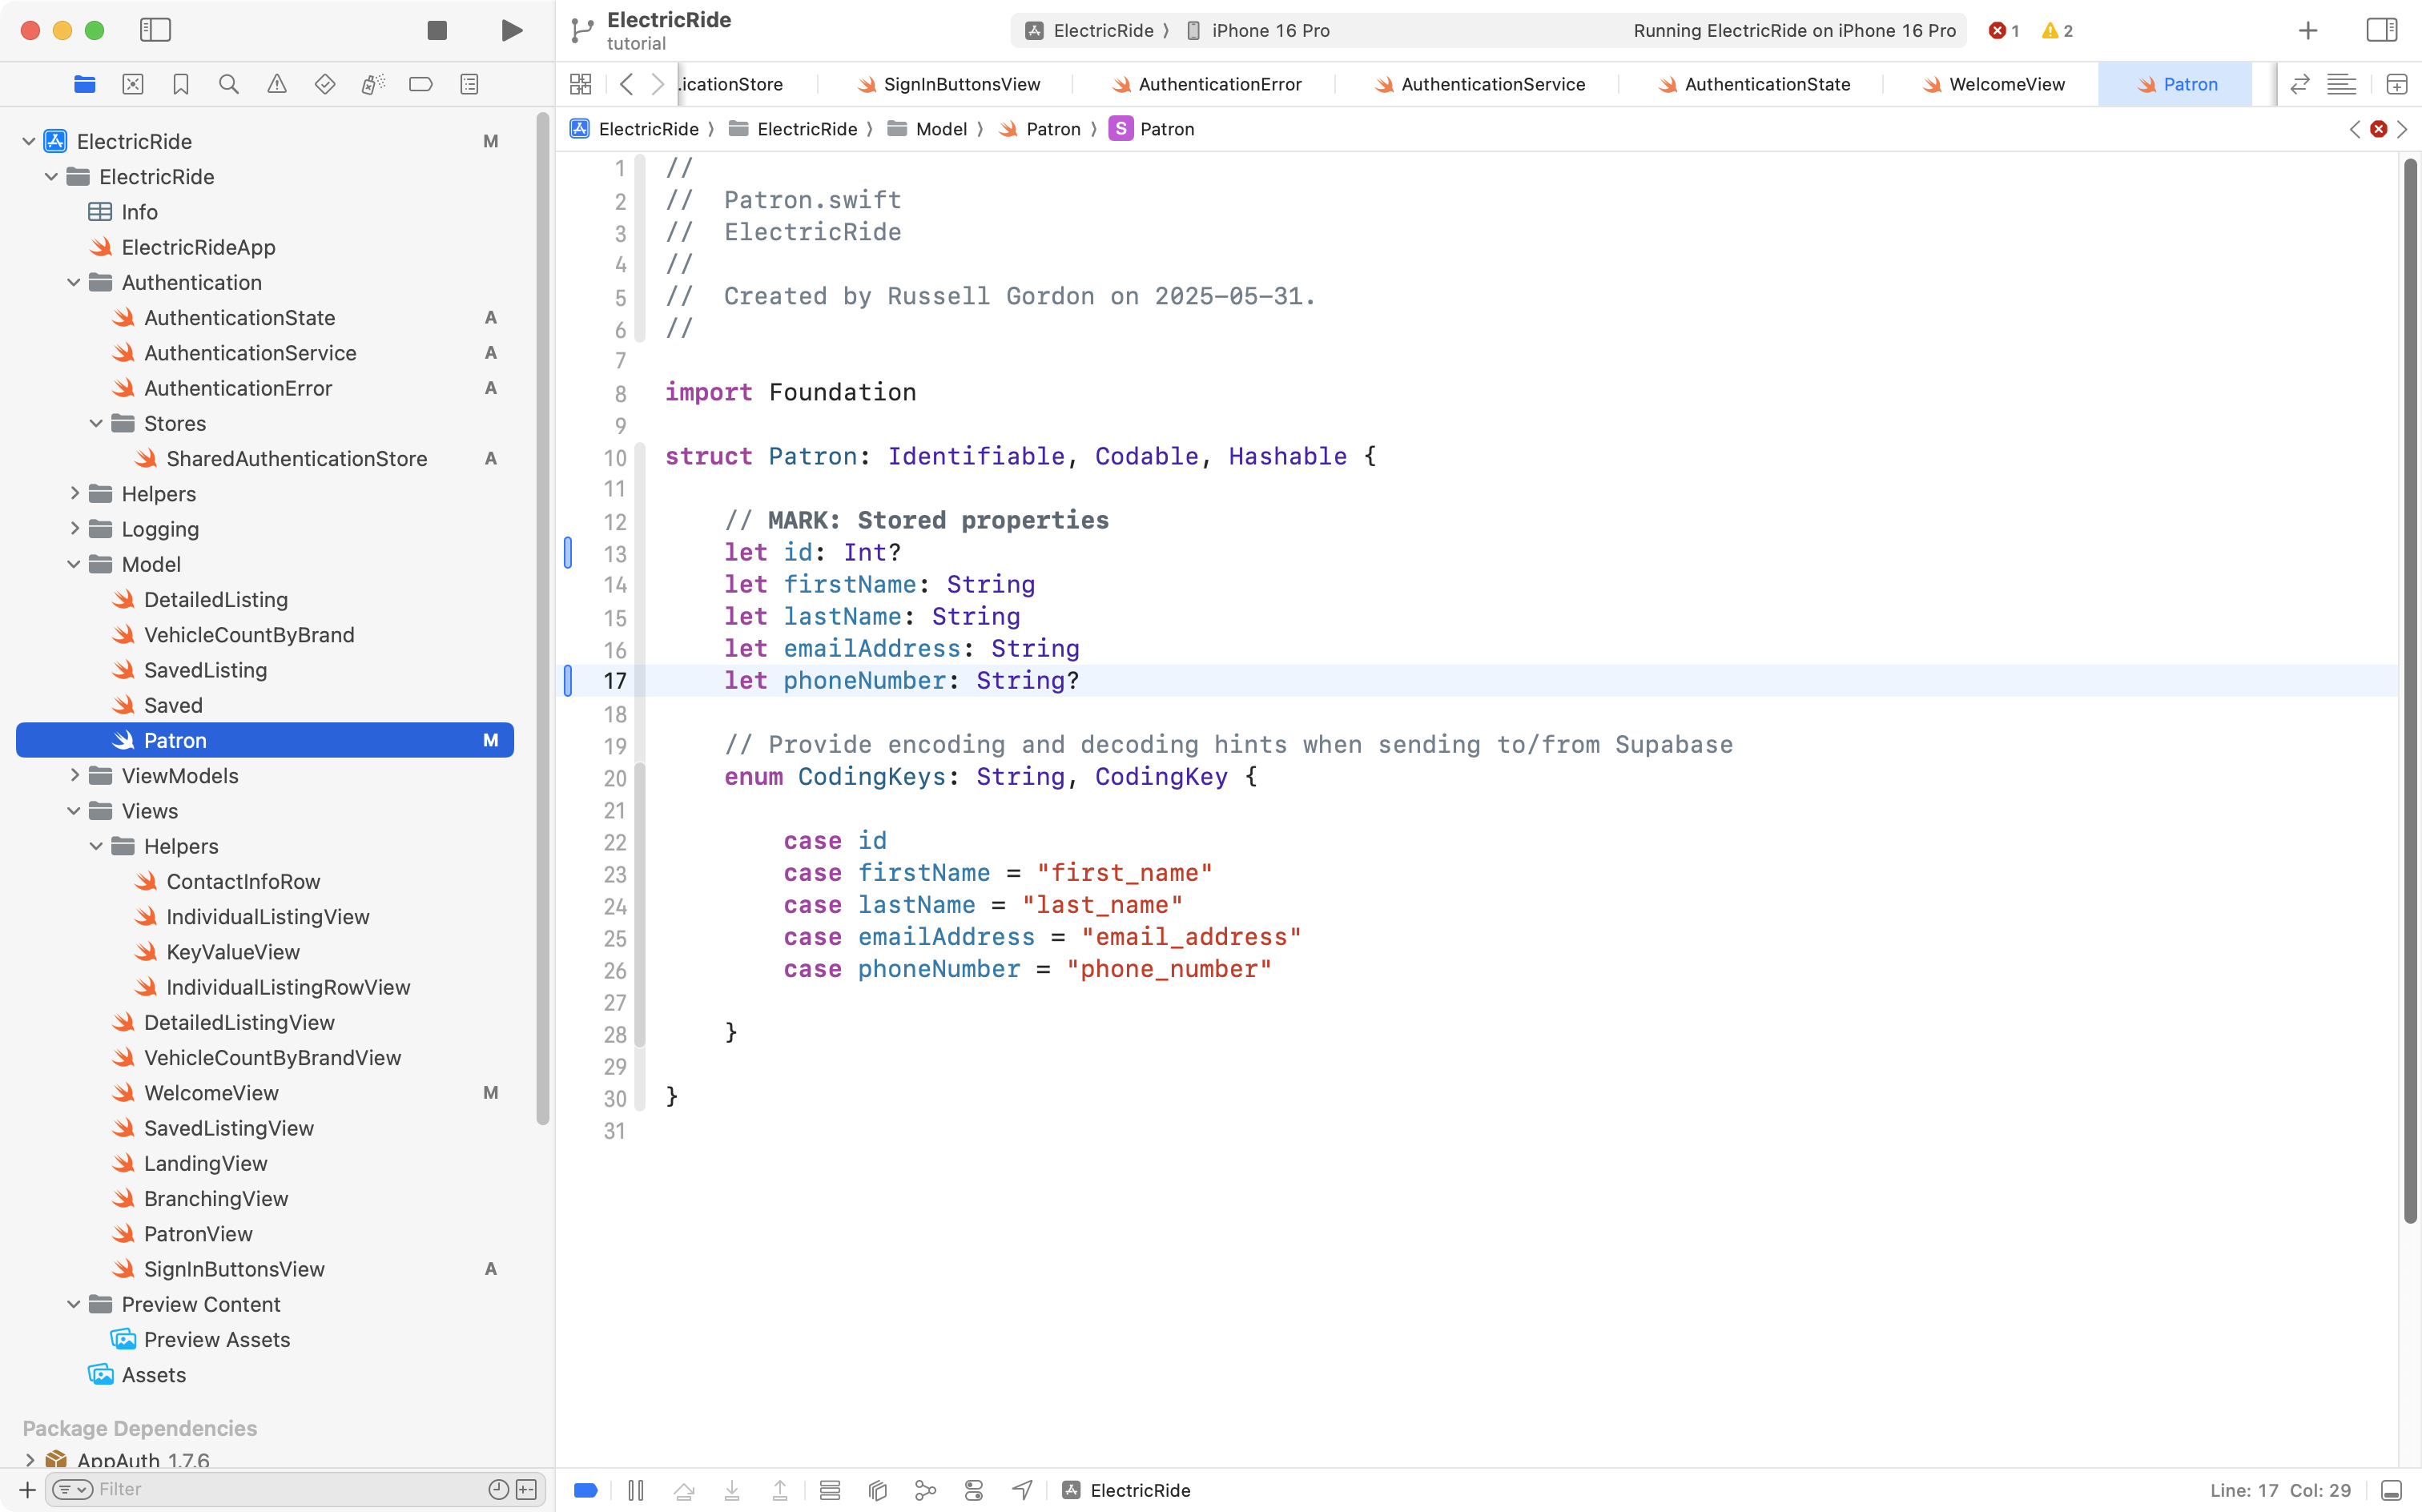
While we are here, the phone number should also be made optional, as a new user signing in from Google may not have provided their phone number to Google (meaning we won’t be able to access that information when they sign in):
Making Patron have an optional id and phone number means there are some modest changes needed elsewhere in Mr. Gordon’s exemplar to handle those optional properties.
First, on PatronView, if a phone number doesn’t exist, a default value of an empty string will be shown instead:
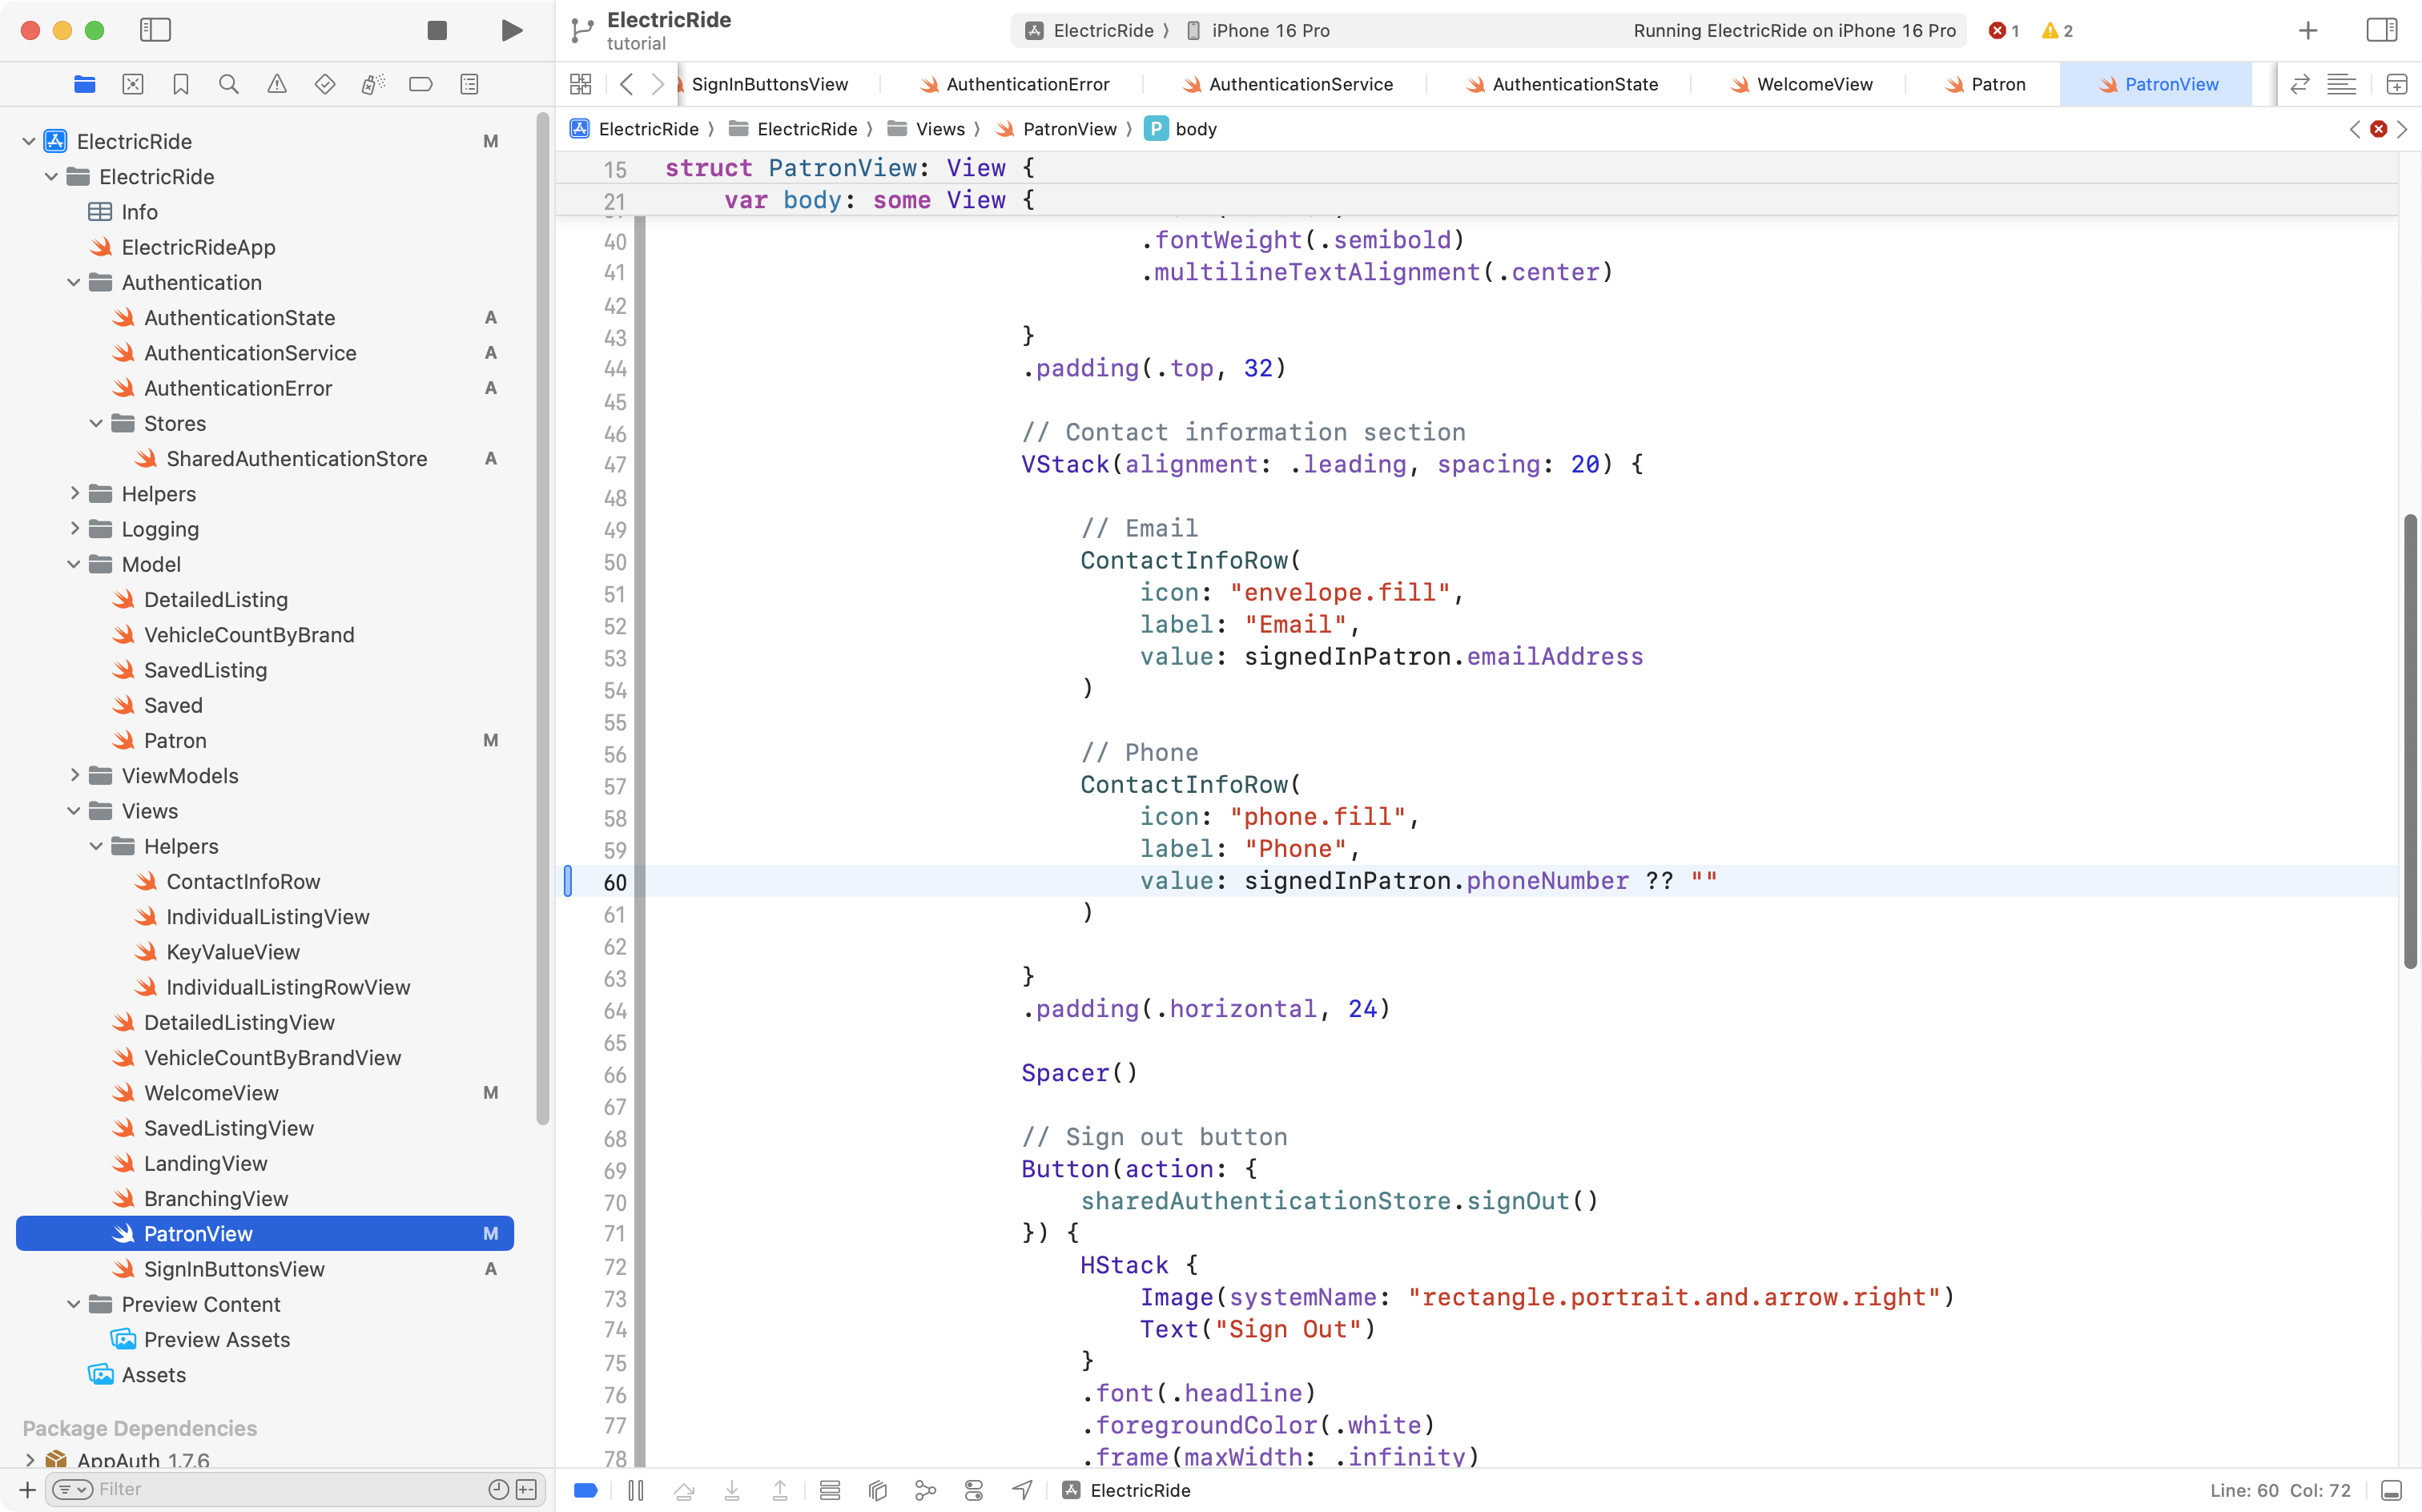
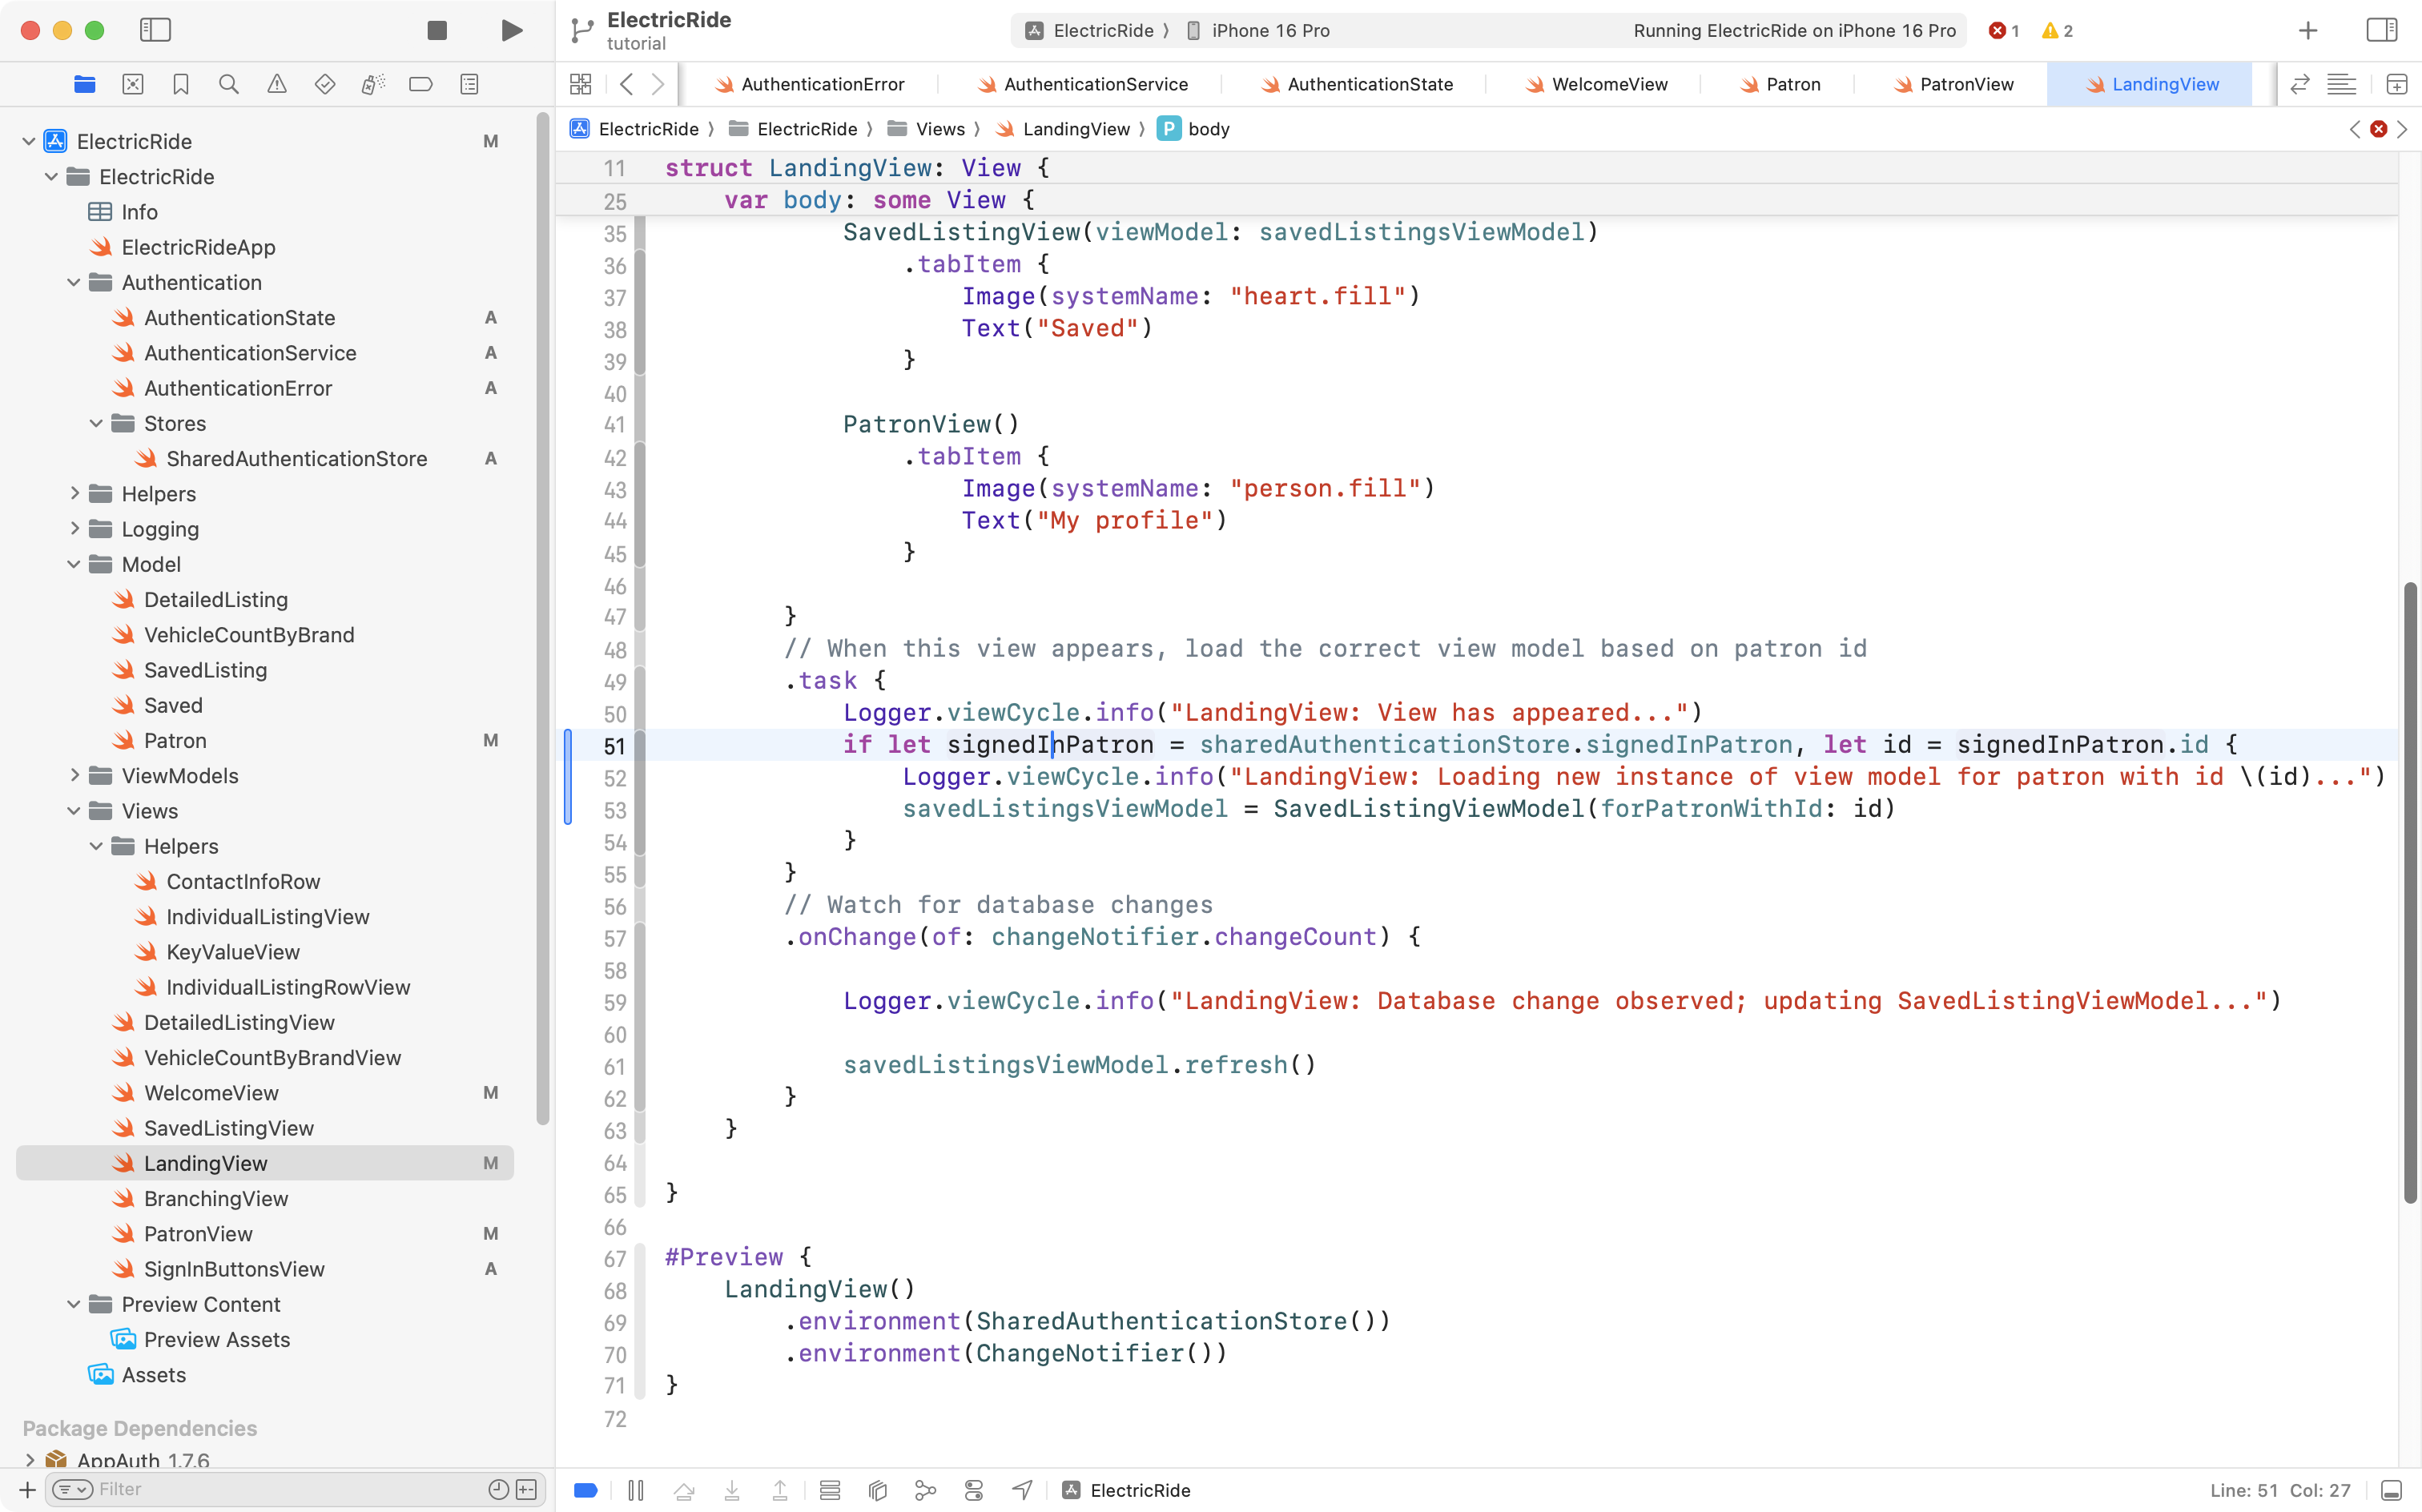
Next, on LandingView, Mr. Gordon has some code that loads the view model that contains saved car listings for a given user:
The problem is that he is trying to print a message that uses the id property of a signed in patron – but that id is now optional, and the log message code doesn’t know how to handle that optional id. So, Mr. Gordon changed the code to unwrap the optional value first, like this:
Adjust the branching view
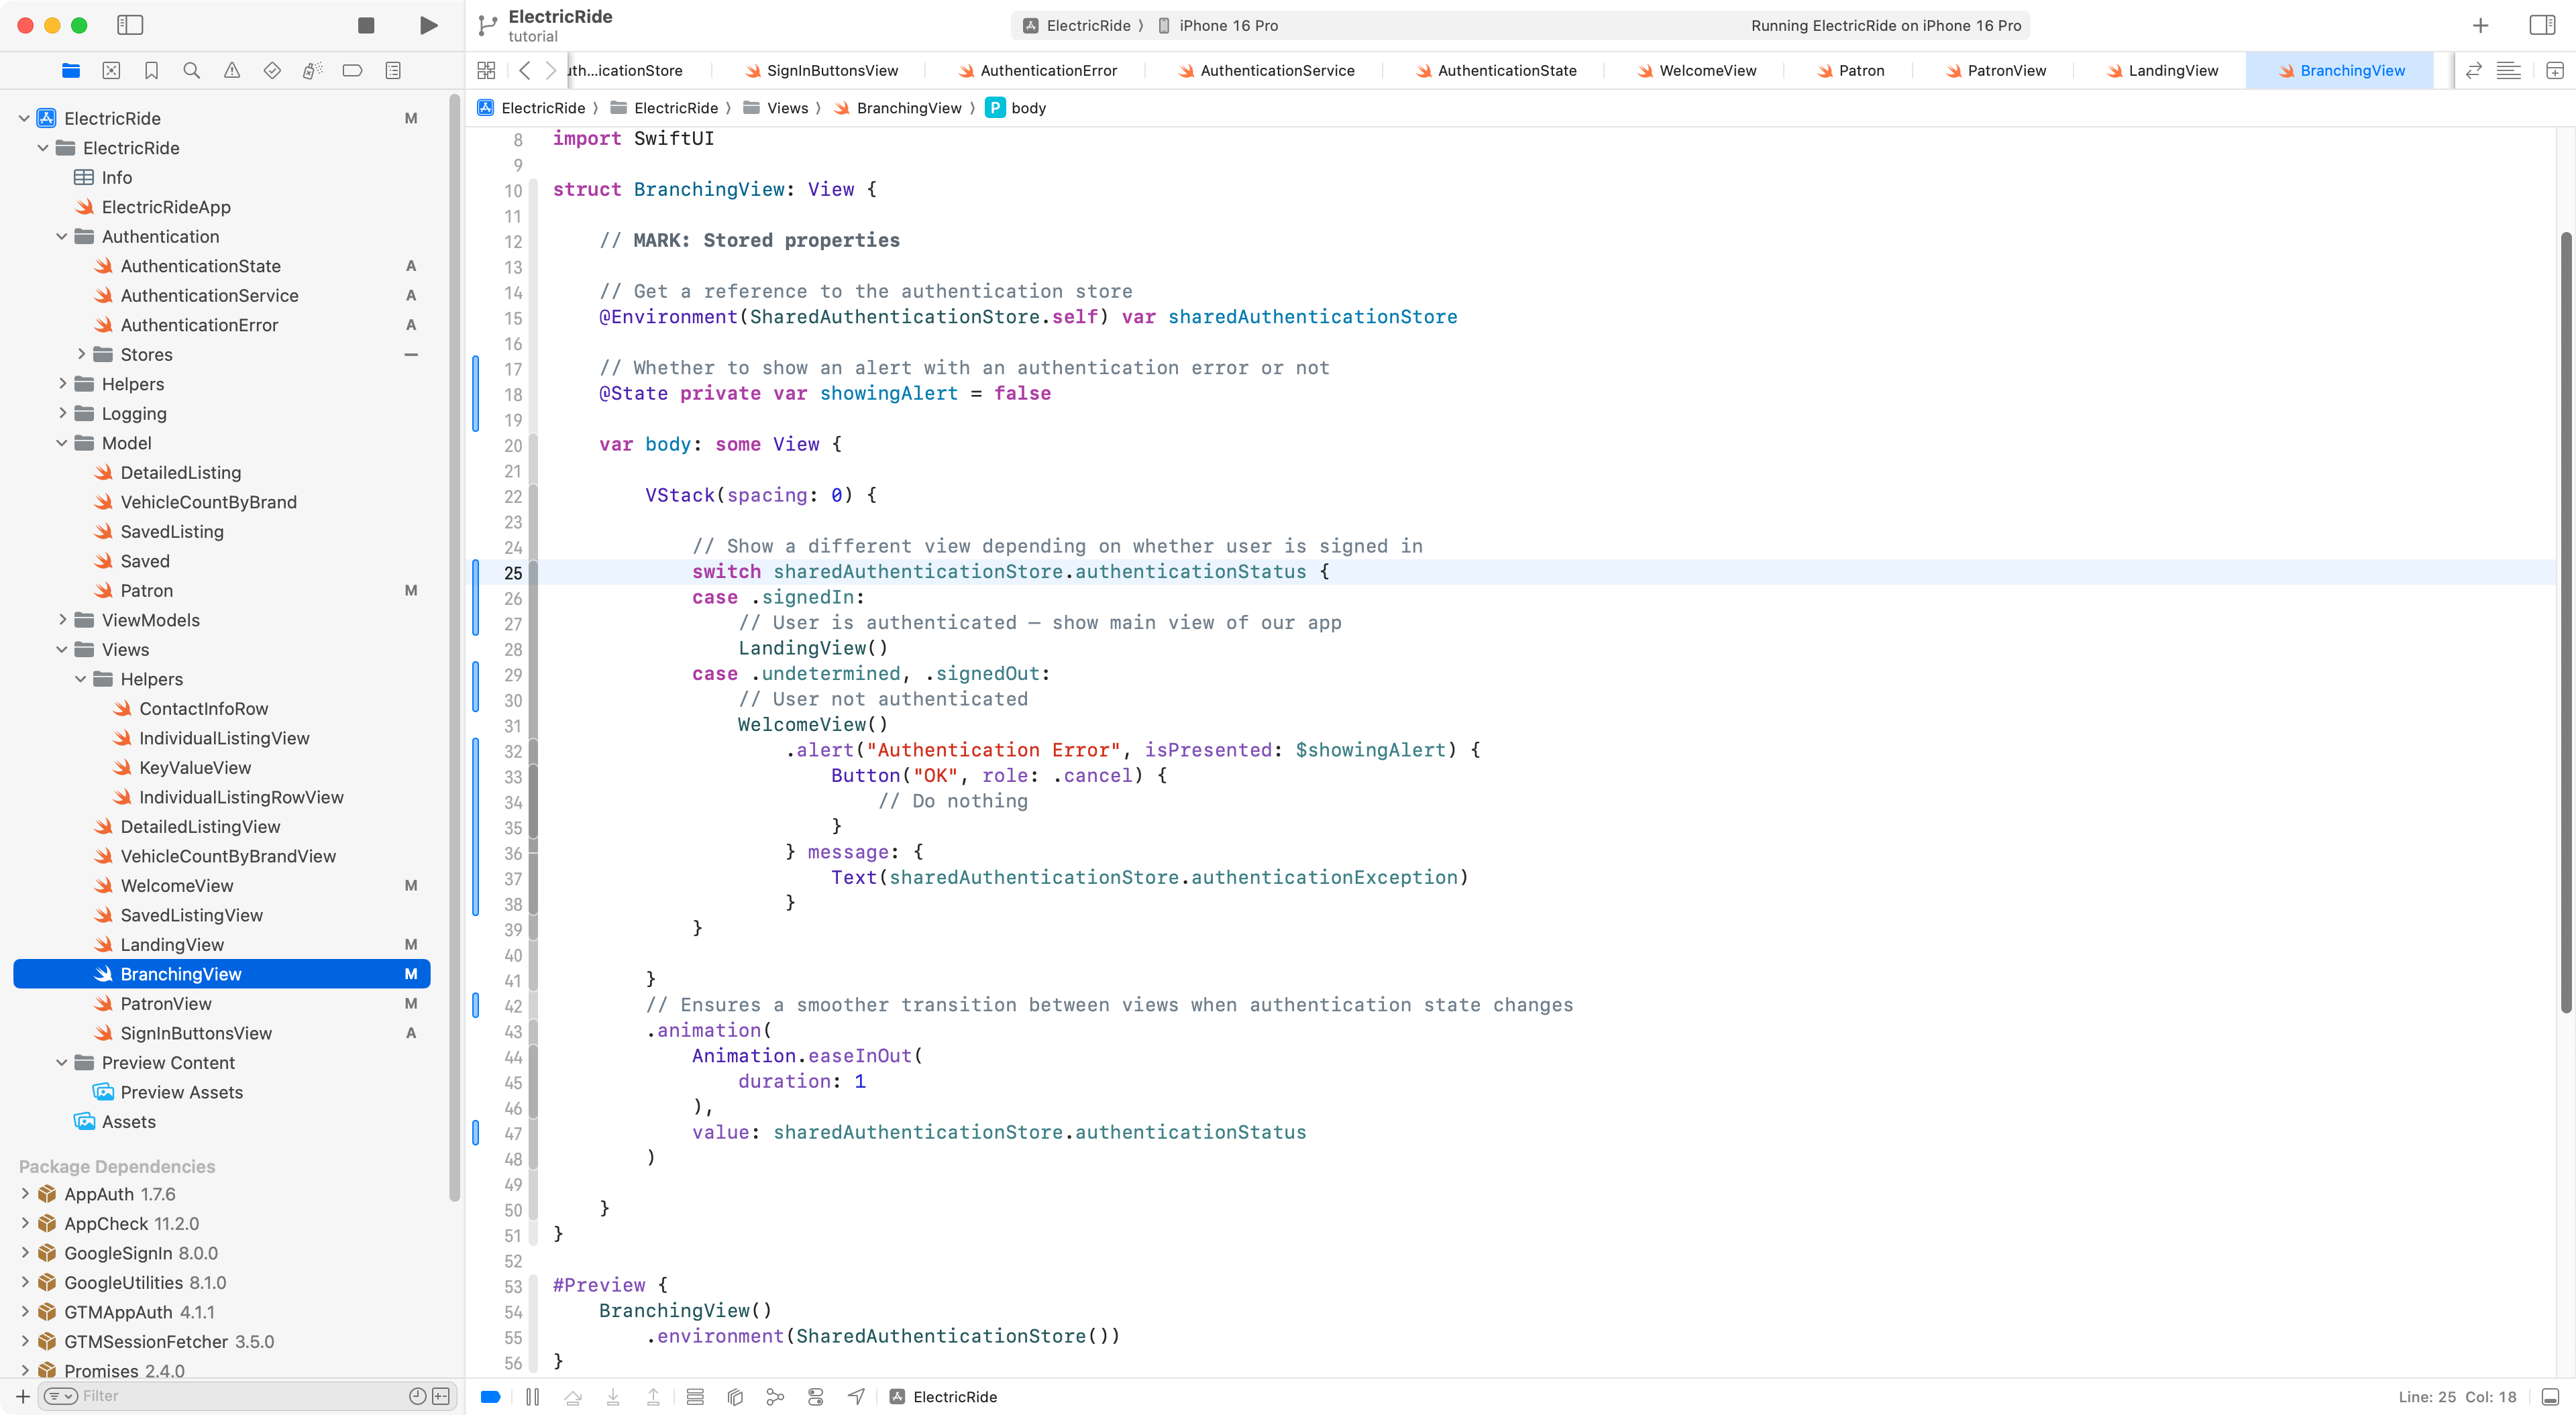
The final change is to make BranchingView watch for changes in sharedAuthenticationStore that signal when a user has signed in.
This is what that code looks like right now:
Here is what the code will change to:
//// BranchingView.swift// ElectricRide//// Created by Russell Gordon on 2025-05-31.//import OSLogimport SwiftUIstruct BranchingView: View { // MARK: Stored properties // Get a reference to the authentication store @Environment(SharedAuthenticationStore.self) var sharedAuthenticationStore // Whether to show an alert with an authentication error or not @State private var showingAlert = false var body: some View { VStack(spacing: 0) { // Show a different view depending on whether user is signed in switch sharedAuthenticationStore.authenticationStatus { case .signedIn: // User is authenticated – show main view of our app LandingView() case .undetermined, .signedOut: // User not authenticated VStack { WelcomeView() .alert("Authentication Error", isPresented: $showingAlert) { Button("OK", role: .cancel) { // Do nothing } } message: { Text(sharedAuthenticationStore.authenticationException) } } } } // Ensures a smoother transition between views when authentication state changes .animation( Animation.easeInOut( duration: 1 ), value: sharedAuthenticationStore.authenticationStatus ) .onOpenURL { url in Task { do { try await supabase.auth.session(from: url) } catch { Logger.authentication.error("BranchingView: Error handling OAuth callback: \(String(describing: error))") } } } }}#Preview { BranchingView() .environment(SharedAuthenticationStore())}
It looks like this when added to the project:
Essentially, the same thing is happening when this view is loaded, but instead of using an if statement to decide what view to use, based on the patronIsSignedIn property of sharedAuthenticationStore, it uses the new authenticationStatus property instead.
Additionally, there is a small amount of code added to present an alert with an error message, in case there was any unexpected problem when signing in.
With all of those changes in place, we can now Sign in with Google to the Electric Ride app:
TIP
These were a lot of code changes. Don’t hesitate to approach Mr. Gordon to ask for assistance while implementing this.
Anonymous access to database views
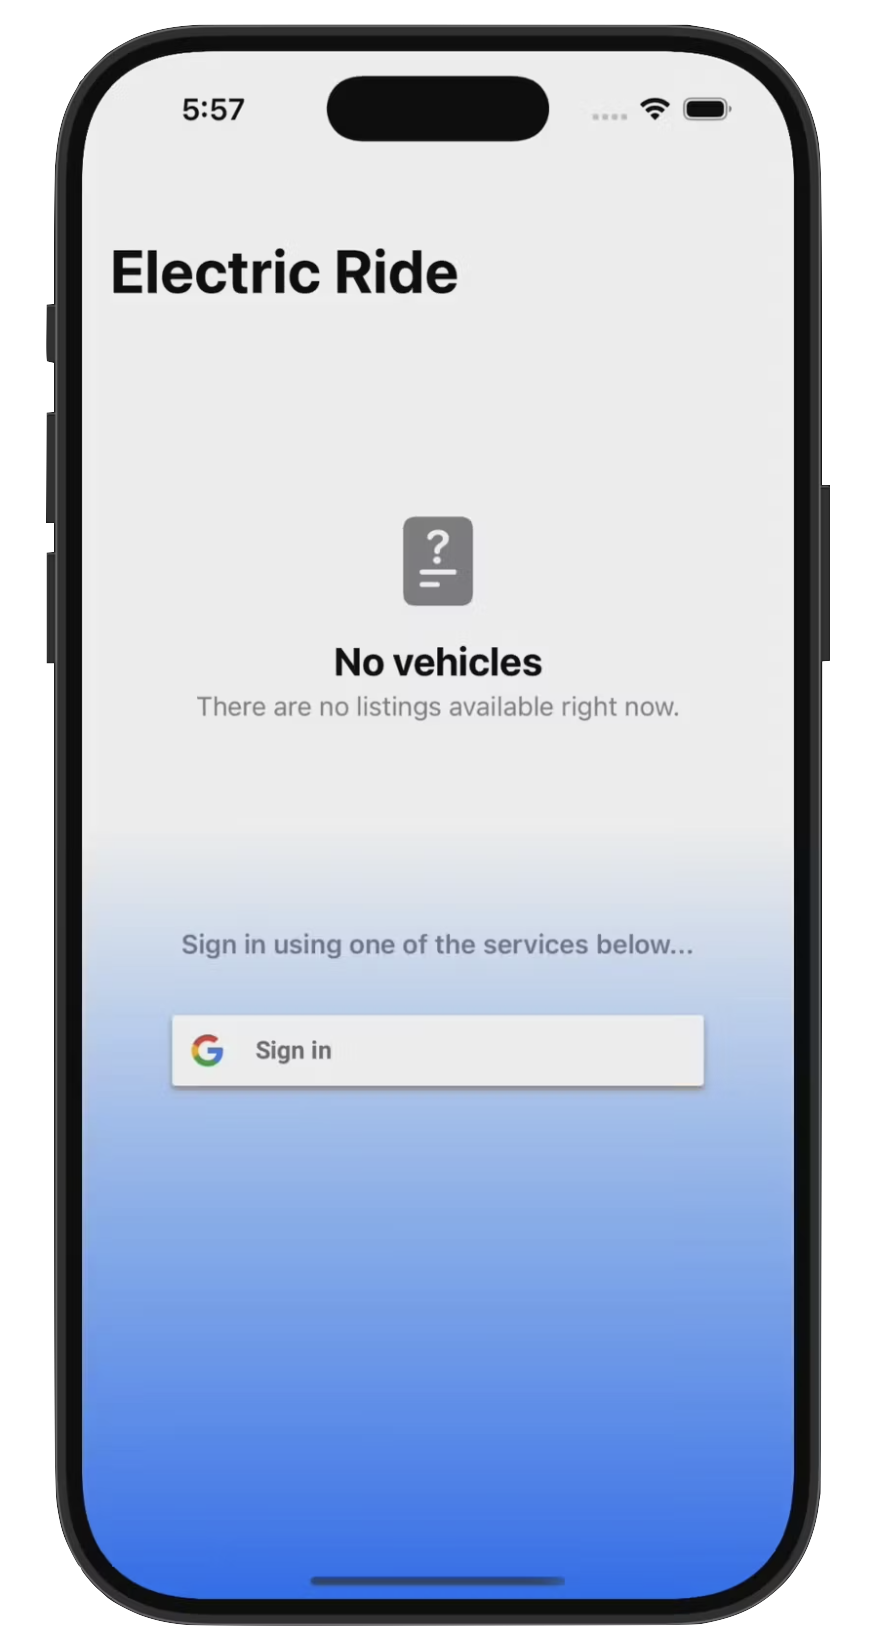
WelcomeView does not, initially, actually show the summary of how many vehicles are for sale within a given brand:
The current count_of_vehicles_by_brand database view uses security_invoker=on and queries listings_with_details, which also uses security_invoker=on:
-- VIEW: Get a count of cars for sale, grouped by brandCREATE OR REPLACE VIEW count_of_vehicles_by_brandWITH (security_invoker=on)ASSELECT brand, COUNT(id) as "vehicles_available"FROM listings_with_detailsGROUP BY brand;
That means when a user with the anon role calls the aggregate database view, it still runs with anon privileges and cannot read the underlying protected data.
As a result, our application view (the user interface):
… that uses the view model:
… that in turn uses the database view in question does not return any rows.
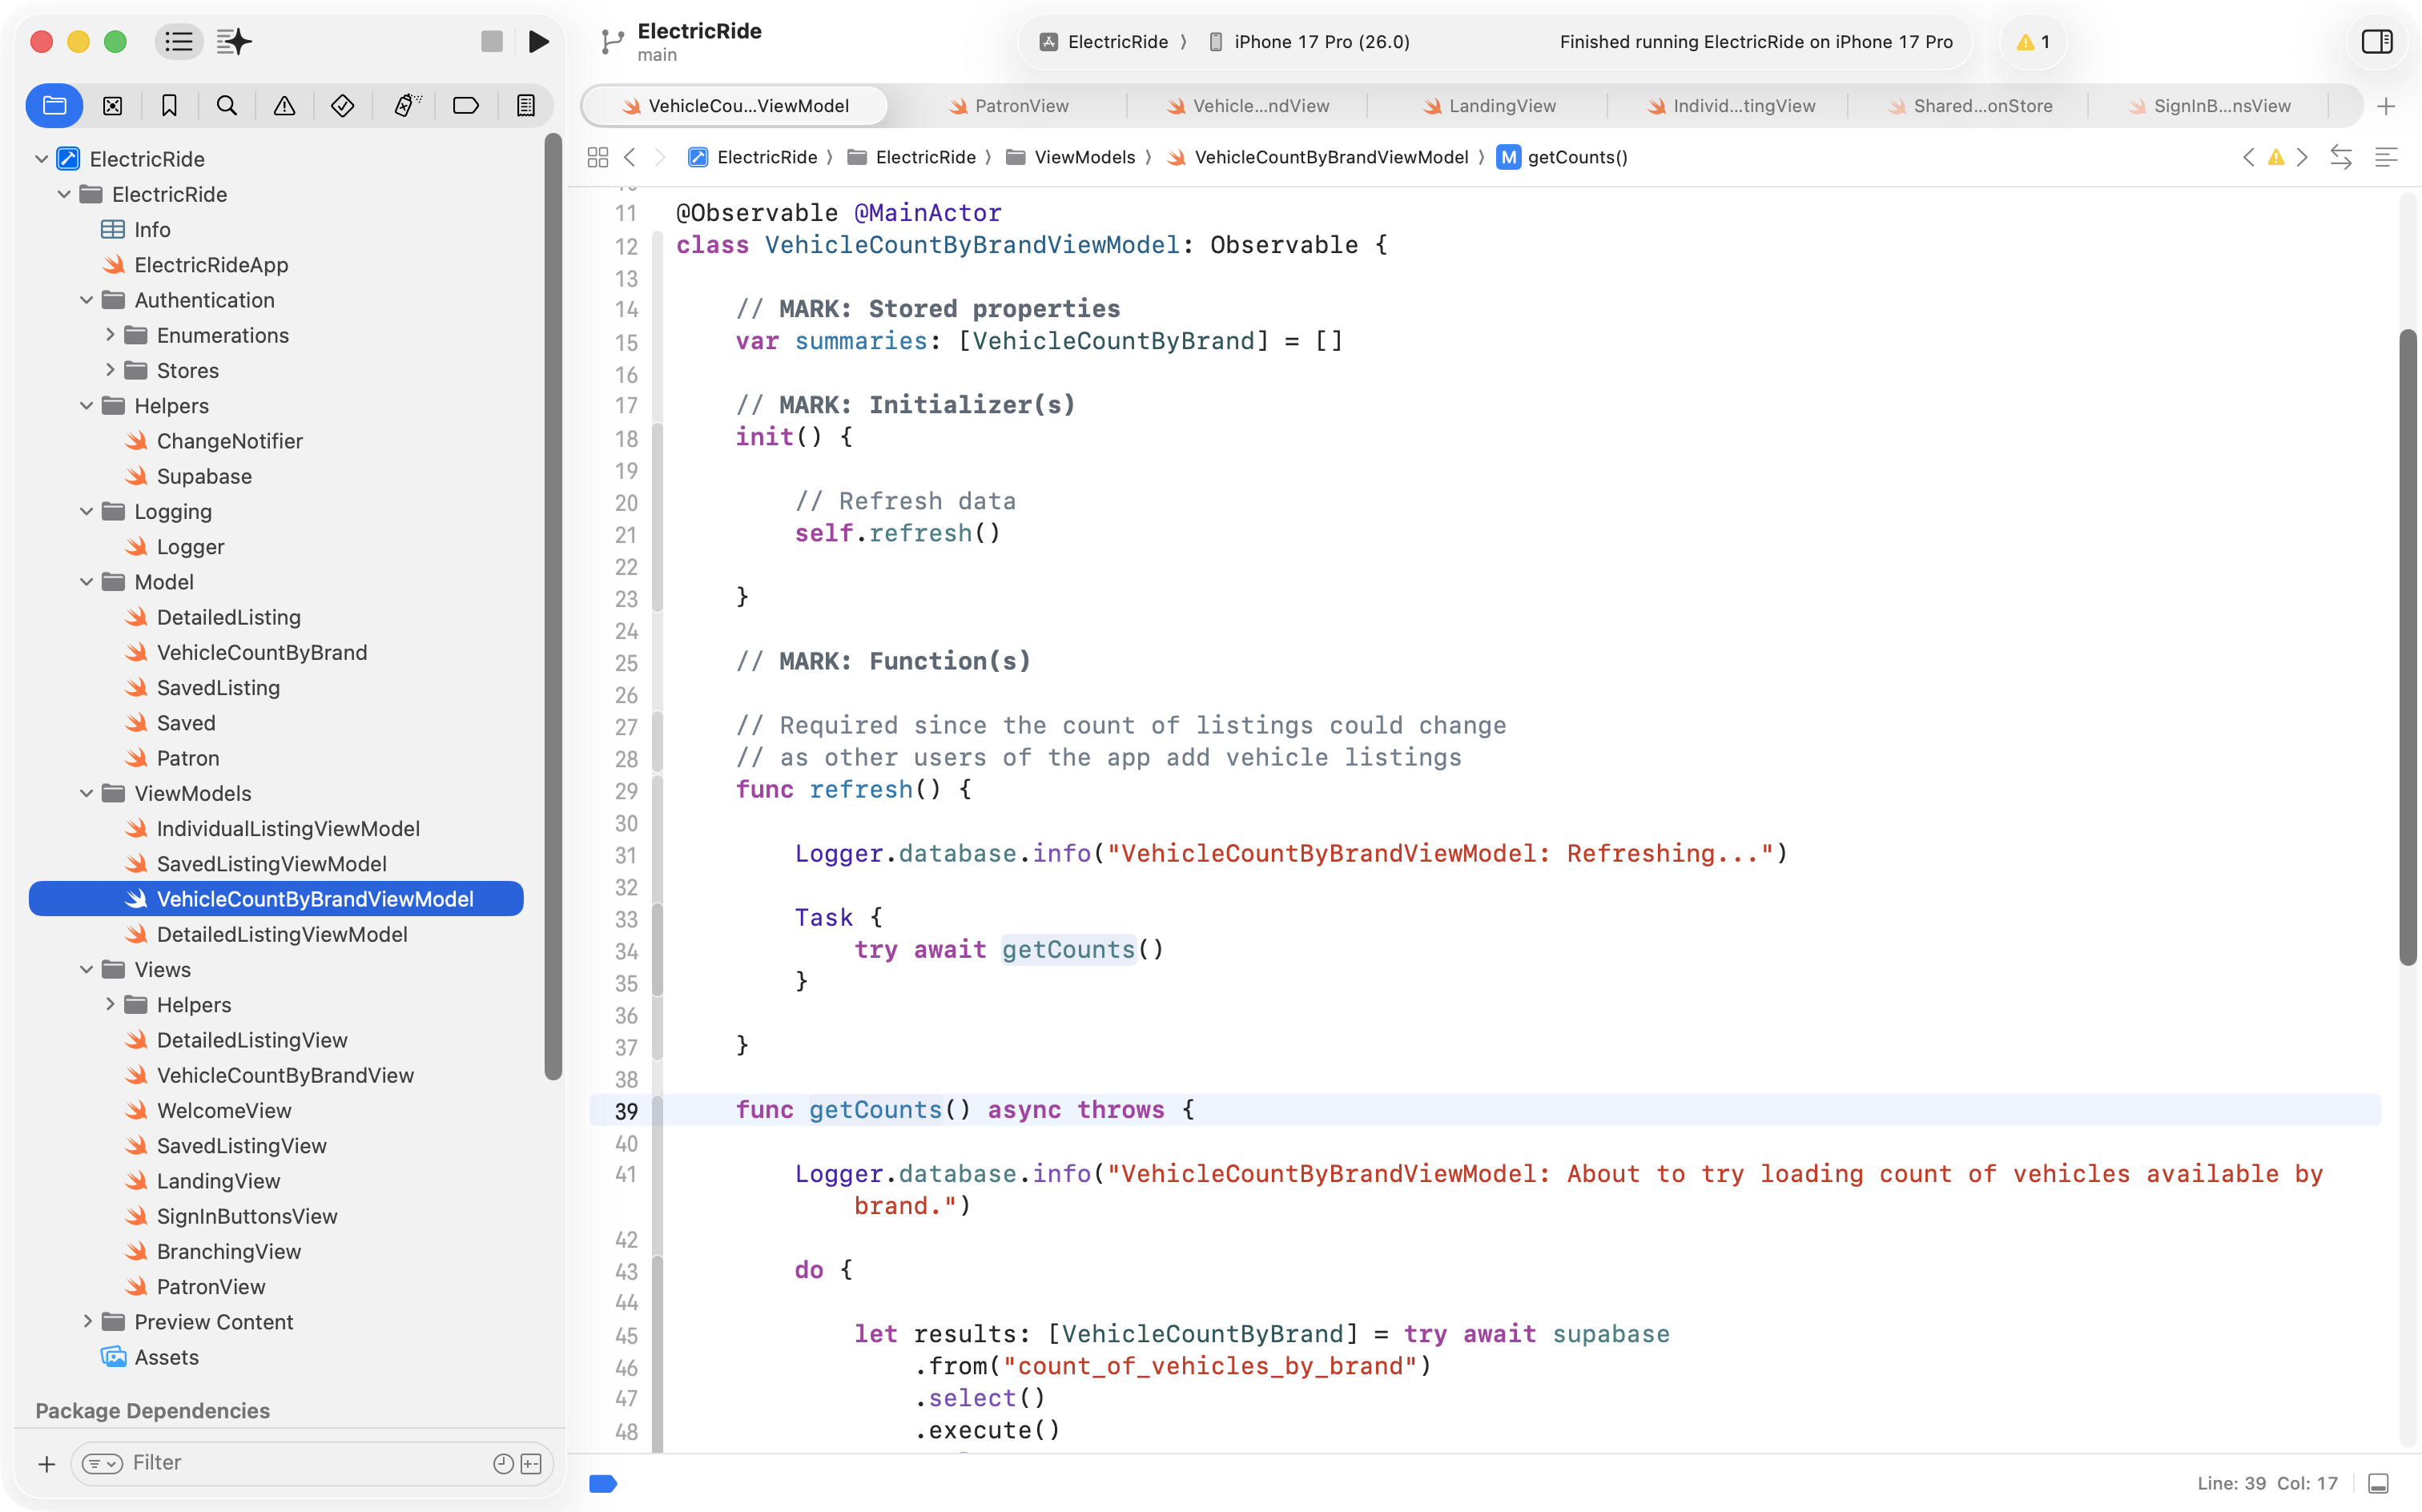
To make the aggregate data available publicly, the aggregate database view should be recreated without security_invoker and should query minimal base tables directly (listing, vehicle, make) with l.is_active = true, like this:
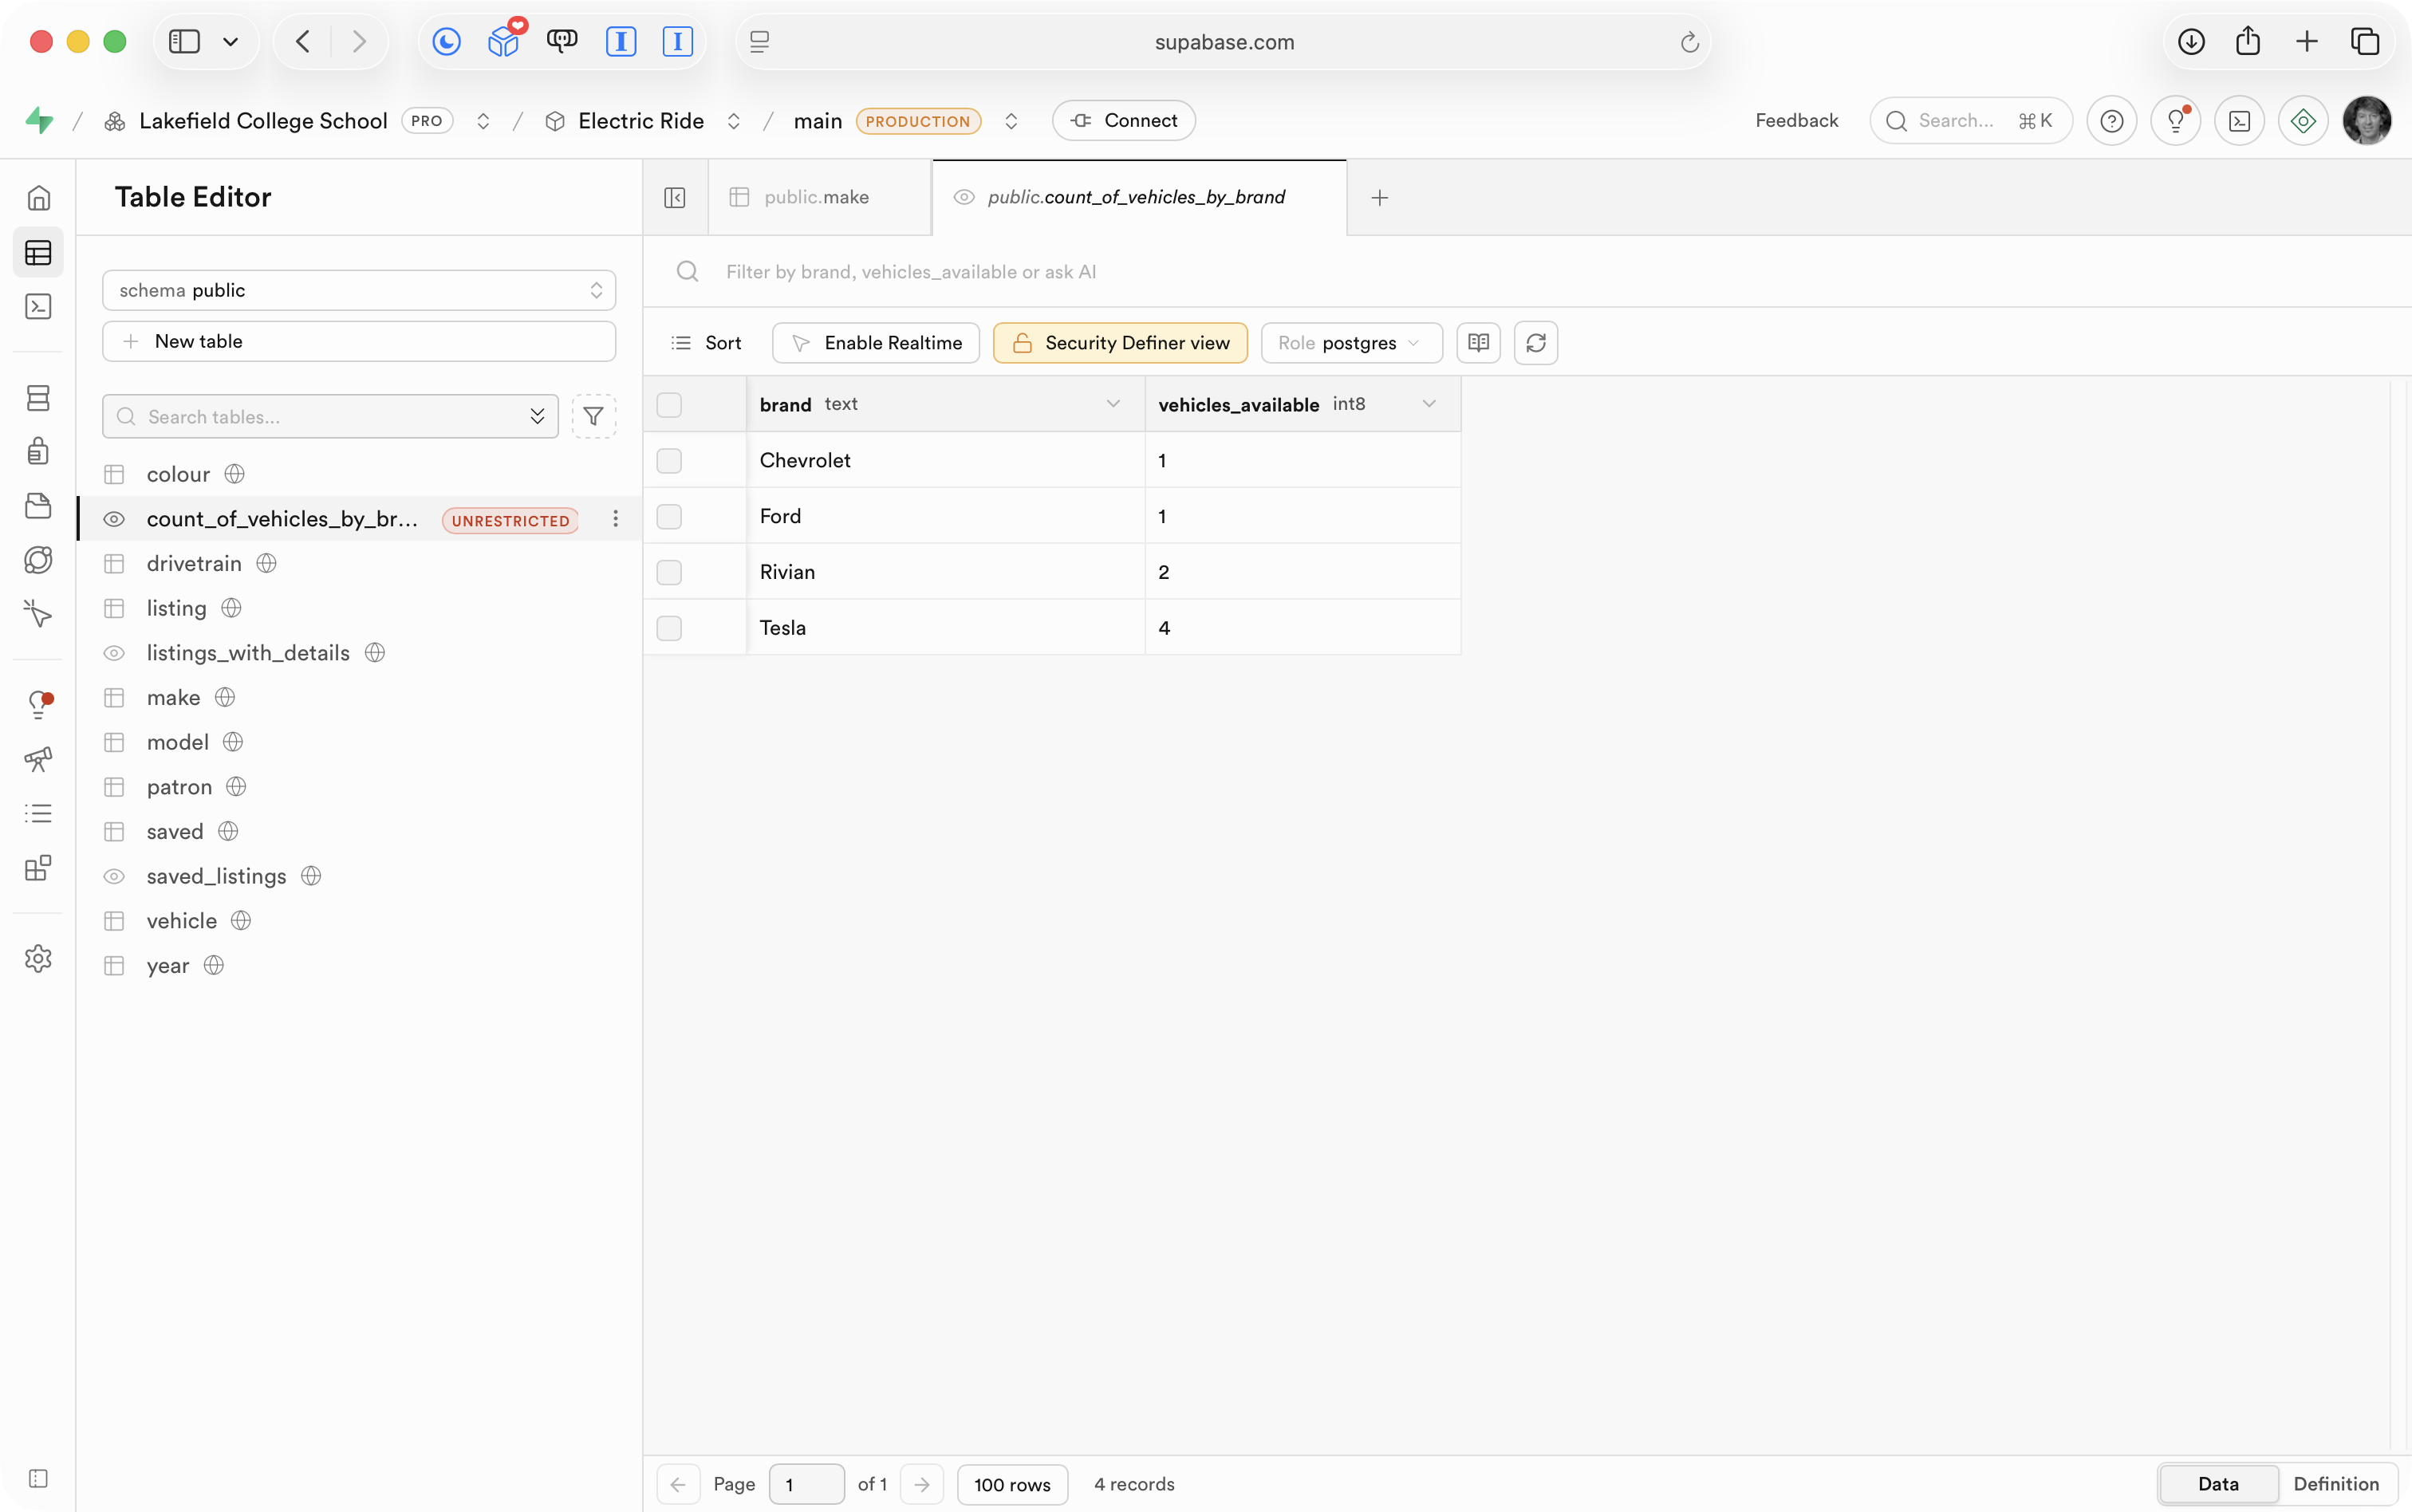
-- Anon accessible view to show count of vehicles by brandcreate or replace view public.count_of_vehicles_by_brandasselect mk.brand_name as brand, COUNT(l.id) as vehicles_availablefrom public.listing linner join public.vehicle v on l.vehicle_id = v.idinner join public.make mk on v.make_id = mk.idwhere l.is_active = truegroup by mk.brand_name;-- Set permissions for this view (both anon and authenticated users can read data from this view)grant select on public.count_of_vehicles_by_brand to anon;grant select on public.count_of_vehicles_by_brand to authenticated;
This creates narrow public output (brand, vehicles_available):
… while keeping detailed rows and intermediate views private.
listings_with_details remains security_invoker=on and explicitly not granted to anon, so unauthenticated users cannot access detailed listing data.
Only the aggregate view gets SELECT permissions for the anon role.
Invoker vs. definer for security
You may be wondering – what does the security_invoker=on line in the view even do?
According to the Supabase docs, there are two important view settings:
security_invoker
security_definer (this is the default when security_invoker is not turned on)
What security_invoker means
A view with security_invoker runs using the permissions of the person (or role) calling the view.
So if the caller is anon, the view only has anon-level access.
If anon cannot read the underlying tables, the view will not be able to read them either.
What security_definer means
A view with security_definer runs using the permissions of the view owner (the role that created the view).
This can let low-permission users read data from a view even when they cannot directly read the underlying tables.
Why the aggregate view did not explicitly set either option
In PostgreSQL, if neither option is written, a view uses the default behaviour (security_definer).
For count_of_vehicles_by_brand, this default behaviour is useful because:
The project wants anon users to read only brand counts.
The project does not want anon users to read detailed listing data.
A definer-style aggregate view can expose only safe summary data (brand, vehicles_available) while keeping detailed sources private.
Why this must be done carefully
The Supabase docs warn that definer views in exposed schemas can accidentally leak too much data if the query is broad.
That is why the aggregate view should stay narrow and simple:
return only the needed summary columns
avoid sensitive columns
grant SELECT to anon only on that specific aggregate view
keep detailed views/tables restricted
After making these changes at the database level, when we are not logged in to the app, the vehicle summary shows:

.png)

.png)